
You are using an out of date browser. It may not display this or other websites correctly.
You should upgrade or use an alternative browser.
You should upgrade or use an alternative browser.
Roaring Forties #091
- Thread starter iraceone
- Start date
Roaring Forties #091
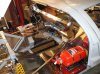
347,self assembled,,,massaged edelbrock performers,scorpion rollers,moroso pan, x303 cam,,,, TWM is just sitting on top of completed long block. Need to machine my "bleed ports" from the aft end of the intake so I dont get the air pockets in the top aft end of the heads .
347,self assembled,,,massaged edelbrock performers,scorpion rollers,moroso pan, x303 cam,,,, TWM is just sitting on top of completed long block. Need to machine my "bleed ports" from the aft end of the intake so I dont get the air pockets in the top aft end of the heads .
Attachments
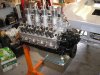
Hi Dan, it's their 9 qt street strip road race pan.Part # 20503 . I have not put the motor in and the gearbox. I sat the block only in once with the oil pan on to make sure it would clear the cross member. One thing I did notice during putting the motor together. I could only bolt the oil pump to the block opposite of the normal place, and the oil pan could only be bolted on backwards as well. When I flipped the engine over I also discovered the hole for the distrib was cast in the wrong location as well. I am hesitating putting the motor in as I don't know which way to face it ??? Ha-Ha
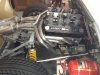
Thanks Hilly , but I wish mine had color on it like yours and my motor was still laying in pieces,LOL !
Thanks Hilly , but I wish mine had color on it like yours and my motor was still laying in pieces,LOL !
Last edited:
You would have to be proud of that.
Jim c
Jim c
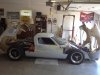
Well its been many years from when I last posted. I am alive and now single, I have a wonderful lady and we are about to move to south west Florida together to start a new life. Just sold the house, will miss my shop. I managed to keep my 40 and she even bought me a LSD last winter to help motivate me and get me going on the car again! It has sat idle for almost 7 years, time really flys! I look forward to getting this car built and enjoying it in Florida.
Attachments
Very good Dan, nice work!
Can I ask what transaxle you have and did your oil pan need any mods to fit?
Cheers, Gus.
Can I ask what transaxle you have and did your oil pan need any mods to fit?
Cheers, Gus.
David Lowe
Lifetime Supporter
Good to hear you're back on track with your RF GT40 build Dan.
Look forward to the progress posts.
Look forward to the progress posts.
Nice to see your back at it.
Great news about the LSD.
You should test her commitment and see if you can squeeze a paint job as well.
Jim
Great news about the LSD.
You should test her commitment and see if you can squeeze a paint job as well.
Jim
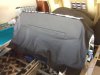
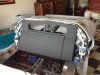
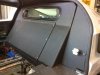
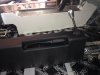
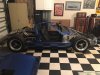
Got settled in Florida and some work is progressing on the car. Intalled Dynamat , then Dynaliner on bulkhead, then leather I purchased on ebay, I then followed by installing the mid screen. Now working on console. Need to come up with a boot cover for the shifter and brake handle, It would be nice to find something ready made that I can adapt, searching ebay and the net...
Attachments
Dan your gear lever boot, use a steering rack boot ,they look the part with the bellows.
Jim
Jim
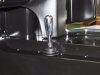
Thanks Guys, Dave I bought a whole hide off ebay, I looked and the seller does not have any more of them. Their are many listings though for leather, I just used 3M yellow automotive super contact adhesive and several band-aids for my fingers after dealing with razor blades trimming the stuff!
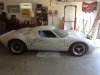
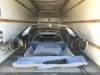
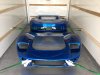
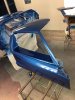
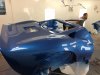
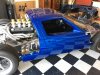
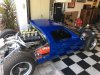
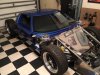
Well its been a long time since a post. I have been continuing to work on my car. I finished the body work in December and 8 weeks ago I removed the panels, rented a truck and took them to a paint shop. They did a great job and I was able to watch on two separate days of shooting in the paint booth. It was like being there for the birth of a baby except this one has taken much,much longer to build! lol
Attachments

Last edited:
As soon as I got the panels home I started re-assembly, the paint color I picked from a BASF chip, it has a fine silver metal flake and looks much lighter in the sun, I'm very happy with it.
Attachments

Looks very nice Dan. Excellent work.
Similar threads
- Replies
- 21
- Views
- 9K
- Replies
- 1
- Views
- 554
- Replies
- 17
- Views
- 10K