Roaring Forties 66

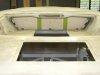
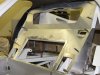
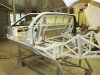
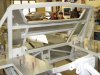
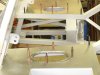
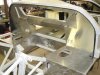
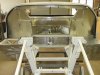
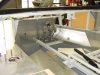
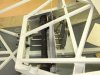
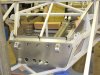
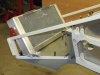
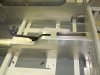
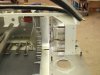
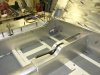
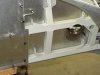
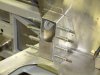
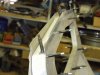
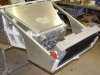
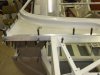
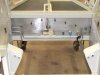
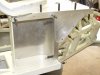
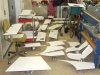
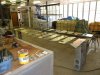
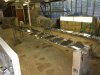
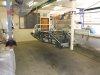
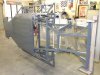
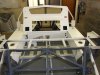
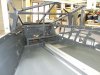
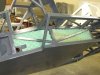
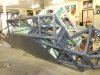
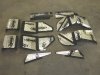
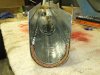
I wanted a more original looking bulkhead window. Refitted the spider and rear clip to produce a template for the cut out. A few more panels made and fitted as well.
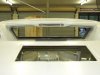
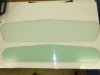
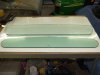
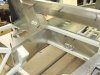
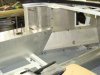
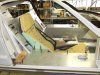
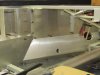
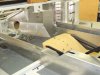
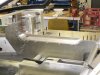
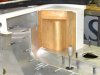
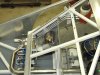
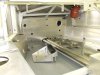
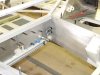
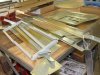
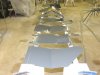
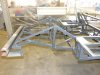
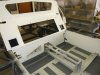
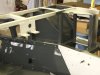
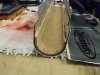
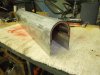
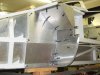
With the opening done, made another template for the new window. Which will be thicker (10mm) and bigger by 15mm all the way around (glued to the front edge of the bulkhead).

Clayton
 

Attachments

  • 29.11.08 001.jpg
    29.11.08 001.jpg
    173.2 KB · Views: 382
  • 29.11.08 006.jpg
    29.11.08 006.jpg
    106.7 KB · Views: 358
  • 04.12.08 002.jpg
    04.12.08 002.jpg
    127.5 KB · Views: 376
  • 04.12.08 003.jpg
    04.12.08 003.jpg
    111.8 KB · Views: 338
  • 04.12.08 004.jpg
    04.12.08 004.jpg
    59.4 KB · Views: 342
  • 04.12.08 005.jpg
    04.12.08 005.jpg
    106.1 KB · Views: 357
To help with sound proofing, I wanted the whole bulkhead to be doubled skinned and have at least 25mm between them. Here’s the start of the window opening with its channel fitted.
Added flush access panels to the top of the rear sill area, which helped during fuel pump / filter install.

Clayton
 

Attachments

  • Christmas 2008 003.jpg
    Christmas 2008 003.jpg
    111.7 KB · Views: 373
  • Christmas 2008 007.jpg
    Christmas 2008 007.jpg
    112.8 KB · Views: 320
  • Christmas 2008 006.jpg
    Christmas 2008 006.jpg
    115.2 KB · Views: 338
Bulkhead mostly done, few other panels progressed

Clayton
 

Attachments

  • 23.01.2008 002.jpg
    23.01.2008 002.jpg
    149.2 KB · Views: 364
  • 23.01.2008 004.jpg
    23.01.2008 004.jpg
    141.4 KB · Views: 349
  • 23.01.2008 005.jpg
    23.01.2008 005.jpg
    130.4 KB · Views: 329
  • 23.01.2008 007.jpg
    23.01.2008 007.jpg
    131.6 KB · Views: 332
  • 23.01.2008 008.jpg
    23.01.2008 008.jpg
    123.7 KB · Views: 331
Centre and side consoles started.
Fuel filler closure panels started.
Added an extra side bar to the seat frames and started the foaming process.
As I’m 6’ 2”, I needed to lower the seat base as much as possible. Ended up with 25mm of Motorcycle seat foam resting on the floor pan.
I don’t have a dropped floor chassis, as I wanted to run as low as possible without compromising ground clearance (speed bumps etc).

Clayton
 

Attachments

  • 04.03.09 002.jpg
    04.03.09 002.jpg
    157.1 KB · Views: 369
  • 04.03.09 004.jpg
    04.03.09 004.jpg
    164.2 KB · Views: 348
  • 04.03.09 006.jpg
    04.03.09 006.jpg
    132.8 KB · Views: 338
  • 04.03.09 007.jpg
    04.03.09 007.jpg
    126.8 KB · Views: 351
More panelling to the front of the chassis.
Machined up some anti-roll bar mounts.

Clayton
 

Attachments

  • 20.03.09 003.jpg
    20.03.09 003.jpg
    144.3 KB · Views: 323
  • 20.03.09 009.jpg
    20.03.09 009.jpg
    110.2 KB · Views: 323
  • 20.03.09 007.jpg
    20.03.09 007.jpg
    125.3 KB · Views: 338
  • 01.04.09 001.jpg
    01.04.09 001.jpg
    159.5 KB · Views: 357
  • 01.04.09 002.jpg
    01.04.09 002.jpg
    142.9 KB · Views: 347
Added the wheel well panels and radiator side support panels.
With the added height of the centre console, decided to use the aft section for storage. Albeit only for a phone…….

Clayton
 

Attachments

  • 16.04.09 006.jpg
    16.04.09 006.jpg
    127.1 KB · Views: 297
  • 30.04.09 001.jpg
    30.04.09 001.jpg
    141.5 KB · Views: 335
  • 30.04.09 003.jpg
    30.04.09 003.jpg
    172.7 KB · Views: 311
  • 30.04.09 004.jpg
    30.04.09 004.jpg
    145.4 KB · Views: 312
  • 30.04.09 008.jpg
    30.04.09 008.jpg
    107.3 KB · Views: 330
Gear shift side console finished. Fuel filler cover panels done.
Pretty much finished the cabin panels.

Clayton
 

Attachments

  • 28.05.09 002.jpg
    28.05.09 002.jpg
    146.7 KB · Views: 339
  • 28.05.09 005.jpg
    28.05.09 005.jpg
    124.3 KB · Views: 327
  • Gt40 update 18.10.09 004.jpg
    Gt40 update 18.10.09 004.jpg
    139.5 KB · Views: 344
  • Gt40 update 18.10.09 006.jpg
    Gt40 update 18.10.09 006.jpg
    139 KB · Views: 345
  • Gt40 update 18.10.09 008.jpg
    Gt40 update 18.10.09 008.jpg
    114.8 KB · Views: 361
Started the plumbing for the masters. Fitted the combined reservoir as high as possible to negate the use of residual valves.
As the reservoir is located in the cabin. Made a holder with catch bowl for over flows / spills.
Drain pipe runs down the right hand side wheel well.
For a bit more added sealing around the rack ends. Fitted a bolt in tube that has a rubber strip that seals around the rack housing.

Clayton
 

Attachments

  • Gt40 update 18.10.09 018.jpg
    Gt40 update 18.10.09 018.jpg
    117 KB · Views: 395
  • Gt40 update 18.10.09 019.jpg
    Gt40 update 18.10.09 019.jpg
    98.6 KB · Views: 356
  • Gt40 update 18.10.09 020.jpg
    Gt40 update 18.10.09 020.jpg
    147 KB · Views: 383
  • Gt40 update 18.10.09 023.jpg
    Gt40 update 18.10.09 023.jpg
    132.3 KB · Views: 357
  • Gt40 update 18.10.09 028.jpg
    Gt40 update 18.10.09 028.jpg
    149.9 KB · Views: 371
  • Gt40 update 18.10.09 024.jpg
    Gt40 update 18.10.09 024.jpg
    96.9 KB · Views: 384
Clayton,
You are showing one of the cleanest builds I have witnessed. You are showing some imagination and thought that I never came up with. Just talked with a guy at the last show I went to who talked about the sharing of the Master cylinders reservoir for clutch and brake in the Miatas. I was skeptical at first, but I see it really makes sense. I was thinking of one small reservoir for all 3, not a larger one!! What material are you using for your lines??

Bill
 
Thanks Bill
I appreciate that.
Regarding the reservoir, I had a few requirements.
Packaging, I wanted the reservoir to be hidden, but be able to be filled and checked easily. So single entry would be better.
It needed to have a float switch for both brake circuits (Brake fail, one of our ADR requirements).
Wandering around the wreckers I found a Toyota Coaster Bus had all these. Being a bus, I thought the volume should be fine as well.

For the tubing I use 5052-0, mainly in 0.035” wall. Easy to bend / flare and way over kill for the pressures I’m using.
5052-O ALUMINUM TUBING from Aircraft Spruce

Clayton
 
Rear trailing arm cover panels fitted.
The spider will be glued in place and sealed around the rear bulkhead. To help with this, added a few pieces to the top bar so there was something to glue against.

Clayton
 

Attachments

  • Gt40 update 18.10.09 029.jpg
    Gt40 update 18.10.09 029.jpg
    109.3 KB · Views: 334
  • Gt40 update 18.10.09 030.jpg
    Gt40 update 18.10.09 030.jpg
    115.4 KB · Views: 350
  • Gt40 update 18.10.09 032.jpg
    Gt40 update 18.10.09 032.jpg
    107.1 KB · Views: 328
Finished panel work.
The R/H side rack cover plate was this shape to allow the install / removal of the rack.
Starting on the relay / fuse box.

Clayton
 

Attachments

  • update 11.11.09 003.jpg
    update 11.11.09 003.jpg
    133.6 KB · Views: 349
  • update 11.11.09 007.jpg
    update 11.11.09 007.jpg
    99.7 KB · Views: 320
  • update 11.11.09 009.jpg
    update 11.11.09 009.jpg
    155.1 KB · Views: 356
  • update 11.11.09 012.jpg
    update 11.11.09 012.jpg
    119.5 KB · Views: 346
As mentioned before, the spider will be permanently attached to the chassis. Here's the angle section around the front. Even with the front / sides clamped down, if you pulled the top of the A pillar down (roof edge), the bottom of the A pillar would spread slightly. Ended up fitting long tek screws from underneath right at the rear most edge and that helped a lot.

Started the fuel crossover tubing in the rear.

Clayton
 

Attachments

  • Panels 30.06.10 007.jpg
    Panels 30.06.10 007.jpg
    111.1 KB · Views: 321
  • Panels 30.06.10 004.jpg
    Panels 30.06.10 004.jpg
    114.2 KB · Views: 304
  • Panels 30.06.10 001.jpg
    Panels 30.06.10 001.jpg
    114.3 KB · Views: 306
  • Panels 30.06.10 002.jpg
    Panels 30.06.10 002.jpg
    119.1 KB · Views: 288
  • Panels 30.06.10 005.jpg
    Panels 30.06.10 005.jpg
    108.4 KB · Views: 324
Now that all the panelling is done, time to paint them.
You don’t realise how many there are until they’re all in the same area.
A mate had some large acid and alodine baths which I couldn’t say no to.
Then painted them in 2 pac etch primer.

Clayton
 

Attachments

  • Panels 15.07.10 001.jpg
    Panels 15.07.10 001.jpg
    138.1 KB · Views: 323
  • Panels 15.07.10 004.jpg
    Panels 15.07.10 004.jpg
    172.6 KB · Views: 312
  • Panels 15.07.10 012.jpg
    Panels 15.07.10 012.jpg
    175.6 KB · Views: 293
  • Panels 15.07.10 015.jpg
    Panels 15.07.10 015.jpg
    155.3 KB · Views: 321
  • Panels 15.07.10 025.jpg
    Panels 15.07.10 025.jpg
    125.8 KB · Views: 303
Painted the panels graphite grey mainly on the side that will be against the chassis. After all the panels are fitted and sealed, I'll repaint the whole chassis again.
Some of the finished panels waiting in the study.......
Finished foaming the seats and had them covered.

Clayton
 

Attachments

  • Panels 15.07.10 028.jpg
    Panels 15.07.10 028.jpg
    167.5 KB · Views: 276
  • Panels 15.07.10 029.jpg
    Panels 15.07.10 029.jpg
    123.9 KB · Views: 299
  • Panels 15.07.10 042.jpg
    Panels 15.07.10 042.jpg
    193.3 KB · Views: 320
  • Panels 15.07.10 044.jpg
    Panels 15.07.10 044.jpg
    212 KB · Views: 342
Certain areas of the chassis painted grey, ready for panels.

Clayton
 

Attachments

  • Panels 30.07.10 009_renamed_6578.jpg
    Panels 30.07.10 009_renamed_6578.jpg
    152.2 KB · Views: 266
  • Panels 30.07.10 010_renamed_10570.jpg
    Panels 30.07.10 010_renamed_10570.jpg
    152.7 KB · Views: 309
  • Panels 30.07.10 018_renamed_31331.jpg
    Panels 30.07.10 018_renamed_31331.jpg
    164.1 KB · Views: 311
Finally gluing and riveting the panels on for good.
The cabin will be painted satin black.

Clayton
 

Attachments

  • Panels 30.07.10 033_renamed_26126.jpg
    Panels 30.07.10 033_renamed_26126.jpg
    130.1 KB · Views: 310
  • Panels 30.07.10 034_renamed_32737.jpg
    Panels 30.07.10 034_renamed_32737.jpg
    149.3 KB · Views: 299
  • Panels 30.07.10 038_renamed_6938.jpg
    Panels 30.07.10 038_renamed_6938.jpg
    122.7 KB · Views: 278
  • Panels 30.07.10 054_renamed_23622.jpg
    Panels 30.07.10 054_renamed_23622.jpg
    128.9 KB · Views: 292
Between the double skinned panels, I added Dynamat and R45 insulation (25mm thick).
Living in the tropics, this should make the drive a lot more comfortable.

Clayton
 

Attachments

  • Panels 30.07.10 027_renamed_5169.jpg
    Panels 30.07.10 027_renamed_5169.jpg
    166.8 KB · Views: 331
  • Panels 30.07.10 043_renamed_1300.jpg
    Panels 30.07.10 043_renamed_1300.jpg
    143 KB · Views: 264
  • Panels 30.07.10 045_renamed_21596.jpg
    Panels 30.07.10 045_renamed_21596.jpg
    184.2 KB · Views: 293
  • Panels 30.07.10 064_renamed_20047.jpg
    Panels 30.07.10 064_renamed_20047.jpg
    152.9 KB · Views: 327
Clayton,
You have used the heat shield Dynamat. If you really want to block the heat add on top of that the sound proofing Dynamat. It is a closed cell product that is about a 1/4- 1/2" thick mat. I used it on my central tunnel and there is no heat coming through that stuff if on top of the heat shield. Over time(long trip) the heat will sort of meld through the heat shield. The sound proofing on top will stop it for a much longer period of time. The surface of the sound proofing works well with fabric glue for finishing off the surface in your choice of materials.

Bill
 
Thanks Bill
I'll keep that in mind for my next build (Escort Mk1).
In the past I have used cork tiles with good results, so I tried them out in the centre tunnel.
Not much room beside the water pipes, but fitted dynamat, then cork, then dynamat again.
It works well, doesn't get hot.

Clayton
 

Attachments

  • DSCF0809.jpg
    DSCF0809.jpg
    172.7 KB · Views: 319
  • DSCF0817.jpg
    DSCF0817.jpg
    160.4 KB · Views: 295
  • DSCF0820.jpg
    DSCF0820.jpg
    145.7 KB · Views: 287
Back
Top