As it turns out im Jelous! Looks great Hans!

You are using an out of date browser. It may not display this or other websites correctly.
You should upgrade or use an alternative browser.
You should upgrade or use an alternative browser.
Scratch build MK IV
- Thread starter RexDanni
- Start date


Davidmgbv8
Supporter
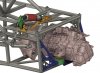
Impressive, where did you learn to bend and notch tube like that?

Davidmgbv8
Supporter
Impressive, I wish someone could tell us how to rotate our pictures we load! Anyone?
Joel K
Supporter
Impressive, I wish someone could tell us how to rotate our pictures we load! Anyone?
This works for me. On my iphone if the picture loads on gt40s sideways. I edit the pic on the phone. rotate it once then save it. then edit it again and rotate it again(3 times) till straight then save. Now when you upload to gt40s it should be good.
Paul Hendrickx
Supporter
Very sturdy build... dont bang with that in the back of a modern vehicle , you will go straight through ... and ending up at the air filter.....
quality job....
Paul
quality job....
Paul
Stephen Ducker
Supporter
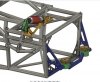
Super sturdy, make sure your head never comes in to contact with it !


Ian Anderson
Lifetime Supporter

1967 Ford Mk IV Gallery Images - Ultimatecarpage.com
1967 Ford Mk IV: 81-shot gallery, full history and specifications
www.ultimatecarpage.com
Posted by Jim a few years back….Owner of J6
Ian
Bryan Koehler
Supporter
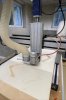
Looks like i know what im asking santa for, for christmas!!! That is a great use of that router. And your fit up is superb. Hey what size tubing are you using and is it 4130?
Similar threads
- Replies
- 14
- Views
- 4K
- Replies
- 14
- Views
- 4K