SL-C Kit Spec in Australia

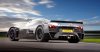
Thought it might interest some to see what's happening with the Superlite Coupe(SL-C) kits in Australia. I would have posted earlier, but with the rapidly expanding business, I've been very busy.

I've attached some photos of the Autralian kits being prepped for delivery. Not everything is fully fitted, but it will give you an idea.

We've taken a different approach due to ADR compliance requirements and our target market in Australia.

The standard specification of SL-C kits:

* Body fully fitted, fully aligned fully trimmed. Inner panels for front and rear clip. Lower inner ducted rear guards. Inner duct panel for roof scoop. Covers for front clip and door hinges. Rear difuser fully fitted.

* Front clip gas strut hinging with custom hinges. Doors gas strut hinging with custom hinges. Rear Clip gas strut hinging with custom spherical bearing hinges.

* All suspension fitted with customisations for Australian market. Basic suspension alignment performed with ADR compliant bump steer.

* Anti-Intrusion bars fitted to doors. Reinforced door hinge and striker points.

* Incorporated retractable seatbelt and harness mounts.

* Incorporated urethane engine & gearbox mounts (engine, adaptor plate and gearbox mounts)

* Radiator soft mounted.

* ADR test documentation for chassis, body, suspension etc. Standard street chassis has torsional stiffness of 25500 Nm/deg/M. Suspension strength exceeds ADR requirements by more than 10 times.

And lots more...

Enjoy the photos.
 

Attachments

  • IMG_2354 [1600x1200] [800x600].jpg
    IMG_2354 [1600x1200] [800x600].jpg
    41.2 KB · Views: 1,166
  • IMG_2222 [1600x1200] [800x600].jpg
    IMG_2222 [1600x1200] [800x600].jpg
    46 KB · Views: 9,352
  • IMG_2357 [1600x1200] [800x600].jpg
    IMG_2357 [1600x1200] [800x600].jpg
    38.1 KB · Views: 1,300
  • IMG_2224 [1600x1200] [800x600].jpg
    IMG_2224 [1600x1200] [800x600].jpg
    26.4 KB · Views: 966
  • IMG_2362 [1600x1200] [800x600].jpg
    IMG_2362 [1600x1200] [800x600].jpg
    36.1 KB · Views: 999
Last edited:
Some more photos...
 

Attachments

  • IMG_2376 [1600x1200] [800x600].jpg
    IMG_2376 [1600x1200] [800x600].jpg
    40.1 KB · Views: 1,075
  • IMG_2384 [1600x1200] [800x600].jpg
    IMG_2384 [1600x1200] [800x600].jpg
    50.2 KB · Views: 1,069
  • IMG_2489 [1600x1200] [800x600].jpg
    IMG_2489 [1600x1200] [800x600].jpg
    42.4 KB · Views: 1,753
  • IMG_2490 [1600x1200] [800x600].jpg
    IMG_2490 [1600x1200] [800x600].jpg
    38 KB · Views: 1,046
  • IMG_2491 [1600x1200] [800x600].jpg
    IMG_2491 [1600x1200] [800x600].jpg
    39.1 KB · Views: 1,049
Also included a copy of our packing list to give you an idea of the quantity of parts supplied in the full kit.
 

Attachments

  • SL-C Packing List.pdf
    72.5 KB · Views: 620
Thanks Molleur.

Dave, just realised the best photo of the rear clip inner panels, the panelling is not complete, there is a front section to go on that inner fender.

Will grab a photo of the lower inner fender piece as well. Trick venting design to help draw air through the engine bay from the side pods.
 
I'd like to see that too Craig. Also really like the little clamshells to hide the front clip hinges..
 

Craig Gillingham

Banned because I can't follow the forum rules.
glad to see that youve added gearbox mounts and softened it all up. Things will break in no time without.
Also make sure that all the clearances are big enough when the rear clam and front clams are down (around fuel fill point and top inner lip of front clam etc etc etc) as although things look clear after a driving session things rub where you wouldnt believe (not nice after an expensive paint job) - imagine the shaking without the bushes ect.
regards (but this will be deleted anyway) hheheheehehe
 
Stupid question time! ( :D )

In the front, how are you hinging it? Atleast the way I installed mine, my front splitter is snug up against the front clip keeping it supported and from sagging. There's no way I can remove the front without either dragging it along the front splitter, or first adjusting the rod ends to lower the diffuser, so I can't really see how the hinges would allow the clip to slide forward and then tilt up without dragging along the splitter (unless it's not set very tightly, and the hinges themselves keep the clip propped up......)
 
when I look at the suspension parts, I noticed the triangles? are solid alu? but at the ends where they are mounted to the chassis there is a bolt/eye drilled/mounted into it...is that strong enough? normally the triangle is one part like say the example in the second picture...when you brake hard and accelerate hard there come enormous power on those things I guess...

attachment.php


here under the picture as example that the triangle is in one part direct to the chassis.


aus2008031038901_alt.jpg
 

Craig Gillingham

Banned because I can't follow the forum rules.
Stupid question time! ( :D )

In the front, how are you hinging it? Atleast the way I installed mine, my front splitter is snug up against the front clip keeping it supported and from sagging. There's no way I can remove the front without either dragging it along the front splitter, or first adjusting the rod ends to lower the diffuser, so I can't really see how the hinges would allow the clip to slide forward and then tilt up without dragging along the splitter (unless it's not set very tightly, and the hinges themselves keep the clip propped up......)

use an up and over type hinge that you will use to clear the splitter.
Make sure that you use a 1/4 turn quick release fastener to the clam and splitter as this hinge is inclinded to lift up when down.
i.e try pulling the front up of the clip - and it does by about 2". At speed the clip will lift slightly.
cheers
 

Craig Gillingham

Banned because I can't follow the forum rules.
use an up and over type hinge that you will use to clear the splitter.
Make sure that you use a 1/4 turn quick release fastener to the clam and splitter as this hinge is inclinded to lift up when down.
i.e try pulling the front up of the clip - and it does by about 2". At speed the clip will lift slightly.
cheers

mind you a little more complicated at the rear hehehe
 

Attachments

  • aspirarearrend.jpg
    aspirarearrend.jpg
    25.5 KB · Views: 983
Stupid question time! ( :D )

In the front, how are you hinging it? Atleast the way I installed mine, my front splitter is snug up against the front clip keeping it supported and from sagging. There's no way I can remove the front without either dragging it along the front splitter, or first adjusting the rod ends to lower the diffuser, so I can't really see how the hinges would allow the clip to slide forward and then tilt up without dragging along the splitter (unless it's not set very tightly, and the hinges themselves keep the clip propped up......)
Hoods Deck Trunk Hinges
I have the smaller hinges at the bottom of the page. Do not have them installed yet but see no reason they would not work with how you have your splitter mounted. I also believe these are the same hinges that Fran is using on his car and he also offers them. I believe it was Molleur who pointed them out to me.
 
....the panelling is not complete, there is a front section to go on that inner fender.

Will grab a photo of the lower inner fender piece as well. Trick venting design to help draw air through the engine bay from the side pods.
Will you or Fran be offering/making availble any of these to current SL-C owners?
Ducting, wheel wells, gas strut hinging etc.
 
Hoods Deck Trunk Hinges
I have the smaller hinges at the bottom of the page. Do not have them installed yet but see no reason they would not work with how you have your splitter mounted. I also believe these are the same hinges that Fran is using on his car and he also offers them. I believe it was Molleur who pointed them out to me.


Perhaps my description was a bit lacking - right now I've got the diffuser snug against the bottom of the front clip, and the front clip is latched down in the rear. It's nice and tight - I can't lift it up at the front or back, or side-to-side.

If I undo the latch at the back, the back lift up off the guide pins (because it's tight at the front - has to be tight, otherwise the front clip sags and you almost have to sit on it to get it into the guide pins flush). Okay, the back is loose in the air, but the front is tight - I can't lift the front up because the splitter is keeping it tight against the bottom, and the side radiator aluminum "prongs" are snug in the front pockets of the body. The only possible movement is front/back, in which case I need to lower the splitter first so I don't drag the body along the splitter.

I understand the concept of the hinges and how they work, but with the "prongs" on the side radiator pieces I don't see how they can work because the body is snug in the prongs and needs to be removed from them first in order to go up. My understanding is there are several versions of the front radiator aluminum - I could see the ones without prongs the hinges working easily on, but with the prongs I just can't visualize it.
 

Craig Gillingham

Banned because I can't follow the forum rules.
Perhaps my description was a bit lacking - right now I've got the diffuser snug against the bottom of the front clip, and the front clip is latched down in the rear. It's nice and tight - I can't lift it up at the front or back, or side-to-side.

If I undo the latch at the back, the back lift up off the guide pins (because it's tight at the front - has to be tight, otherwise the front clip sags and you almost have to sit on it to get it into the guide pins flush). Okay, the back is loose in the air, but the front is tight - I can't lift the front up because the splitter is keeping it tight against the bottom, and the side radiator aluminum "prongs" are snug in the front pockets of the body. The only possible movement is front/back, in which case I need to lower the splitter first so I don't drag the body along the splitter.

I understand the concept of the hinges and how they work, but with the "prongs" on the side radiator pieces I don't see how they can work because the body is snug in the prongs and needs to be removed from them first in order to go up. My understanding is there are several versions of the front radiator aluminum - I could see the ones without prongs the hinges working easily on, but with the prongs I just can't visualize it.

perhaps your version was an experiment?
 
Fran explained it to me - you leave the 'prongs' on if you want the clip to be easily removeable (like I want); you remove them if you want to hinge it. Multi-functional piece in one; thanks Fran :thumbsup:
 
Alex, trim the radiator support panel between the "notches" at the front & all will be well. Originally designed to be a completely removable front clip, the hinges were added later. Need to trim the aluminum support panels.

Dave L., RCR is now making a simple version of the front clip hinges with gas struts that actually work better than the hot-rod type. Call RCR to check availability.
 
Wow nice work on hinging the rear clip. Looks like you put supports on the fiberglass fore aft and side to side under the clip. any chance of a close up jpg on that work? Very nice!
 
In the front, how are you hinging it?

For the front clip we use a custom scissor type hinge with gas strut assistance. When the front clip is down, it is locked both front and rear.

To open the front clip you just unlatch it and then just tilt it open, clears everything required. You can even open it with one person. Just lean over and pull it from the middle of the air outake. Took a lot of development to get it to this stage and it works very well.

when I look at the suspension parts, I noticed the triangles? are solid alu? but at the ends where they are mounted to the chassis there is a bolt/eye drilled/mounted into it...is that strong enough?

Yes it is. We have had the entire suspension setup(all components, hardware and chassis mounting points) analysed by an independent acredited engineer. Everything surpases the ADR requirements by many multiples. The rear suspension is actually something like just under 15 times stronger than ADR requirements. It's a 30 page suspension report that we supply with the Australian kits.

Attached photos of front clip supports and rear lower inner guards.

We got a few driving SL-C's that we have been able to test and refine everything on. Both on and off the track. These cars have been extensively refined. Both Fran and I have been working hard to develop extra components etc.
 

Attachments

  • IMG_2541 [800x600].jpg
    IMG_2541 [800x600].jpg
    36.4 KB · Views: 974
  • IMG_2537 [800x600].jpg
    IMG_2537 [800x600].jpg
    40.4 KB · Views: 1,951
  • IMG_2538 [800x600].jpg
    IMG_2538 [800x600].jpg
    38.4 KB · Views: 803
Back
Top