Alex, Ya, had Fran fit the body panels and he threw in the wet sanding of all the mold lines. he also threw in the cuttin of the apertures, bonus. i had expected to do that. also paid him a little to support the tail with diagonals. I figured he'd know the best location/gauge Al/etc. Are yo thinkin about adding any of these? When do you get yours?

- Forums
- GT40 Replica Manufacturers' Corner
- RCR Forum - RCR40/SLC/917/Superlite Aero
- The SLC Clubhouse
You are using an out of date browser. It may not display this or other websites correctly.
You should upgrade or use an alternative browser.
You should upgrade or use an alternative browser.
SLC 36 Cam's Build
- Thread starter Cam MacIsaac
- Start date
I really like the look of these cars, and fully appreciate the engineering that goes into them. To me they look like a hybrid of IMSA GT cars and the Grand Am prototypes.
What powerplant/transaxle combination have you chosen for the Super Banana?

I want to see someone put a four rotor engine in one of these...Dare to be the first :nice:
Alex, Ya, had Fran fit the body panels and he threw in the wet sanding of all the mold lines. he also threw in the cuttin of the apertures, bonus. i had expected to do that. also paid him a little to support the tail with diagonals. I figured he'd know the best location/gauge Al/etc. Are yo thinkin about adding any of these? When do you get yours?
If he's able to stick with the original 16weeks, it should be mid-Novemberish. Fingers crossed =)
I paid him to fit the stuff and do all the cut-outs.
In terms of the spoiler support, are you referring to the 2 cross-braces that go from the wing mount downwards? I thought those were part of the stock design, no?
Last edited:
I really like the look of these cars, and fully appreciate the engineering that goes into them. To me they look like a hybrid of IMSA GT cars and the Grand Am prototypes.
What powerplant/transaxle combination have you chosen for the Super Banana?
I've got a crate Chevy LS376 sitting in the garage. 480 HP. Note to self, put that in the SLC this weekend. For the transaxle i went with the Ford GT Ricardo. Still waiting on the twin disc clutch.
No rotatary for me, i'm keeping this plain and simple and hopefully low budget, this economy ain't so spiffy.
No rotatary for me, i'm keeping this plain and simple and hopefully low budget, this economy ain't so spiffy.
Plain....simple....low budget.........somebody's never built a component race car before :laugh:
")
OK, i haven't been sitting idle but i feel like i've picked up a part time job in the evenings. Part of it is tracking down funky fastners. more on that later. First thing was to get at the Ricardo. I took the diffuser and tail off. Thanks Jack for the hint about releasing the pressure on the shocks first. Duh on my part.
Once i got rear clip off it was screaming for epoxy. i used Autobahn truck bed liner 2 part. i tried rustoleum, too think although the autobahn is a little glossy but it should give a little reinforcement form stone chips. Bonus, it cuts alot of glass splinters.
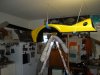
I'm trying to use as little space as possible so the clip got hoisted to the roof. i saw an Ultima guy do this. keeps the kids away from it too!
Once i got rear clip off it was screaming for epoxy. i used Autobahn truck bed liner 2 part. i tried rustoleum, too think although the autobahn is a little glossy but it should give a little reinforcement form stone chips. Bonus, it cuts alot of glass splinters.
I'm trying to use as little space as possible so the clip got hoisted to the roof. i saw an Ultima guy do this. keeps the kids away from it too!
Attachments
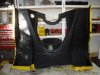
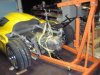
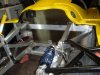
Ok, got more room to move in the garafge. so got the tranny out. simple harbor freight 1 ton hoist. i shoulda gotten the 2 ton for a little more reach might be tight getting the mated tranny/engine. Found a clutch tool on ebay. has all the right numbers on it but man is it tight. Spent 1/2 sanding it and i may still need to use the engine winch to get it out once it lines up the 2 discs of the ricardo. While i had the rear clip open i used some heat reflective from heatsheild, their lava mat. Prettty cool, looks like carbon fiber....
HSP770003 - Lava Mat Lava Mat Heavy duty; 36" x 48" Uncoated With Adhesive - Withstands 1200 Degree Heat Direct - HSP770003
HSP770003 - Lava Mat Lava Mat Heavy duty; 36" x 48" Uncoated With Adhesive - Withstands 1200 Degree Heat Direct - HSP770003
Dave Lindemann
Lifetime Supporter
Alex -
The diffuser is attached to the chassis. The body hinges on the diffuser.
Regards,
Dave L
The diffuser is attached to the chassis. The body hinges on the diffuser.
Regards,
Dave L
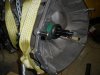
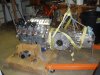
So the adapter plate and clutch for LS3 to Ricardo take a few special fastners. i figure ill mention them now before i forget. The clutch needs nine 8mm x 90mm hardened hex head bolts, not easy to find unless you want to buy a bag of 50 from Fastenal. the ricardo also needs two 16mm x 30mm locating pins. it actually looks liek 32mm would be exact but good luck finding those. i suppose i could cut 8mm from a 40mm pin. Then you need six M10 x 40mm 10.9 allen head bolts, adapter to LS, so the heads hide. Adapter to tranny needs five M10 x 60mm hex heads. the hex stay captive in the plate so you can tighten when they are buried under the plate. Here is a pic of the plate loaded up. I wish i had this laundry list instead of carting the plate around to 5 fastner shops. hope it helps someone out there!
Attachments
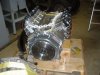
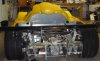
My favorite shot, automotive pornography if you ask me. Chevy and Ford mated!
The intended offspring is HP to the tarmack...
Ah, that picture takes me back to not so long ago....
Great googly moogly I'd forgotten how good the SLC looks!
So the adapter plate and clutch for LS3 to Ricardo take a few special fastners. i figure ill mention them now before i forget. The clutch needs nine 8mm x 90mm hardened hex head bolts, not easy to find unless you want to buy a bag of 50 from Fastenal. the ricardo also needs two 16mm x 30mm locating pins. it actually looks liek 32mm would be exact but good luck finding those. i suppose i could cut 8mm from a 40mm pin. Then you need six M10 x 40mm 10.9 allen head bolts, adapter to LS, so the heads hide. Adapter to tranny needs five M10 x 60mm hex heads. the hex stay captive in the plate so you can tighten when they are buried under the plate. Here is a pic of the plate loaded up. I wish i had this laundry list instead of carting the plate around to 5 fastner shops. hope it helps someone out there!
For the record, I spec'd the clutch bolts and dowel pins from Ford. They are GT parts. I remember the clutch bolts came in bags of 4... perfect for when you need 9
") .
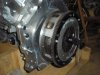
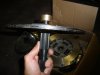
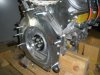
.Here are a few pics with the clutch/flywheel on. the clutch alignment tool was a pain to remove, probably the hardest part. anything more than 10 ft/lbs and the delrin locked in there. i ended up using a comealong to yank it out so the 2 discs didn't misalign at low torque on the bolts. i also added a shot of the Ricardo just beacuse i could never find one on the web! it's hard to see but i had wear marks on this inside of the bellhousing. i'm curious if this might be a remanufactured Ricardo or if that happened in final test?