Stewart Warner 240A Fuel Pump Switch Renewal

Charlie Farley

Supporter
Brian,

The original SW rebuild sheets state that the intake valve should be finger tight, then one quarter turn.
Over time, i've developed the following modus, when testing switches.

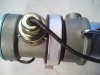
1.Unscrew the intake valve and set aside.

2.Insert finger into bottom of piston tube and by viewing thro the switch access hole, let the piston and spring drop so that the 'cut out ' in the piston is in the correct position to install the switch.

3.Install switch, remembering to push the actuator arm to the up position.

4. Install the intake valve, finger tight.

All the above should be done with the pump body horizontal on the bench.

Dont bother with the filter and bowl until you get that sucker to kick continously.

By the way guys, a point you may not be aware of.

If the piston tube moves laterally, it means the hidden seal at the base of the piston tube has shrunk. In most cases, using an appropriate tool ( i have the original SW tool ) you can re stake the tube . Failure to do this, will allow fuel past the piston tube base and into the switch area. Not a good idea.

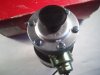
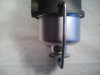
Finally, one example of the latest batch of pumps i've totally refurbished.
Replated, new gaskets & seals, new top boot,rubber mounting strap and new oem switch wire.
 

Attachments

  • SW 1.jpg
    SW 1.jpg
    22.6 KB · Views: 652
  • SW 2.jpg
    SW 2.jpg
    26 KB · Views: 605
  • SW 3.jpg
    SW 3.jpg
    28.1 KB · Views: 593
  • SW 4.jpg
    SW 4.jpg
    17.1 KB · Views: 590
Last edited:

Charlie Farley

Supporter
I forgot one important point, pertinent to my last post.

To correctly check any lateral movement in the piston tube,
you must first remove the threaded plate that the inlet valve
screws into. Then remove the copper switch pins and let the coil
drop out. Then and only then can you correctly ascertain lateral
movement in the piston tube.
Obviously, leaving the coil and base plate in position prohibits
any side movement of the piston tube. Consequently you can't
see if the seal has shrunk.
 
Randy and company ; once again you show why this is the best forum out there. Most of the information you guys post can be used in any build and it has helped me out with my current project (BMW) immensely. Keep up the good work guys.
 

Charlie Farley

Supporter
No problem Brian,

If you need Gasket & Seal Kits, Mounting Bracket Rubbers, Original Switch Wire or Top Rubber Boots, email me: [email protected].
Also, i can supply a free pdf of the original Stewart Warner Rebuild Sheets,.
Don't go paying for them on eBay please.
 
Last edited:

Charlie Farley

Supporter
Information for you folks out there.
Don't get me wrong.
This pump has it's ' Achille's Heel ', namely the switch.
But it is far superior to any contemporary pump.

I received a pump from a customer the other day
for a full rebuid and ran it on my test rig.
This was an NOS pump, together with the original box.
I checked the mounting bracket and it had clearly never
been mounted in a car. It even had the inlet/outlet plastic
plugs inplace. Infact, i was surprised to find the original
purchase invoice included. Wouldn't have let that out of my
sight !.

Anyway, after about 10 or 11 minutes of running time, i went
back out to check it and fuel was running in a steady stream from the pump.
After removing the switch cover, i traced the leak to the weep hole in the switch cover plate.

In days long gone, SW would have sold you a replacement switch.
As we all know, unused switches are like ' rockinghorse sh!t '.
Where are you going to find one ?
And if you do find one, even unused, will it still work and for how long.

Now for the good news.
For the last few months i have been throwing time & money at effecting
a solution.
Many of you will know that i have had a full kit of the the replaceable
Gasket & Seal kits remanufactured, together with remanufactured
Top Rubber Boot & Mounting Bracket Rubber. I have further added to
the SW Parts inventory, by acquiring replacement switch wire from the
original supplier to Stewart Warner ( it features the original script on the wire ) and remanufactured Fuel Filters.
However, when i went down the path of curing the switch, it was a whole
different ball game.
In the switch is a seal. Stewart Warner made this seal to not be replaceable.
I've attached a photo of this seal below. It is out of an NOS pump and clearly shows how the rubber coating has de-bonded from the fabric core.
There is an arguement that seals are best left immersed in fluid for 30 to 40 years, rather than left unused. I won't go into that here.
All i know, is that that seal was causing the leak. And believe me, i don't like to see fuel leaking into an electrical switch !
I've now had the brass assembly remanufactured and fitted with an aerospace specification seal, made by DuPont. So now guys, if like many others, you have pumps with switches that leak, i have the facilities to bring it back into service. You can contact me on [email protected].
 

Attachments

  • Old SW seal.jpg
    Old SW seal.jpg
    16.1 KB · Views: 591

Randy V

Moderator-Admin
Staff member
Admin
Lifetime Supporter
I've not had that problem ((yet)) Andy... But I'm sure that I will given enough time..


I am curious if you're going to publish the info on how to replace the seal and also how much the seal will cost...

Thanks..
 

Charlie Farley

Supporter
Randy,

If you look at the brass assembly on the end of the switch, you will see that it has been manufactured as a sealed unit. You cannot successfully take it apart and replace the seal.
I have had to have my replacement remanufactured likewise.
The brass component is pressed together.
I have not yet advertised it's existence, but through existing customers,
i have initial orders for over 60. That tells us how many pumps there are out there that are either u/s or the concern by owners that the seal maybe approaching the end of it's shelf life.
Without wishing to be accused of promoting this replacement, i'd far rather find out the seal was on it's last legs, on a test rig. Rather than when installed in a car !
 
It seems to me I made a mistake ;-(
I did buy on ebay a NOS switch and now I would like to test it, but don't know how.

I've a working fuel pump which I don't intend to open and remove the switch.

Is + on the cable and - on the case. If yes the switch is doing NOTHING....
 

Randy V

Moderator-Admin
Staff member
Admin
Lifetime Supporter
With all the images gone thanks to Photobucket’s money grab, it’s difficult to guide you.
I did write an illustrated document on how to cleanup and rebuild the pumps but that computer is a couple thousand miles from my location and it will be a couple months before I am back there.
 
Pedro provided that document to me a couple days ago and I broke it up into the original SW documents so here they are just in case you'd rather have them in this format. I wish somebody had an archive of Andy's original posting with photos. That would be an amazing resource for us DIY types.
 

Attachments

  • SER 4746 Switch Kit.pdf
    335.6 KB · Views: 346
  • SER 4747 regulator kit 2.pdf
    174.3 KB · Views: 334
  • SER 4747 regulator kit.pdf
    316.2 KB · Views: 311
  • SER 4750 Coil kit 2.pdf
    183.5 KB · Views: 302
  • SER 4750 Coil Kits.pdf
    357 KB · Views: 299
  • SW-SER 4745 Fuel Pumps.pdf
    2.4 MB · Views: 341

Brian Stewart
Supporter
I downloaded what I believe to be Randy's original SW 240A Fuel Pump service document way back in October 2009. It was very useful and enabled me to rebuild mine successfully. It is a Word document of around 31MB. Not sure of the best way to make it available.
 

Pedro

Guest
Supporter
Brian I wonder if the document I just posted is the same one you have, this one has very good information or replacing the switch.
 

Attachments

  • SW Switch.pdf
    1.8 MB · Views: 383
Back
Top