
You are using an out of date browser. It may not display this or other websites correctly.
You should upgrade or use an alternative browser.
You should upgrade or use an alternative browser.
Stewart Warner 240A Fuel Pump Switch Renewal
- Thread starter Big-Foot
- Start date
Brian I wonder if the document I just posted is the same one you have, this one has very good information or replacing the switch.
This *IS* the document I authored... I hope it is of some help!
Read the above write up by Randy V on the SW240 pump switch. I just took my 240 apart, got the pump to run fine , except will not pump much fuel, just labors, slows down under load from the fuel. Does anyone know if the switch clicks to open the circuit and remains open then clicks closed closing the circuit or should the switch perform as an immediate momentary switch .... off on off on etc...? Thinking the switch may not be cycling and activating correctly when under load as I might have assembled incorrectly . Any info appreciated. Thanks Mark
Mark - it sounds like perhaps you still have some varnish on the contacts. I recall having to use very fine emery cloth on them along with contact cleaner. I just can’t recall the exact electrical function of the switch in circuit…Read the above write up by Randy V on the SW240 pump switch. I just took my 240 apart, got the pump to run fine , except will not pump much fuel, just labors, slows down under load from the fuel. Does anyone know if the switch clicks to open the circuit and remains open then clicks closed closing the circuit or should the switch perform as an immediate momentary switch .... off on off on etc...? Thinking the switch may not be cycling and activating correctly when under load as I might have assembled incorrectly . Any info appreciated. Thanks Mark
Thanks for responding Randy. I will clean them again, has a mechanical hard closing and opening like a light switch, even when not under an electrical load. Maybe the issue is elsewhere, weak coil, piston ball not sealing? Pretty intrigue pump comparied to a rotary Holley. I see that Charlie of Gold parts has parts. Have asked him the question too.
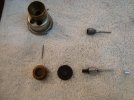
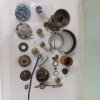
Well... decided to take the SW240 fuel pump switch apart, near all the way. So to make a long story short, appears the round diaphram seal inside the lever cavity gets hard overtime and restricts the movement of the pin arm that opens and closes the points. I replaced this diaphragm and the switch opens and closes the points perfectly. It is a real tedious operation; removing the cripped case to release the pivot housing unit, then removing the .040" pivot wire hinge and machining off the pressed on diaphram retaining bushing from the point operating arm. The finger that sits in and moves with the piston groove has a small spring encapulated in its housing and rocks independently of the points operating arm. This part of the unit is roll crimped in place. Removing this spring and finger would be a major job, however with the six switches done so far this part of the unit seems pretty robust, none have shown any sign of wear. Reassembly is again tedious, pressing on a new diaphragm and bushing then recrimping the unit back into the switch housing. I got all the switches to operate and the test pump I use really pumps. Thought some might find this interesting, I sure did.
Attachments
I have an SW240A fuel pump that I am trying to rebuild. This site has the best info about these pumps that I can find. Disassembled my pump, took out the switch and uncrimped the switch housing to remove the switch and clean up the two contacts as described by Randy. At this point I would like to replace the seal in the brass lever cavity as Mark has done. Thank you both for the information.
Question I have is, are these seals available to purchase anywhere and what is the best way to open the brass housing. Did you uncrimp the rolled radius end of the housing to get the end cap off? Looks like the brass housing is still attached to the steel switch housing in your photo. Does that mean you did not uncrimp the four staked areas at its base?
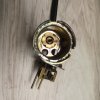
Any information you can give will be appreciated. I enclosed some photos of my pump and switch.
Thanks, Jay B.
Question I have is, are these seals available to purchase anywhere and what is the best way to open the brass housing. Did you uncrimp the rolled radius end of the housing to get the end cap off? Looks like the brass housing is still attached to the steel switch housing in your photo. Does that mean you did not uncrimp the four staked areas at its base?
Any information you can give will be appreciated. I enclosed some photos of my pump and switch.
Thanks, Jay B.
Attachments
Ian Anderson
Lifetime Supporter
Should have the parts you need
Thanks Ian, will try to contact him thru that site.
Neal
Lifetime Supporter
Also here…

Hi Jay, Yes you pry the rolled crimp open and press out the internals, but don’t remove the four stamped crimps from the steel case. The rubber diaphragm, brass pivot and pintle that move the points can then be removed. Mark the orientation before pressing the pentle assembly out. Anyway, the small diaphragm is crimped between the needle arm and a pressed on pintle bushing , usually black in color. Make sure the pintle is straight. You need to take care as the pintle arm pivots on a .040” wire which can be removed, all very delicate and oriented to move vertically to operated the points, so reassembly in the correct position is critical. The points will probably need adjustment too, the adjustment tab is for that. Repacing the diaphragm is tedious, but two ways. Leave the factory bushing on and get the old out and stretch the new on (works sometimes) or machine off the factory bushing and press on new, much mini lathe work. The small aluminum bush I made is in my picture above. The plastic pintle tip that rides in the piston groove is spring loaded and cannot be removed without rendering it useless, see above picture with plastic end and one I removed so I could understand its operation, small spring inside for movement. The kits from Cobra Performance have the diaphragm included, I also made some diaphragms form bulk material. Also I would replace the brass piston cylinder oring seal and restalk the brass in the housing. I made a bunch of special tools to recrimp the rolled brass casing to reassemble and recrimp the brass cylinder . Really all very cool! PM me if you need additional info. Good Luck
Last edited:
Thanks Mark, I did not realize that seal was included in the Cobra Performance kit I bought. Did not want to attempt disassembly until I got that seal. Now I can try it.
Did you roll the brass lip out while holding it in your hand, a vise or in a lathe? Did you make a tool to unroll it with or just a screwdriver tip? Once I get it undone I will PM you if I have any questions about the internals. I do have a Levin micro lathe so I will probably machine the bushing off, so I don't tear the seal. Then I will just make a new aluminum bushing for it.
Glad you were able to get this done. At least I know it is possible now. Will let you know how it goes.
Thanks for all the help.
Jay B
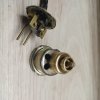
Here is the completed pump running.
I unrolled the lip with a small open end wrench ground to be used as a lever and then pressed out the guts with a hollow sleeve and switch case holder. Also remembered while typing all this, I cleaned out the old diaphragm material with a schroll saw fine toothed blade the width of the diaphragm, then stretched the new seal over the existing bushing into its groove, did this in the lathe. The procedure with the homemade diaphragm and bushing was/is pretty labor intensive. Just have to be careful when pulling the kit diaphragm over the factory bush, I tore a few seals before I got the technique down, soaked in boiling water then stretched over.Thanks Mark, I did not realize that seal was included in the Cobra Performance kit I bought. Did not want to attempt disassembly until I got that seal. Now I can try it.
Did you roll the brass lip out while holding it in your hand, a vise or in a lathe? Did you make a tool to unroll it with or just a screwdriver tip? Once I get it undone I will PM you if I have any questions about the internals. I do have a Levin micro lathe so I will probably machine the bushing off, so I don't tear the seal. Then I will just make a new aluminum bushing for it.
Glad you were able to get this done. At least I know it is possible now. Will let you know how it goes.
Thanks for all the help.
Jay B
Last edited:
Mark, I made a tool to uncrimp the brass lip, but that's as far as I got due to a medical issue of a family member. No time to do anything yet.
I will let you know as soon as I get back to it. Thanks.
I will let you know as soon as I get back to it. Thanks.
Similar threads
- Replies
- 2
- Views
- 1K
- Replies
- 15
- Views
- 1K
- Replies
- 2
- Views
- 923