Ron,
Are you going to stick with the same wheels or go with the factory steel wheels ?
Dave
1972 VIN Decoder
Are you going to stick with the same wheels or go with the factory steel wheels ?
Dave
1972 VIN Decoder

") , but could be returned to stock configuration with current front springs & bolts in original holes, & probably require similar efforts @ rear to get it to hook up as well. Probably not legal in normal sanctioned series, but in Young vs Earp anything goes!!
, but could be returned to stock configuration with current front springs & bolts in original holes, & probably require similar efforts @ rear to get it to hook up as well. Probably not legal in normal sanctioned series, but in Young vs Earp anything goes!!Also agree with using original rubber bushes on the tension strut @ front end... maybe shorten up the steel tube sleeve that dictates how tight those bush's can be compressed, but most important is that with the top & bottom w/bones jigged up in the ride height position the two studs of the tension strut should drop straight in... the load imposed by the coil spring might be throwing you a curve ball here at moment..
Go to the oval track suppliers and get yourself the adjustable upper ball joints.
Ron,
Don't end up "out-tricking" youself. Unless you replce the entire chassis and suspension on the Torino, you will always be limited by what Ford built.
It will NEVER handle like the Lola and indeed, you will probably never push it that hard. Upgrade the handling and go for as much brake as you can get and call it a day.
Now you could add the "Hydroboost" power steering pump powered disc brakes from the Lincoln Mark or a Thunderbird (same platform as the Torino) which makes boost assist easy to modulate with a hydraulic pressure valve.
Does your car have the gauge package with the tach? If not, worth looking for.


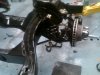
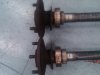
HI Ron The retaining rings should come packaged with the bearings. Looks like the wide retainer was substituted from a truck application. Just get on these with the chisel at 120 Degrees and score them they will come off. The bearings are best left for the press.