Changing pedal location

This turned out to be an easy fix - especially if you are one of those contortionists that can fit your entire body into a shoe box. This took 30 minutes at most. It takes a 1/2" socket only.

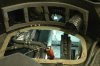
I am 5' 8" on a good day. My pedals were set up to the farthest forward location and I had to slump in the seat to reach them. I had been told that I had one closer location to move them to. This was wrong...I had about 4 closer locations - each at least 1" closer. I think you could be 4' 11" and find a pedal location to suit you.

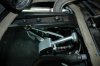
The pedal assembly as installed in my car sat behind a square tube cross brace on the floor. It looked like it could not be moved forward even though there were locations on the four rails to accomodate it. The car has four rails with preset bolt receptacles evenly spaced (two top and two bottom) about ever 1.5". Undo the four bolts and you are given a fairly wide range of movement. I think I am in the middle of the range and they almost feel too close. I might try this location for a while and then push them one position back if needed.

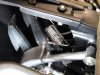
As you move the pedal assy closer, the front left bolt runs out of locations first. However, there is another flange on the left rear of the assembly that lines up easily - thus maintianing four connection points.

Mike
 
Is it possible to adjust the pedals individually? I crawled around a MK II at Monterey this past weekend and found that while the overall position of the pedals was just fine, the relationship between the accelerator and brake was such that heel & toeing would be almost impossible.
 
I can't answer that - the whole assembly moved together. It is tight under there and I did not get a good look. Maybe someone else can chime in...
 
Changing the length of the master cylinder push rods to bias bar would alter the height of the brake pedal. I think the accelerator pedal could also be adjusted if needed
 
The throttle pedal can be adusted, you can change the rod length between the pedal and the fulcrum and the cable and stops can be adjusted to suit.
Dave
 
I have been told that the first slot available from the original position is about 3" to 4" difference due to a rail on the floor that it has to pass... was that the case for you Mike?
 
I originally pulled the bolts like Mike did but an easier way if you’re not vertically challenged like Mike and I (5’ 9” on a really good day) or a contortionist is through the top which is what I did in the end. It requires removing the nose and moving the A/C unit out of the way but really isn’t very hard. I wanted to take a good look around and needed to reinstall the nuts that hold the lower control arm which are also located in that area. Moving the A/C does not require you to discharge/recharge the system. In the 3rd picture you'll see a tube hanging out on the right side of the picture. As you start to swing the A/C unit away and to the left you will have to remove two screws that attach that tube to the A/C unit. After the A/C unit is out of the way there is just a few screws holding the access panel in place. In an attempt to water proof the area there is a gasket under the access panel that feels like it has wax or something on it. I would be carful to disturb it as little as possible. Also you might want to take some pictures of how everything looks as you take it apart as there are wires that can get disconnected. Wonder how I know that?

There are four equally spaced sets of bolt holes four per set two on top and two on the bottom for each possession. The only gotcha I found was if you wanted to move the assembly from the possession behind bar you need to tilt the top of the assembly towards the rear of the car to get it short enough to get it over the bar. Also my holes didn’t line up very well and required some persuasion to get the bolts back in, just another reason not to do it standing on your head.

That doesn't read as well as I whould have liked it but you'll see when you take it apart.

I don’t think there is much you can do with the pivot but there are hyme joints that allow you to adjust the pedal in relation to the brake pedal. See pictures. I also replaced the very heavy return spring with something that didn’t require the legs of a speed skater to push in.
 

Attachments

  • DSC_4729.jpg
    DSC_4729.jpg
    44.8 KB · Views: 882
  • DSC_4720.jpg
    DSC_4720.jpg
    33.7 KB · Views: 934
  • DSC_4732.jpg
    DSC_4732.jpg
    36.9 KB · Views: 975
  • IMG_0185.jpg
    IMG_0185.jpg
    39.1 KB · Views: 955
Last edited:
Getting ready to follow procedure. Have clip off being mod'd so wiper won't rub clip.

Before I jump into procedure, does anyone know, from the factory, how far the pedlas can be moved toward the front of car to allow for more leg room?

Thanx
Mark
 

Seymour Snerd

Lifetime Supporter
Having just done this (to put in Rick Muck's seal kit) here's a quick summary:

1. Remove two 6mm bolt/nut pairs connecting straps at front of fake oil tank. Lift off tank and set aside.
2. Remove three phillips screws at front and center holding down black plastic A/C unit. Minding wires and hoses, push A/C unit down and forward off the big panel. There is one switch with a pair of wires you might want to pull off to get more movement.
3. Remove four 6mm stainless screws holding down panel; lift panel off (as noted: take good care of the underlying gasket).

Voila, all is revealed.

(BTW at the rear edge of the now-revealed opening is a set of three 6mm screws retaining a bracket underneath. On my car all three were loose and one didn't even have a nut. Worth checking and it might fix a rattle).

(And if you're thinking of putting in Rick's sealing kit, now would be the time).
 

Seymour Snerd

Lifetime Supporter
Getting ready to follow procedure. Have clip off being mod'd so wiper won't rub clip.

Before I jump into procedure, does anyone know, from the factory, how far the pedlas can be moved toward the front of car to allow for more leg room?

Thanx
Mark

FWIW On my car the pedals were already at the rearmost position. You should be able to tell if you "dive in" to the footwell with a flashlight. Do your stretching exercises first and shoo away anyone with a camera. :)
 
Hi everyone,

We've been trying to follow the contortionist way of bringing the pedals forward (they're sitting in the farthest position), and there is absolutely no way the pedals can be lifted out of that metal brace thing.
There are railings where we can see the empty bolt holes, but we cannot lift the pedal assembly out from behind that brace.

How did you guys do it?

Now we're sitting with 3 bolts unbolted, plus a screw undone that held some kind of spring that was attached to the gas pedal.

Please help!

Thank you in advance :)
 

Chet Schwer

Lifetime Supporter
Mine has two bolts above that fasten to the "Dash" and 2 bolts that bolt to the track on the floor. It takes a little effort to get the pedals up and over the brace in the floor. Once you are over that brace the floor bolt on the clutch side will need to be moved to the hole in the pedal assembly that is behind the bracket.
 
You have to tilt the pedal assembly by lifting the end closest to the driver effectively shortening the assembly before it will clear the square tube.
 
Yes, thank you :) I re-read the topic, and understood what Richard said a few posts back.
I got over that part, now the problem is that the bottom right bolt doesn't line up with the hole.
The two top ones are all right, but the bottom one doesn't want to cooperate.
I can't do anything with the bottom left, there's no railing there. It wasn't even bolted at all to start with.

EDIT: I understand there is a left lower rear hole too, but our pedal assembly came with only 3 bolts: top right, top left, bottom right.

EDIT2: I tried the bolt hole on the left lower rear side, and it doesn't fit there either.

EDIT3: I also tried putting in the lower bolt first (lower right side [gas pedal side]), but then I couldn't fit the top two...

EDIT4: Is it enough that the two top bolts are bolted in and tightened? Since the bracket is right behind the pedal assembly, and the top two bolts are tightened, I don't see a way for the pedal assembly to move anywhere or not function well when the bottom bolts are not on. The pedal assembly is resting solid on the floor.
 
Last edited:

Doug S.

The protoplasm may be 72, but the spirit is 32!
Lifetime Supporter
Welcome to the trials and trivulations of replica ownership, Minami!

Always something to be done, never finished!

Oh, and we forgot to mention....nothing lines up when they are new, fugettaboudit if things get out of alignment or disassembled.

In the end, though, they are worth it, or why would we do it?

Cheers from Doug!!
 
I had the same problem and ended up going in from the top. It's really not hard. There was a sticky gasket under the access panel but I used some 3M rope seam sealer when I put in back together. I'm looking for some better pictures.
 

Chet Schwer

Lifetime Supporter
I fiddled with the 4 bolts for about 4 hours but finally got all 4 STARTED at the same time and was able to tightnen them all. Lost about 5 pounds in 80 degree garage then drank 4 beers!
Chet
 
Back
Top