SLC 24 Howard Jones

Howard Jones

Supporter
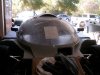
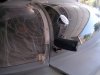
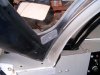
A couple of things, first I was very concerned about giving up any clearance on the inside of the wheel well. The forward most mounting point in just about at the place where the tire has the least clearance vertically. I went so far as to space the flange in the cutout so that even with the added fiberglass underneath I had added a 1/16 inch vertical tire clearance.

Then with the nut plates consuming 3/32 it left me with a "loss" of 1/32 inch total.The nutplate extends downward 1/32 beyond the inside of the wheel well roof. I thought I could live with that.

I had considered using nylocks and washers underneath but the net loss of clearance would have been nearly 1/8 to 3/32s. That doesn't seam like much but if the tire did rub in extreme bump then I would have had a nice deep groove in the tire. 1/32 deep groove wouldn't deflate the tire (I hope), 3/32 is too deep to take a chance with.

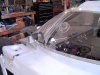
I like the "look" of fasteners on the top of the vents. I also like the look of button socket heads. So I did what I like. Your idea would work but you will need to remove the hardware from under the fender (take tire off).The vent material is only a 1/8 thick. That's not enough material thickness to simply screw a stud into IMHO. A stud plate like this might work for you but I've not used them and they would be prone to spinning unless they are glassed in or glued down. See link below.

The second thing, mine just comes off from the top (ease of maintenance theme again). Both will work, it's up to you what you like I guess.

EZ-POINT NUTS & STUDS from Aircraft Spruce
 
Last edited:

Howard Jones

Supporter
Cabin ventilation and rear view mirrors done. I got the snap vents from Aircraft Spruce and the mirrors are from Pegasus Racing.

The snap vents go in with a simple 3 1/4 hole saw. Cut the hole VERY slow with a variable speed drill. VERY SLOW !!!!(min turning speed). Also once you have the hole bored about half way through, cut from the back side to produce a complete scoring circle all the way around, then go back to the front and finish the hole. This will prevent any possibility of cracking as the saw completes the hole and removes the jagged edge.

Did I say SLOW!

The mirrors are just about right for this car. IMHO. I used convex mirrors on both sides. All you are looking for on track is a presence of a car in a specific place behind you. Convex works perfect for that. They also hold their position very well as they are able to be tightened down so that they can't be moved by hand. The 2 set nuts are on top and from the inside of the car (picture of mounting backing place with hole in it is for hex wrench).

They are not cheap but I didn't want to make my own like some of you successively have.


SNAPVENT® - MODEL CC3251 from Aircraft Spruce

https://www.pegasusautoracing.com/productselection.asp?Product=5196
 

Attachments

  • HPIM2084.jpg
    HPIM2084.jpg
    157.9 KB · Views: 387
  • HPIM2087.jpg
    HPIM2087.jpg
    179.1 KB · Views: 374
  • HPIM2088.jpg
    HPIM2088.jpg
    146.2 KB · Views: 378
  • HPIM2089.jpg
    HPIM2089.jpg
    150.9 KB · Views: 362
Last edited:
Howard

On the mirrors, did you just buy them?

Which version are they?

If these are the ones that only use the screw and an o-ring on top to keep in place, good luck.

We have bought 2 sets from same supplier. First set was 2 yrs ago and I had to make a modification and add a way to clamp the mirrors from turning. Screw and o-ring no go.

The second set came with a modification and a set screw to do what I had done.

I can get a pic or two for you if needed.
 
Howard old style left. (Stainless button head on top). I had to fab up a part to have a setscrew to lock down mirror. The O-ring under mirror housing on top of mounting shaft would not hold mirror.

The new mirror (right) design has a plastic screw and washer on top and is mounted on bottom instead of thru hole and o_ring on top.
 

Howard Jones

Supporter
It looks like mine are the old style. How long did it take for the mirror to loose adjustment?Remember I will be doing 25 min sessions. Or maybe I just make up some of your little dogigies if I need them. Thanks for the idea. No tellin how long it would have taken me to figure that one out.
 
The mirror start to turn the moment you drive at speed. That older mirror design has been a problem for years on every car that goes over 100 mph...

The second problem is the o-ring under the top screw was put on before the mirror was sticky taped in place.

Once you remove the screw and slide the pole out for modification the o-ring falls off.

Really don't need the o-ring after some other mod to keep mirror from turning. A set screw of some kind.

You will relish the challenge...

Post when you figure out your solution..

And duct tape does not count....
 
And duct tape does not count....

That counts me out :(
BUTT, seriously - I have the same type mirror although possibly from a different maker. It still has the lock down screw at the top so my guess it will have the same problem <qwap>

Another way to tell if you're past 100MPH :idea:...your mirrors come out of adjustment.
 

Howard Jones

Supporter
That's funny Don. These mirrors are advertised to be the result of the need (rules) for a larger mirror at Le Mans. What? on the tow truck?
 
But you can always wait till the mirror has a problem before fixing the issue.

Just carry a bit of duct tape until proven a problem.. Just sayin... :)
 

Howard Jones

Supporter
AJ yes, the forward links have LH/RH rodends on each end. I can get +- more than 10 degrees adjustment. Likely we will be in the +- 3 range or less. see pic

Found a couple of water leaks since (loose band clamps) and tuned up the carb a bit as well as moved the water hot idiot light sensor, and the top front steam bleed from the manifold to the thermostat housing. Little stuff.

By the way total water in car was 8 gallons and Oil was 8 Quarts.

What's left? Make front canards, make diffuser/front brake cooling hose mount, make rear upright brake cooling hose mount, make duct for rear brake cooling hose, bleed brakes, bleed clutch, disassemble car for paint, transport for paint, put it all back together, Adjust everything and do alignment on car.Then I need to find a place to run it through the gears and get brake balance close. After that, fix what is wrong.

Aaron, In the back of my mind I am thinking Willow Springs in October could happen. IF I'm not living in Texas at that point.

I intend to take it to Thunder Hill first available track day once I'm ready if that happens sooner.

On top of all that I need to fix my GT40 and buy another trailer, get my house ready for sale, look for a place to live in Texas while I build a house there. And move....................Busy year...............................
 

Attachments

  • HPIM1250.jpg
    HPIM1250.jpg
    221.9 KB · Views: 323
Last edited:
Got a personal audio check today on Howard's car. Not sure why there was music needed in the video, maybe the audio was lacking (?) Fear not the engine sounds like it means business.
 

Attachments

  • 20150405_132805.jpg
    20150405_132805.jpg
    165.3 KB · Views: 337
Back
Top