
You are using an out of date browser. It may not display this or other websites correctly.
You should upgrade or use an alternative browser.
You should upgrade or use an alternative browser.
Ago's scratchbuilt GT40 Mk I
- Thread starter Ago73
- Start date
The 302 short block is now a long block, next step is to source the intake manifold for the quad webers.
I also spent a lot of time looking around for the original air vents but they are really rare, so I opted for 3D printing the internal parts and to mount them into Capri's air vent houses.
View attachment 116769View attachment 116771
I can confirm the Capri vents and the zephyr ones are the same size in terms of ball.
What water pump is that on the engine?
Rest of the build is looking great in the above posts as well.
keep going.
Ryan
Hi Ryan, I have around an in-line Craig electric water pump and I want to use it in my project. To simplify the connection to the engine I decided to use a standard sbf water pump with the front flange for the pulley removed and sealed with a plug, so I can use the water pump connections for plumbing and I remove any risk for the front clearance between the engine and the firewall. This is something that I saw a lot of time ago in a build thread, I cannot remember exactly where, but I liked the idea.
Regards,
Agostino
Regards,
Agostino
I was thinking the same thing.
What do you do for the auxiliary drive belt. Are you just going to run from the crank to the alternator and back again?
Also, what are you going to do for battery placement. I think I want to put mine in the left rear side sill, as per original road cars and have been stuck at this point with the design for the last 6 months as I have had too many other things on the go.
If the battery goes in the passenger foot well there seems to be a few more channels that you need to weld in that are not in the drawings.
Ryan
Yes, the alternator is the only thing I need to drive (no servo or A/C).
For the battery I'm still considering what to do. My original idea was to stay with the road car placement near the left fuel tank, but recently I'm considering to put it at the passenger foot. This second option may require much less work, from the limited info that I have the attachment points are quite simple, a folded channel similar to the rail for the pedal box to create a basement for the battery at the same level of the channel in the front part of the floor and two L shaped channels with a nut welded in the middle to attach the battery fixing bracket. I can send you a drawing as soon as I finish them with the CAD. Moreover the front positioning can allow to simplify the fuel tanks design, I'm planning to build alloy tanks from myself and a single design for both tanks can help to save time.
Agostino
Yes I understand all those points, however mine will foremost be built as a road car so I think I would prefer to have the passenger foot well free. I have seen some good photos and videos of the yellow MK II at the 1966 Ford GT40 MKII | Simeone Foundation Automotive Museum (simeonemuseum.org) that show that foot box details. cant remember where they were at the moment.
Hi Ryan,
you can find some pictures of this solution in Rune's buildlog,
take a look at post #69 and #70.
The second channel looks placed just where the front part of the chassis narrows, with an L folded bracket with the nut hole being attached just at the back of this second channel. The front L with the nut hole for the battery fixing is a little bit behind the floor channel, so the space for the passenger feet is a little bit reduced compared to the driver. I don't know if it makes a big difference for the usability of the second seat, the passenger comfort on a GT40 looks to me a big compromise in any case.
On the other hand the battery tray in the rear of the left fuel tank asks a lot of work, cutting and trimming the final sill rib and building a battery tray that leave access to the connection to the fuel tank that must be designed to have a lateral pick-up connection. There are some nice pictures of what I mean on Gelscoe website in the Mirage GT40 build description.
Agostino
you can find some pictures of this solution in Rune's buildlog,
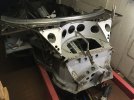
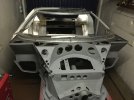
Assembling a Monocoque
Are those stampings the outer roof skin or the inner. Do you have any close up pictures of the inner? All the photos look great. I check everyday to see if you have posted anymore!
www.gt40s.com
take a look at post #69 and #70.
The second channel looks placed just where the front part of the chassis narrows, with an L folded bracket with the nut hole being attached just at the back of this second channel. The front L with the nut hole for the battery fixing is a little bit behind the floor channel, so the space for the passenger feet is a little bit reduced compared to the driver. I don't know if it makes a big difference for the usability of the second seat, the passenger comfort on a GT40 looks to me a big compromise in any case.
On the other hand the battery tray in the rear of the left fuel tank asks a lot of work, cutting and trimming the final sill rib and building a battery tray that leave access to the connection to the fuel tank that must be designed to have a lateral pick-up connection. There are some nice pictures of what I mean on Gelscoe website in the Mirage GT40 build description.
Agostino
How's the build coming along Agostino, long time no update.
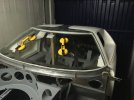
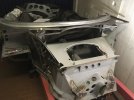
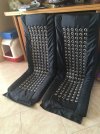
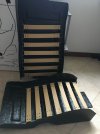
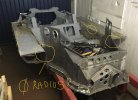
Hi David, the project is still alive and moving forward, I'm just very lazy with the updates. Finally the monocoque is completed with the spider, the windshield and the doors in place. But on these last things I need to do some additional trimming. I have also finished the two seats (thanks to Rune for the excellent seat fabric job). Some pictures below of the front fabrication but not very recent, now I have added the front subframe but I have no pictures yet, I'll take a few over the weekend. Moreover sorry for the pictures always taken from the same perspective, but I have no room to move far away for taking better ones. 
Attachments
Davidmgbv8
Supporter
Great job, where did you get your spyder?
I got all the spider parts (they are about 25 metal sheet parts) and then assembled them together. It took a lot of time for trimming each single part and welding without the correct jig, basically all the single parts had to be positioned together with the windscreen and the doors for trial fitting, then kept together with a lot of clecos and clamps and finally welded trying to avoid any distortion.
Devin
Supporter
I know some of your pain on the spider construction Agostino. Excellent work!I got all the spider parts (they are about 25 metal sheet parts) and then assembled them together. It took a lot of time for trimming each single part and welding without the correct jig, basically all the single parts had to be positioned together with the windscreen and the doors for trial fitting, then kept together with a lot of clecos and clamps and finally welded trying to avoid any distortion.
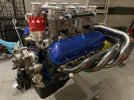
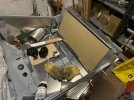
A long time from the last update. There are so many things to do yet, but some parts are finally taking shape. The engine is almost ready with the adapter for the Audi gearbox, in the front of the car I'm trial fitting the parts collected over the last years to see if they match. The plan now is to finish all the front of the car step by step before moving to the rest.
Attachments

I believe he meant what company individual you purchased them from.I got all the spider parts (they are about 25 metal sheet parts) and then assembled them together. It took a lot of time for trimming each single part and welding without the correct jig, basically all the single parts had to be positioned together with the windscreen and the doors for trial fitting, then kept together with a lot of clecos and clamps and finally welded trying to avoid any distortion.
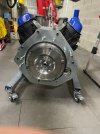
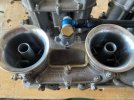
The spider panels should have been fabricated by Goran in Sweden, I've got them form a German guy. It was in 2021, quite some time ago. If someone is interested I can PM the contact for this guy, maybe he can help. By the way I want to thank all the kind and passionate community that keeps GT40 projects like mine alive, providing parts as well as the enthusiasm to continue in such a long trip. Here there are some details of parts sourced in the GT40 community, the 01E adapter and the carburetors.
Attachments
Adrian Starling
Supporter
Similar threads
- Replies
- 21
- Views
- 2K
- Replies
- 3
- Views
- 356