
You are using an out of date browser. It may not display this or other websites correctly.
You should upgrade or use an alternative browser.
You should upgrade or use an alternative browser.
Big-Foot's RCR-40 Build Thread - "SuperCar"
- Thread starter Big-Foot
- Start date

Alex Hirsbrunner
Lifetime Supporter
Hi Guys,
Can you post the IHI starter model you are using?
Ron - did the Hi Torque brand starter you mentioned here:
http://www.gt40s.com/forum/gt40-tec...edicament-3.html?highlight=starter#post198460
not work out? (maybe I am getting confused between IHI and HiTorque/IMI).
Thanks,
Al
Can you post the IHI starter model you are using?
Ron - did the Hi Torque brand starter you mentioned here:
http://www.gt40s.com/forum/gt40-tec...edicament-3.html?highlight=starter#post198460
not work out? (maybe I am getting confused between IHI and HiTorque/IMI).
Thanks,
Al
Randy,
I just visited your website for the first time. your attention to detail is just impressive.
Especially your section on fitting the gearbox will already help me a lot, because i will go with a very similar combo.
I purchased a G50/04 ( same dimensions but i like the gear ratios more than that of the 03) and also the shifter kit is the same. Engine will as well be a 331 with Edelbrock heads, a Super Victor and a single 650 cfm Carb.
Have you thought about using the sideshifter conversions available for this gearboxes ? If yes what are the pro´s and con´s of these ?
@RON and RONNY
I also would be very interested in your choice of starter, could you pm me partnr´s and brand ? Would be great
Thanks from Germany
TOM
HI Fellas,
Thanks for the kind words... Much appreciated!
Here's the starter I bought from the seller on eBay for $120 USD;
eBay Motors: PORSCHE 911 MINI STARTER ALSO 912 / 914 / 930 IMI (item 320209184672 end time Jan-24-08 19:34:01 PST)
I've not yet tried to fit it - It says "Hi Performance of America" cast right into the housing.
(20 minutes later)
Okay - been home bound for 4 days with a nasty cold so don't tell my wife I went out to the shop.. I took some pictures of the starter as compared to the original.
It still doesn't come very close to fitting but it does show some promise. I'll re-drill the bellhousing for one of the studs and weld up a bolt-on bracket similar to Jeff Hamilton's for the second stud.
The drive gear of the new starter is very close in proximity to the mounting face to that of the original.
Here are the pictures..


and finally - the Dyno Sheet;

Thanks for the kind words... Much appreciated!
Here's the starter I bought from the seller on eBay for $120 USD;
eBay Motors: PORSCHE 911 MINI STARTER ALSO 912 / 914 / 930 IMI (item 320209184672 end time Jan-24-08 19:34:01 PST)
I've not yet tried to fit it - It says "Hi Performance of America" cast right into the housing.
(20 minutes later)
Okay - been home bound for 4 days with a nasty cold so don't tell my wife I went out to the shop.. I took some pictures of the starter as compared to the original.
It still doesn't come very close to fitting but it does show some promise. I'll re-drill the bellhousing for one of the studs and weld up a bolt-on bracket similar to Jeff Hamilton's for the second stud.
The drive gear of the new starter is very close in proximity to the mounting face to that of the original.
Here are the pictures..
and finally - the Dyno Sheet;
Oh and Tom about the side shifter - No - I did not even know that one was available. The Brandwood shifter that I have came with the package from RCR as part of the kit. Remember now that the shifter was probably made for a G50/01 which has a different end housing that is shorter and I believe that the shifter mounting brackets were made for the G50/01 and that the In/Out (gear select) cable was actually for the full length G50/03 or 04..
I just engineer and fabricate my way to the degree required..")
Ron - Thanks for showing me that it can be done (image)... Now how did you do it?
I just engineer and fabricate my way to the degree required..
Ron - Thanks for showing me that it can be done (image)... Now how did you do it?
With work being relentless and my mother being extremely ill and requiring full time care from the family - I've not made the progress I had hoped for.
I have made many updates to my website http://www.GT-Forty.com with some of my work. The latest update is the Porsche G50 Competition Transaxle Support. I'm going to put up another post with more pictures and you can visit my website to get pretty much all the information you need to create one for yourself.
Here's a picture of one of the support struts in position.
Still only minor updates to post given the work/family situation but am going to be taking a few days off next week and hope to get a lot more accomplished with the next delivery from RCR in a few days.
Today I can report that I purchased the Weber 48-IDA setup from Jack Houpe here on the forum. Pictures forthcoming.
Also I've finalized the rear motor mounts to help support the adapter plate since I had to move the engine forward a couple of inches to make my non-standard G50/03 transaxle work. These rear mounts were made from a single RCR Engine mount.
GT-Forty.com
Also - Since I could not find a suitable ready-made part - I've started fabricating an Alternator mounting system to mount the 1-wire Delphi 130 amp alternator down low on the right side of the engine. More pictures will be posted to my website later..
Attachments
Been a while since my last post here... I've still not been able to spend the time away from job and family to get a lot accomplished - BUT - I slowly chip away....
I've been keeping my Build-Site http://www.GT-Forty.com as up to date as possible while I sit with Mom or winding down at home in the evening.
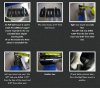
Latest accomplishment is the work on a remounting the Gear-Reduction starter on the G50 Transaxle to clear the RCR Chassis.
Much the same as Ron Earp and Jeff Hamilton, I have relocated my engine further forward to keep the longer G50/03 transaxle inside the body..
See this post to see the issues Ron and Jeff had and how they addressed them;
http://www.gt40s.com/forum/gt40-tech-fueling-electrics/22079-porsche-930-starter-predicament-2.html
I don't know how many pictures it will allow me to post so you may want to just check my Build-Site and click on Starter. (here's the link)
GT-Forty.com
Standard clocking

Desired clocking

A long way from bolting up here

Need a new mounting hole here

But it's kind of thin - I hope I can install a stud (bolt) from the inside but I don't know if I'll have a clearance problem with the pressure plate yet.

I used a transfer punch to locate the point on the block plate where I will run the second starter mounting bolt

Now that I figured out how to re-mount the starter, I knew that one bolt was in a thing housing and the other was extended out 4.350" from the block-plate. I needed to figure out how to control the 525 Ft Lb rated starter from twisting from the torque. Below is the beginning of what I call a Torque Strap-Clamp. It will help control the counter clockwise torque reaction of the starter and also offer some additional clamping pressure to the starter mounting boss.

I decided that I needed to extend the torque strap-clamp to the block plate where I will ultimately bolt it in place. This is the first cut as I continue designing on the fly;

Yes it's crusty old angle iron but it will work just fine.

Cleaned up some and dropped into position

Here you can see that I spent a lot of time to actually match the contours of the housings. I knew that I needed to have a very close fit with tight tolerances in order to keep it from shaking itself to bits

First cut at the spacers needed. The one on the left is just a few thousandths shorter than the height of the starter mounting boss. This will allow the torque strap-clamp to be tightened without collapsing.
The spacer on the right is alloy and is 4.350" with a 7/16" hole that will transfer the clamping force from the starter mounting boss through the spacer to the block plate.

Alloy spacer in position

I had to file reliefs in the spacer to clear the bellhousing. I kept these tolerances very close as I may decide to weld the alloy spacer to the housing in the future.

The Clamp spacer required a touch of work as well to clear the radius contour of the bend in the angle iron.

Bolts to be used are GR8 7/16 (because I have them and 12.9 metrics are a PITB to procure here).
If you check my build site, there is more information that may interest you on this as well as other parts I have fabricated for my build.
I've been keeping my Build-Site http://www.GT-Forty.com as up to date as possible while I sit with Mom or winding down at home in the evening.
Latest accomplishment is the work on a remounting the Gear-Reduction starter on the G50 Transaxle to clear the RCR Chassis.
Much the same as Ron Earp and Jeff Hamilton, I have relocated my engine further forward to keep the longer G50/03 transaxle inside the body..
See this post to see the issues Ron and Jeff had and how they addressed them;
http://www.gt40s.com/forum/gt40-tech-fueling-electrics/22079-porsche-930-starter-predicament-2.html
I don't know how many pictures it will allow me to post so you may want to just check my Build-Site and click on Starter. (here's the link)
GT-Forty.com
Standard clocking
Desired clocking
A long way from bolting up here
Need a new mounting hole here
But it's kind of thin - I hope I can install a stud (bolt) from the inside but I don't know if I'll have a clearance problem with the pressure plate yet.
I used a transfer punch to locate the point on the block plate where I will run the second starter mounting bolt
Now that I figured out how to re-mount the starter, I knew that one bolt was in a thing housing and the other was extended out 4.350" from the block-plate. I needed to figure out how to control the 525 Ft Lb rated starter from twisting from the torque. Below is the beginning of what I call a Torque Strap-Clamp. It will help control the counter clockwise torque reaction of the starter and also offer some additional clamping pressure to the starter mounting boss.
I decided that I needed to extend the torque strap-clamp to the block plate where I will ultimately bolt it in place. This is the first cut as I continue designing on the fly;
Yes it's crusty old angle iron but it will work just fine.
Cleaned up some and dropped into position
Here you can see that I spent a lot of time to actually match the contours of the housings. I knew that I needed to have a very close fit with tight tolerances in order to keep it from shaking itself to bits
First cut at the spacers needed. The one on the left is just a few thousandths shorter than the height of the starter mounting boss. This will allow the torque strap-clamp to be tightened without collapsing.
The spacer on the right is alloy and is 4.350" with a 7/16" hole that will transfer the clamping force from the starter mounting boss through the spacer to the block plate.
Alloy spacer in position
I had to file reliefs in the spacer to clear the bellhousing. I kept these tolerances very close as I may decide to weld the alloy spacer to the housing in the future.
The Clamp spacer required a touch of work as well to clear the radius contour of the bend in the angle iron.
Bolts to be used are GR8 7/16 (because I have them and 12.9 metrics are a PITB to procure here).
If you check my build site, there is more information that may interest you on this as well as other parts I have fabricated for my build.
Just back from the Engine Dyno (Superflow 902) at R&R Performance.
I can only post quick numbers right now as I am headed right back out the door to go instruct at the Drivers School.. I'll be back online tonight but won't be able to do scans of the dyno sheets or post pictures / video (yes video!) until this weekend..
Engine is a 331 with Dart Pro1-170 Heads, 10:1 compression, Weber 48IDA carbs 37mm chokes, Inglese "Weber grind" Roller cam with 115LC, 222/224 duration @ .050, .571 Intake, .565 Exhaust. Dyno long primary headers.
After a bit of Jet tuning (Thanks Jac-Mac you really helped out a bunch here) we threw down some pretty good numbers although a bit shy of the hoped for 450 HP the Torque was well above expectations.
414 HP / 430 TQ
We need to revisit the valve springs and/or push rods as she had valve float at 5900. The power band started nosing over around 5700 anyway..
Either way - the engine idled very well - not real choppy but enough of a lump to let you know that something stronger than the family station wagon is lurking...
Throttle response was very crisp.
More later!
Hi Guys,
I'm actually very pleased with the engine. I will be getting hold of Inglese and Comp Cams to talk with them about the valve float and will take the appropriate action to get the useable RPM range up a ways higher..
Dave Engel from Carriage House Custom Automotive designed and built the engine and I am very impressed with the quality of his work..
Since my job has be doing backflips all day and handstands half the night - there just wasn't the time to do the deed myself.
Remember that these are small port heads with small valves - this engine will be very driveable and in the lightweight GT40, it ought to have some very good acceleration.. The 180 degree headers should really help pick it up even further but since we can't fit them on the dyno, there's no real way to test them..
Now that I'm home - I'll work on getting the Dyno sheets scanned and the video captured...
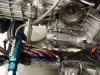
Meanwhile - Here's Ron of R&R Performance tweaking the fuel mixture on the Webers..

I'm actually very pleased with the engine. I will be getting hold of Inglese and Comp Cams to talk with them about the valve float and will take the appropriate action to get the useable RPM range up a ways higher..
Dave Engel from Carriage House Custom Automotive designed and built the engine and I am very impressed with the quality of his work..
Since my job has be doing backflips all day and handstands half the night - there just wasn't the time to do the deed myself.
Remember that these are small port heads with small valves - this engine will be very driveable and in the lightweight GT40, it ought to have some very good acceleration.. The 180 degree headers should really help pick it up even further but since we can't fit them on the dyno, there's no real way to test them..
Now that I'm home - I'll work on getting the Dyno sheets scanned and the video captured...
Meanwhile - Here's Ron of R&R Performance tweaking the fuel mixture on the Webers..
what was your final jetting on the 331?
Here they are guys...
Yes - I know that we could have been just a tad leaner, but we didn't know what the 180 exhaust would do and we're still not done as the Valve springs and pushrods will most likely be replaced. Also - We did not have the right idle jets or correctors with us. The 120 Idle holder would not accept the smaller size idle jets that came in the kit.
Final Jetting / Air Correction was;
F7 Emulsion tube, 145 Main Jet, 120 Air Corrector, 120 Idle Holder, 70 Idle Jet
It was interesting that this engine does not like a lot of timing. The power started dropping off at 31 degrees and a lot more at 32 degrees. No detonation present or noted. The fuel used was 92 Octane pump gas. 3.5 PSI fuel pressure.


Still some tuning to be done...
Yes - I know that we could have been just a tad leaner, but we didn't know what the 180 exhaust would do and we're still not done as the Valve springs and pushrods will most likely be replaced. Also - We did not have the right idle jets or correctors with us. The 120 Idle holder would not accept the smaller size idle jets that came in the kit.
Final Jetting / Air Correction was;
F7 Emulsion tube, 145 Main Jet, 120 Air Corrector, 120 Idle Holder, 70 Idle Jet
It was interesting that this engine does not like a lot of timing. The power started dropping off at 31 degrees and a lot more at 32 degrees. No detonation present or noted. The fuel used was 92 Octane pump gas. 3.5 PSI fuel pressure.
Still some tuning to be done...
that is a very unusual jetting for a small block engine , but it is hard to argue with the results. I am particularly suprised that it is not rich with those big idle jets and the F7 tubes and the small air correctors. but again the numbers do not lie. I may give that combo a try, although mine is a 302 so some adjusting will be in order.
Randy,
Did you ever get the starter question answered? I got the info from Ron Earp and ordered the Hi Torque starter with the lengthened nose piece. Then we noticed it would interfere with the CVs, as it sat too high. It fit well, but it could not be clocked in the right direction. It has about 4 or so positions it can be clocked to. The position it came with was the best(or the lowest). When we inverted it 180, it hit the fins on the trans. We cured that problem with grinding the fins down a bit. The engine should be fired up next week(I hope).
Bill
Attachments
After all that work installing a starter I think I would buy one or two spares. I would hate to have that one fail and not be able to find an identical replacement.
Hi Bill,
I don't know how well my re-clocked starter will work (yet) but I can tell you that it will clear the CV/Axle - that's one of the things I checked for when I have everything bolted into the car..
Jonathan - Not a bad idea! Although I would like to confirm that everything works as well as I think it will...
Chuck - I would give the 135 main jets a try.. You should be pretty close..
What you're really doing is just tuning the fuel to how much air the carbs will pass. The carbs don't know if they are on a 302 or a 427. As long as you can pull a few inches of vacuum at WOT - the carbs will work just fine. I don't think anything larger than the 37mm chokes that are in mine would make much of a difference unless I had a cam that would flow more air..
What you're really doing is just tuning the fuel to how much air the carbs will pass. The carbs don't know if they are on a 302 or a 427. As long as you can pull a few inches of vacuum at WOT - the carbs will work just fine. I don't think anything larger than the 37mm chokes that are in mine would make much of a difference unless I had a cam that would flow more air..
Update -
Body fitting started this weekend.. I am not having as good of a time as some others..
I wrenched my back while man-handling the rear clip by myself...
Also - It seems that my Spider has somehow gotten Z'd.. When looking at it from the rear, it is a good 3/8" deformed to the right side of the car.
I've currently got it forced into position where it comes "close" to mating with the rear clip and I intend on hitting it with a heat-gun to see if I can get the fiberglass to move and take a new set.
I also started fitting the dash. There was a lot of interference with the bottoms of the A-Pillars. Rather than carve up the A-Pillars to clear the dash, I carved up the dash itself.. A lot of fiberglass dust ensued and a couple of pretty good sized holes.
I know I will need to cut up the dash even more once I start fabricating the Rollcage.
Started out by cutting off 1.25" off the bottom of the right side dashboard leg and .750" off the left side's leg.
Here's the right side leg;


Now with the dash in the car - the spider would not fit;

So it was time to start carving up the dash;


Whups! Looks like the steering needs to be centered.. I plan on re-working the shafts / joints to get the shaft up a little higher to clear my size 13's anyway

I've probably got a good 3-4 weeks of eating fiberglass dust ahead of me before I will have things where I need them to be.. I really hope that the spider will settle into place.
Body fitting started this weekend.. I am not having as good of a time as some others..
I wrenched my back while man-handling the rear clip by myself...
Also - It seems that my Spider has somehow gotten Z'd.. When looking at it from the rear, it is a good 3/8" deformed to the right side of the car.
I've currently got it forced into position where it comes "close" to mating with the rear clip and I intend on hitting it with a heat-gun to see if I can get the fiberglass to move and take a new set.
I also started fitting the dash. There was a lot of interference with the bottoms of the A-Pillars. Rather than carve up the A-Pillars to clear the dash, I carved up the dash itself.. A lot of fiberglass dust ensued and a couple of pretty good sized holes.
I know I will need to cut up the dash even more once I start fabricating the Rollcage.
Started out by cutting off 1.25" off the bottom of the right side dashboard leg and .750" off the left side's leg.
Here's the right side leg;
Now with the dash in the car - the spider would not fit;
So it was time to start carving up the dash;
Whups! Looks like the steering needs to be centered.. I plan on re-working the shafts / joints to get the shaft up a little higher to clear my size 13's anyway
I've probably got a good 3-4 weeks of eating fiberglass dust ahead of me before I will have things where I need them to be.. I really hope that the spider will settle into place.
Great progress Randy
I had to do a fair amount of cutting on my dash as well where the A-pillars meet the dash. I think everybody has to do this. I also had to extend the front edge about 1/2" so it would mate up with spider. But this was because mine is a RHD car and the dash is from an original.
I had to do a fair amount of cutting on my dash as well where the A-pillars meet the dash. I think everybody has to do this. I also had to extend the front edge about 1/2" so it would mate up with spider. But this was because mine is a RHD car and the dash is from an original.