Bobs GTD

Hi Bob
Very nice, just one remark from my side.
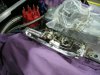
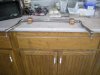
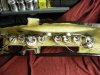
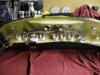
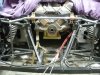
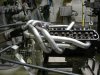
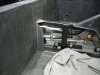
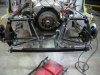
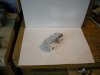
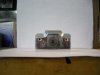
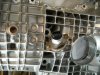
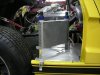
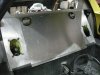
Put the MSD inside of the car it is in no way waterproof. I have bad experience with it as it sucked up water and made a shortcut, totally destroid.
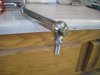
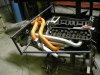
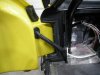
The second one ( as for wireing reasons I can't change the location now) I opend up and sealed it with silicon but I still cover it with a bag on very rainy days or during washing the car.
Cheers
Carlos
 
Carlos,
Excellent advice I will make a water proof cover for it to seal it up. I don't really want to put it inside the car no room as it is in there plus then you have to seal the holes to it.
Thanks,
Bob
 
Ha All,
I was able to get the throttle linkage done this weekend, what a pain in the a** that was but its in and works ok.
See Ya,
Bob
 

Attachments

  • DSCN0523.jpg
    DSCN0523.jpg
    49.6 KB · Views: 423
  • DSCN0524.jpg
    DSCN0524.jpg
    50.1 KB · Views: 380
Ha All,
I was able to get the throttle linkage done this weekend, what a pain in the a** that was but its in and works ok.
See Ya,
Bob

Hi Bob,
if you are going to route the cable over or close to the exhaust it will melt away.....

What I did to prevent any contact is, I just placed the cable as it is into a aluminum tube, and made a big loop over the exhaust so it stays away ....The tube ends in the center tunnel, and has some supporting brackets


Cheers
skeleton
 

Attachments

  • IMG_0068.jpg
    IMG_0068.jpg
    48.7 KB · Views: 454
Skeleton,
Yes I'm sure I will have to do some final adjustments to the cable but I'll wait to do that after the headers are in the car, because my headers don't look or fit exactly like yours do, but thanks for the input and keep checking on the progress.
Bob
 

Randy V

Moderator-Admin
Staff member
Admin
Lifetime Supporter
Or you could turn the carb around and have the cable come in from the front..

Nice work Bob!!
 
Cheers All,
I was going to get my rear sway bar ready to mount but when I looked at the ends I was disappointed to say the least. Who ever did this used little wimpy 5/16 " threads and they weren't even in the center of the shaft. So I got the mill all set up and modified them to accept a 1/2"-20 tap and new heim ends and there you have it, A lot beefier set up than the original. that's it for now.
See ya,
Bob
 

Attachments

  • DSCN0543.jpg
    DSCN0543.jpg
    53 KB · Views: 381
  • DSCN0544.jpg
    DSCN0544.jpg
    42.4 KB · Views: 367
  • DSCN0545.jpg
    DSCN0545.jpg
    41.9 KB · Views: 356
  • DSCN0546.jpg
    DSCN0546.jpg
    38 KB · Views: 359
Ha All,
Got the rear sway bar finished just needs powder coating, and was able to get a good start on wiring the dash. That's it for now.
See Ya,
Bob
 

Attachments

  • DSCN0549.jpg
    DSCN0549.jpg
    62.5 KB · Views: 414
  • DSCN0547.jpg
    DSCN0547.jpg
    50.3 KB · Views: 344
  • DSCN0548.jpg
    DSCN0548.jpg
    47.8 KB · Views: 371
Ha All,
I was able to get to my buddy's shop on Friday and spend 3 days working on my headers. Unfortunately I ran out of J bends on Sunday or I mite have finished them, I guess next weekend is going to have to do, I ordered more J bends and will finish them than. I used the IC engineworks kit to mock up the tubes, boy does that work slick really helps take a lot of guess work and trial and error out of the equation. After they are finished they are going to be ceramic coated and finally put on for good. I'll post more pics next weekend when finished, so far about 22 Hrs. in them
See Ya,
Bob
 

Attachments

  • DSCN0555.jpg
    DSCN0555.jpg
    47.3 KB · Views: 446
  • DSCN0556.jpg
    DSCN0556.jpg
    48.7 KB · Views: 410
  • DSCN0557.jpg
    DSCN0557.jpg
    49.4 KB · Views: 391
  • DSCN0558.jpg
    DSCN0558.jpg
    53.2 KB · Views: 412
Ha Again,
Well its snowing like crazy here so I was able to get my door seals finished today, I'm not crazy about the foam look so I did mine a little different.
See Ya,
Bob
 

Attachments

  • DSCN0559.jpg
    DSCN0559.jpg
    35.4 KB · Views: 372
  • DSCN0560.jpg
    DSCN0560.jpg
    42.8 KB · Views: 374
Ha All,
Well my headers are finally home and ready for fitment to the car, and from the pics attached you can see that they fit quite nicely. Tomorrow I will finish weld them and then they are off to get ceramic coated then finally put on for good. This was quite the undertaking but I,m very pleased with the way they turned out. If anyone is interested I have 35 Hours invested in them and about 200 bucks in j bends. I'll post more pics when they are ceramic coated but for now got to go.
See Ya,
Bob
 

Attachments

  • DSCN0561.jpg
    DSCN0561.jpg
    42.5 KB · Views: 335
  • DSCN0562.jpg
    DSCN0562.jpg
    60.4 KB · Views: 342
  • DSCN0563.jpg
    DSCN0563.jpg
    55 KB · Views: 340
  • DSCN0564.jpg
    DSCN0564.jpg
    50.9 KB · Views: 351
  • DSCN0565.jpg
    DSCN0565.jpg
    57.1 KB · Views: 354
  • DSCN0567.jpg
    DSCN0567.jpg
    56.9 KB · Views: 362
HI Bob Have you had the rear clip on with these ???? I had to remove all the strait pipe from the collectors to shorten the exhaust to clear the clip when tilting it up. Lookin Good. Wally
 
Ha Wally,
Took a few pics with the rear bonet on to show that it does work, I set this up long before I made the pipes so I was confident that it would work. Thanks for the concern its always nice to have another set of eyes look at something just in case you miss something.
See Ya ,
Bob
 

Attachments

  • DSCN0568.jpg
    DSCN0568.jpg
    44.3 KB · Views: 333
  • DSCN0569.jpg
    DSCN0569.jpg
    52.1 KB · Views: 364
Ha All,
Well I was rather busy this weekend and got a lot done. It is presently snowing here in Wisconsin, expected to get 12 to 18 inches of snow so I have a little time to post. I mounted the flywheel and the clutch finished mods on the adapter mounted the starter built the bracket for the slave cylinder and got the LED taillights back and mounted. Please check out the pics and I'll see ya later.
Bob
 

Attachments

  • DSCN0570.jpg
    DSCN0570.jpg
    51.7 KB · Views: 314
  • DSCN0571.jpg
    DSCN0571.jpg
    41.2 KB · Views: 299
  • DSCN0572.jpg
    DSCN0572.jpg
    38.1 KB · Views: 282
  • DSCN0573.jpg
    DSCN0573.jpg
    33.8 KB · Views: 344
  • DSCN0574.jpg
    DSCN0574.jpg
    36.1 KB · Views: 307
Ha Again,
Well I finished the rework on the E-brake system, it is now on both rear calipers like it should be. I also finished the clutch slave cyl. mounting just need to send the bracket out for blue anodizing and it's done, That's it for now
See Ya,
Bob
 

Attachments

  • DSCN0580.jpg
    DSCN0580.jpg
    50.7 KB · Views: 270
  • DSCN0581.jpg
    DSCN0581.jpg
    54.4 KB · Views: 264
  • DSCN0582.jpg
    DSCN0582.jpg
    39.1 KB · Views: 266
  • DSCN0583.jpg
    DSCN0583.jpg
    54 KB · Views: 295
  • DSCN0584.jpg
    DSCN0584.jpg
    54.8 KB · Views: 268
OK so I changed my mind, I was just going to clean up the slave cly. bracket a little for anodizing but when I got to look at it I decided to just keep on polishing and there it is done.
See Ya,
Bob
PS check out the reflection of the camera in the picture, pretty cool.
 

Attachments

  • DSCN0585.jpg
    DSCN0585.jpg
    24.7 KB · Views: 262
  • DSCN0586.jpg
    DSCN0586.jpg
    22.1 KB · Views: 270
Ha All,
Well once again it's snowing like crazy here so I have time to get caught up with my build thread. Anyway I got my VDO speedo sender modified and installed on the trans. this was a standard GM sender and with just a little machining on the outside and it fits and works well. I also was able to get the trans. oil cooler mounted. The first of the interior dash switches are mounted the ignition switch and the start button. The last thing I got finished was the interior engine cover, I was able to get sound deadening and heat barrier in the cover. Well that's all for now time to go plow snow!!!
See Ya,
Bob
 

Attachments

  • DSCN0588.jpg
    DSCN0588.jpg
    49.7 KB · Views: 266
  • DSCN0592.jpg
    DSCN0592.jpg
    48.8 KB · Views: 291
  • DSCN0593.jpg
    DSCN0593.jpg
    38.7 KB · Views: 265
  • DSCN0594.jpg
    DSCN0594.jpg
    38.6 KB · Views: 262
Back
Top