
You are using an out of date browser. It may not display this or other websites correctly.
You should upgrade or use an alternative browser.
You should upgrade or use an alternative browser.
Bobs GTD
- Thread starter Bobs 9401
- Start date
Simon,
I guess nothing else needs to be said!
Thanks,
Bob
I guess nothing else needs to be said!
Thanks,
Bob
Guys,
Thanks for all the encouragement fellas, I'll be posting more soon.
Bob
Thanks for all the encouragement fellas, I'll be posting more soon.
Bob
Ha All,
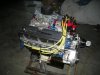
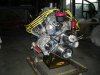
I just had to post a few pics of my new acquisition its a 347 stroker with a ford motorsports block I got this as it sits with everything on it and all the paperwork to go with it. Got an excellent deal on it.
See ya,
Bob
I just had to post a few pics of my new acquisition its a 347 stroker with a ford motorsports block I got this as it sits with everything on it and all the paperwork to go with it. Got an excellent deal on it.
See ya,
Bob
Attachments
Ha Craig,
Sure come on over and lets talk about 40s PM me and I'll give you my address, what a small world hey!
Bob
Sure come on over and lets talk about 40s PM me and I'll give you my address, what a small world hey!
Bob

Hi All,
Well the last couple of weekends I have been busy working on the car, so here is what I have done.
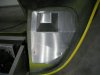
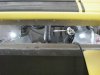
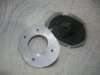
1) I had to make Alum. inner fender covers for the headlights, because they stuck out of the enclosed area they fit in,the pictures explain better than I can, so I welded up some boxes to cover them up.
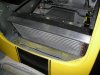
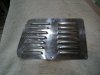
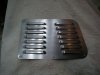
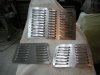
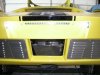
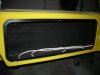
2) The louvered panels I got with the car were polished (somewhat) stainless steel, but I personally like the brushed stainless look better, so there they are all brushed and ready.
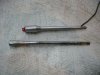
3) I made a stainless steel turn signal arm with my high/low beam headlight button built in the end, should be very convenient to get to, no fumbling around with trying to find a foot switch or a dash mounted switch.
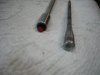
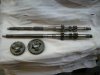
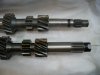
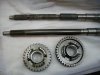
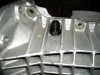
4) And finally after a year of engineering and back and forth with drawings and dimensions, I got my single piece input shaft and new first and second gears for my UN1 box, I can't wait to get it put together , and by the way does anyone see anything different about my 1 piece shaft? Notice that the first gear on the input shaft is NOT a straight cut gear! And they said it couldn't be done, Wrong here it is.
I look forward to any and all feedback.
Thanks,
Bob
Well the last couple of weekends I have been busy working on the car, so here is what I have done.
1) I had to make Alum. inner fender covers for the headlights, because they stuck out of the enclosed area they fit in,the pictures explain better than I can, so I welded up some boxes to cover them up.
2) The louvered panels I got with the car were polished (somewhat) stainless steel, but I personally like the brushed stainless look better, so there they are all brushed and ready.
3) I made a stainless steel turn signal arm with my high/low beam headlight button built in the end, should be very convenient to get to, no fumbling around with trying to find a foot switch or a dash mounted switch.
4) And finally after a year of engineering and back and forth with drawings and dimensions, I got my single piece input shaft and new first and second gears for my UN1 box, I can't wait to get it put together , and by the way does anyone see anything different about my 1 piece shaft? Notice that the first gear on the input shaft is NOT a straight cut gear! And they said it couldn't be done, Wrong here it is.
I look forward to any and all feedback.
Thanks,
Bob
Attachments
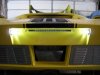
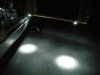
Happy Holidays To All,
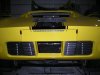
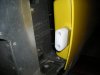
Well I did get a chance to do a little work on the 40 over the holiday, I put in the fittings for my trans cooler, mounted my louvers and check out the cool LED license plate lights and the interior lights, these things only draw 30 milla-amps each. Well its snowing like crazy here so I have to go plow.
See ya Later,
Bob
Attachments
Wally I PMed you.
Bob
Bob
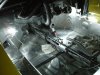
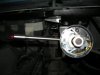
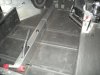
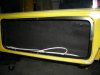
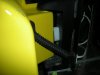
This weekend I made a new bulkhead flange for the steering column the old one was a piece of crap, its amazing what you can do with a few pieces of steel and a hammer. next was the sound deadening material I got that all put in and then the door rubber boots you see in the last pic will be mounted this week.
See ya ,
Bob
See ya ,
Bob
Attachments
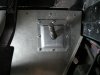
Ha All,
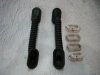
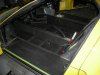
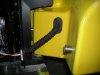
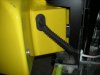
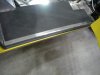
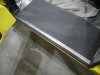
Well I did manage to get in the rubber boots to the doors as you can see by the pics and I also made new door stops, I was not a real fan of the limit strap look as seen on a lot of cars, my father in laws model A ford has those and I think its ugly so I redesigned my own. They seem to work just fine but time will tell ! Well back to work.
See Ya,
Bob
Attachments
Similar threads
- Replies
- 11
- Views
- 869
- Replies
- 2
- Views
- 561