Cheshire SGT build

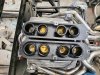
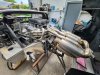
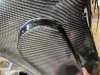
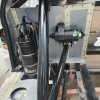
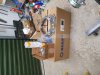
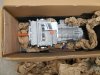
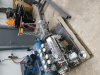
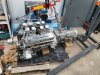
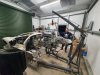
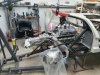
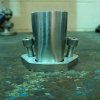
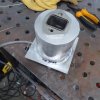
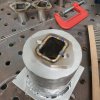
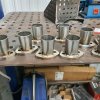
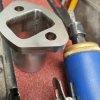
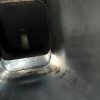
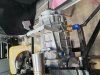
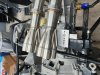
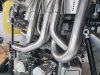
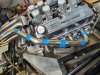
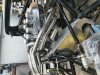
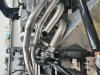
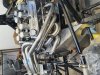
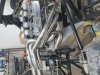
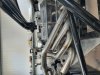
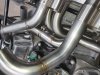
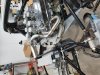
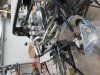
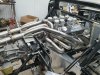
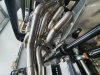
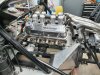
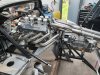
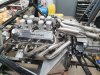
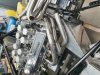
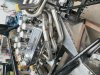
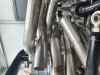
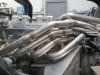
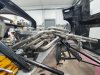
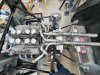
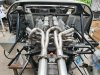
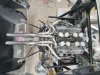
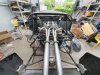
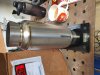
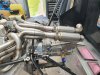
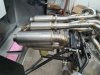
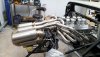
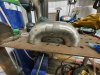
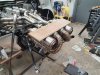
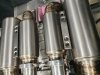
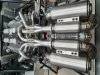
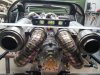
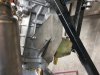
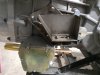
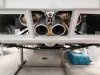
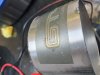
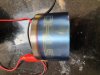
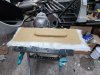
Had to wait a while for the gearbox as quaife were making some changes to it after a few issues but once it arrived got it mated to the engine and in place in the car so I could start on the exhaust

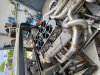
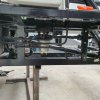
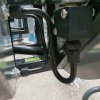
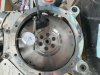
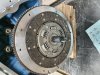
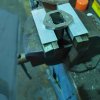
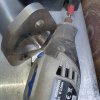
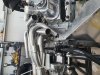
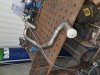
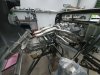
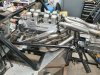
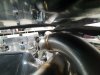
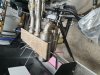
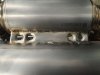
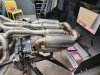
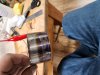
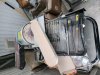
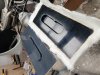
Hasn't got a clutch release at the moment, I want to do a hydraulic throw out bearing but nothing off the shelf so need to come up with a solution for that once it's out the car again
 

Attachments

  • 20220224_115530.jpg
    20220224_115530.jpg
    575 KB · Views: 128
  • 20220224_115954.jpg
    20220224_115954.jpg
    447.6 KB · Views: 133
  • 20220225_131828.jpg
    20220225_131828.jpg
    538 KB · Views: 111
  • 20220303_131912.jpg
    20220303_131912.jpg
    544.9 KB · Views: 101
  • 20220303_134147.jpg
    20220303_134147.jpg
    480 KB · Views: 101
  • 20220303_151341.jpg
    20220303_151341.jpg
    439.6 KB · Views: 115
  • 20220315_170553.jpg
    20220315_170553.jpg
    573.6 KB · Views: 126
  • 20220318_185010.jpg
    20220318_185010.jpg
    439.9 KB · Views: 111
  • 20220323_151000.jpg
    20220323_151000.jpg
    514.2 KB · Views: 113
  • 20220402_162905.jpg
    20220402_162905.jpg
    496.9 KB · Views: 121
Got some stainless exhaust flanges sent over from the states and made some bits to allow me to backpurge whilst welding them up which seemed to work quite well I thin flatted the flanges off again with a file and the belt sander and port matched the insides with a die grinder and dremel
 

Attachments

  • IMG_20210419_153446_203.jpg
    IMG_20210419_153446_203.jpg
    213.1 KB · Views: 113
  • IMG_20210419_153446_278.jpg
    IMG_20210419_153446_278.jpg
    165 KB · Views: 98
  • IMG_20210419_153446_252.jpg
    IMG_20210419_153446_252.jpg
    184.2 KB · Views: 98
  • IMG_20210419_153446_163.jpg
    IMG_20210419_153446_163.jpg
    210.3 KB · Views: 99
  • IMG_20210419_195351_871.jpg
    IMG_20210419_195351_871.jpg
    211.9 KB · Views: 105
  • IMG_20210420_144257_331.jpg
    IMG_20210420_144257_331.jpg
    284.4 KB · Views: 98
  • IMG_20210420_144257_303.jpg
    IMG_20210420_144257_303.jpg
    313.7 KB · Views: 95
  • IMG_20210420_144257_271.jpg
    IMG_20210420_144257_271.jpg
    393 KB · Views: 91
  • IMG_20210421_155134_684.jpg
    IMG_20210421_155134_684.jpg
    231.6 KB · Views: 87
  • IMG_20210421_183929_414.jpg
    IMG_20210421_183929_414.jpg
    251.4 KB · Views: 91
Some more pics
 

Attachments

  • IMG_20210421_155134_725.jpg
    IMG_20210421_155134_725.jpg
    312.2 KB · Views: 96
  • IMG_20210421_155134_710.jpg
    IMG_20210421_155134_710.jpg
    223.7 KB · Views: 91
  • IMG_20210421_155134_745.jpg
    IMG_20210421_155134_745.jpg
    193.2 KB · Views: 97
  • IMG_20210421_155134_763.jpg
    IMG_20210421_155134_763.jpg
    137.4 KB · Views: 104
Started the exhaust work .... I'm not planning on strait pipes by the way just using the tubes to get the collectors lined up and in the right place :D

I tig welded the v bands on the collectors and made some brackets off the gearbox to hold the position of them nice and strait and at the right height then started mocking up how to get all the tubes out to the right banks
 

Attachments

  • 20220414_195208.jpg
    20220414_195208.jpg
    411.7 KB · Views: 99
  • 20220414_214856.jpg
    20220414_214856.jpg
    371.3 KB · Views: 100
  • 20220415_111452.jpg
    20220415_111452.jpg
    687.1 KB · Views: 96
  • 20220416_161115.jpg
    20220416_161115.jpg
    434.5 KB · Views: 106
  • 20220415_150122.jpg
    20220415_150122.jpg
    382 KB · Views: 98
  • 20220416_161228.jpg
    20220416_161228.jpg
    444.5 KB · Views: 103
  • 20220426_195720.jpg
    20220426_195720.jpg
    466.6 KB · Views: 104
  • 20220427_165846.jpg
    20220427_165846.jpg
    419.3 KB · Views: 87
  • 20220427_183924.jpg
    20220427_183924.jpg
    433.1 KB · Views: 88
  • 20220427_183931.jpg
    20220427_183931.jpg
    419.4 KB · Views: 93
Then started working tube by tube to get them in place its not easy trying to get clearance and keep it neat

The wire insulation was to try and keep them all as close to equal length as possible

Once tacked in place I took each tube off and tig welded with a backpurge so they are all hopefully nice and strong
 

Attachments

  • 20220428_184025.jpg
    20220428_184025.jpg
    518.2 KB · Views: 92
  • 20220429_111628.jpg
    20220429_111628.jpg
    535.4 KB · Views: 86
  • 20220429_131447.jpg
    20220429_131447.jpg
    581.3 KB · Views: 90
  • 20220429_131450.jpg
    20220429_131450.jpg
    311.1 KB · Views: 92
  • 20220430_204929.jpg
    20220430_204929.jpg
    467 KB · Views: 93
  • 20220502_152717.jpg
    20220502_152717.jpg
    319.7 KB · Views: 89
  • 20220502_165030.jpg
    20220502_165030.jpg
    472.6 KB · Views: 88
  • 20220505_154836.jpg
    20220505_154836.jpg
    462.8 KB · Views: 93
  • 20220507_111918.jpg
    20220507_111918.jpg
    550.9 KB · Views: 86
  • 20220507_191727.jpg
    20220507_191727.jpg
    445.8 KB · Views: 84
Sorry if the pics aren't very organised it was a while ago and I'm uploading them all from my phone
 

Attachments

  • 20220505_151921.jpg
    20220505_151921.jpg
    430.9 KB · Views: 94
  • 20220505_190751.jpg
    20220505_190751.jpg
    520.3 KB · Views: 90
  • 20220506_104613.jpg
    20220506_104613.jpg
    490 KB · Views: 84
  • 20220506_121306.jpg
    20220506_121306.jpg
    476.4 KB · Views: 84
  • 20220506_121310.jpg
    20220506_121310.jpg
    452.8 KB · Views: 77
  • 20220506_151950.jpg
    20220506_151950.jpg
    305.9 KB · Views: 88
  • 20220507_100216.jpg
    20220507_100216.jpg
    613 KB · Views: 88
  • 20220507_105724.jpg
    20220507_105724.jpg
    406.8 KB · Views: 70
  • 20220507_181920.jpg
    20220507_181920.jpg
    472.2 KB · Views: 73
  • 20220509_111411.jpg
    20220509_111411.jpg
    457.9 KB · Views: 80
Once I had one side done .... (had to remake one as it warped whilst welding :eek:
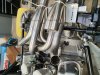
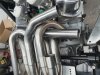
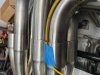
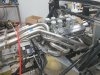
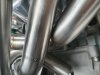
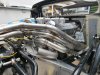
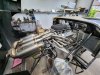
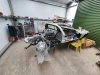
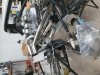
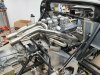
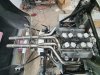
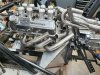
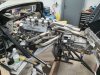
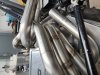
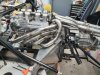
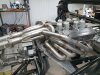
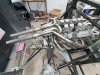
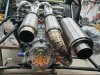
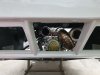
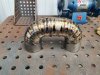
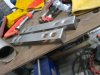
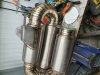
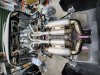
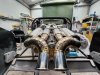
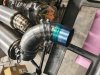
) I started on the other bank
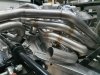
 

Attachments

  • 20220509_194320.jpg
    20220509_194320.jpg
    376.6 KB · Views: 72
  • 20220512_111335.jpg
    20220512_111335.jpg
    522.9 KB · Views: 71
  • 20220512_111527.jpg
    20220512_111527.jpg
    516.6 KB · Views: 72
  • 20220512_111744.jpg
    20220512_111744.jpg
    494.9 KB · Views: 72
  • 20220512_112931.jpg
    20220512_112931.jpg
    594.9 KB · Views: 67
  • 20220517_174740.jpg
    20220517_174740.jpg
    492.9 KB · Views: 71
  • 20220517_174747.jpg
    20220517_174747.jpg
    471.8 KB · Views: 68
  • 20220517_174755.jpg
    20220517_174755.jpg
    390.6 KB · Views: 69
  • 20220517_183647.jpg
    20220517_183647.jpg
    443.9 KB · Views: 68
  • 20220527_144020.jpg
    20220527_144020.jpg
    554.9 KB · Views: 66
Ps I know this is a lot of header pics but some people might find it interesting haha :D
 

Attachments

  • 20220527_170108.jpg
    20220527_170108.jpg
    542.9 KB · Views: 64
  • 20220528_120447.jpg
    20220528_120447.jpg
    578.7 KB · Views: 72
  • 20220528_170802.jpg
    20220528_170802.jpg
    557.9 KB · Views: 65
  • 20220528_171107.jpg
    20220528_171107.jpg
    570.3 KB · Views: 62
  • 20220530_194702.jpg
    20220530_194702.jpg
    349.6 KB · Views: 58
  • 20220606_110752.jpg
    20220606_110752.jpg
    551.4 KB · Views: 62
  • 20220606_111936.jpg
    20220606_111936.jpg
    531.1 KB · Views: 56
  • 20220606_112456.jpg
    20220606_112456.jpg
    544.5 KB · Views: 55
  • 20220606_155112.jpg
    20220606_155112.jpg
    572.5 KB · Views: 54
  • 20220611_161607.jpg
    20220611_161607.jpg
    334.4 KB · Views: 55
Almost done
 

Attachments

  • 20220611_163227.jpg
    20220611_163227.jpg
    556.1 KB · Views: 51
  • 20220613_150805.jpg
    20220613_150805.jpg
    420.4 KB · Views: 57
  • 20220613_174407.jpg
    20220613_174407.jpg
    560.9 KB · Views: 53
  • 20220613_174416.jpg
    20220613_174416.jpg
    432.3 KB · Views: 50
  • 20220613_174420.jpg
    20220613_174420.jpg
    479.1 KB · Views: 57
  • 20220614_164051.jpg
    20220614_164051.jpg
    569 KB · Views: 53
  • 20220614_185010.jpg
    20220614_185010.jpg
    357.4 KB · Views: 55
  • 20220614_190351.jpg
    20220614_190351.jpg
    489.3 KB · Views: 75
Some header beauty pics haha really happy how they turned out especially since it was my first exhaust build
 

Attachments

  • 20220615_163624.jpg
    20220615_163624.jpg
    490.3 KB · Views: 67
  • 20220615_164600.jpg
    20220615_164600.jpg
    507.4 KB · Views: 70
  • 20220615_164608.jpg
    20220615_164608.jpg
    453.8 KB · Views: 65
  • 20220615_164622.jpg
    20220615_164622.jpg
    546.1 KB · Views: 58
  • 20220615_164806.jpg
    20220615_164806.jpg
    531.6 KB · Views: 64
  • 20220615_165130.jpg
    20220615_165130.jpg
    269.2 KB · Views: 60
  • 20220615_164800.jpg
    20220615_164800.jpg
    462.9 KB · Views: 59
  • 20220615_164628.jpg
    20220615_164628.jpg
    674.9 KB · Views: 64
  • 20220615_164634.jpg
    20220615_164634.jpg
    678.9 KB · Views: 69
I thought it would be cool to do the back section of the exhuast out of titanium so was asking Vibrant Performance a few questions about there silencers and they said to apply for sponsorship and I got accepted so got a nice little discount ! Which was great as its not cheap haha

But they are super light !

I am planning to make 2 versions of the exhaust one quieter version to get it road legal and for track days with noise limits ect and one that will be a single silencer for each collector to the back
 

Attachments

  • 20220624_181751.jpg
    20220624_181751.jpg
    448.2 KB · Views: 63
  • 20220624_212603.jpg
    20220624_212603.jpg
    314 KB · Views: 69
  • 20220713_120432.jpg
    20220713_120432.jpg
    466.4 KB · Views: 68
  • 20220713_143205.jpg
    20220713_143205.jpg
    492.1 KB · Views: 72
  • 20220718_115008.jpg
    20220718_115008.jpg
    420.3 KB · Views: 79
  • 20221008_162613.jpg
    20221008_162613.jpg
    416.9 KB · Views: 67
  • 20221008_162607.jpg
    20221008_162607.jpg
    436.5 KB · Views: 63
  • 20221009_142121.jpg
    20221009_142121.jpg
    491.1 KB · Views: 74
  • 20221009_145257_03.jpg
    20221009_145257_03.jpg
    443.7 KB · Views: 68
  • 20221009_145558.jpg
    20221009_145558.jpg
    242.8 KB · Views: 72
Titanium is very sensitive whilst welding so used plenty of argon bottles backpurgeing and using big tig cups and as you all probably know space is at a premium so had to do all pie cut tight radius bends to fit the silencers in the Limited space available but I'm hoping it will make it quiet enough but won't know until I get the car wired up and ready to roll haha
 

Attachments

  • 20221016_211219.jpg
    20221016_211219.jpg
    406.8 KB · Views: 77
  • 20221022_133818.jpg
    20221022_133818.jpg
    425.8 KB · Views: 73
  • 20221023_123555.jpg
    20221023_123555.jpg
    568.8 KB · Views: 85
  • 20221106_181919.jpg
    20221106_181919.jpg
    314.3 KB · Views: 67
  • 20221106_182522.jpg
    20221106_182522.jpg
    353.5 KB · Views: 71
  • 20221111_123534.jpg
    20221111_123534.jpg
    458.3 KB · Views: 73
  • 20221112_181415.jpg
    20221112_181415.jpg
    347.7 KB · Views: 80
  • 20221206_142142.jpg
    20221206_142142.jpg
    478 KB · Views: 78
Made some mounts off the gearbox to hold the weight mounted on rubber bush's and with slots in to allow forward and backward movement for heat expansion so hopefully nothing with crack or stress too much
 

Attachments

  • 20221206_182937.jpg
    20221206_182937.jpg
    393.9 KB · Views: 72
  • 20221207_104847.jpg
    20221207_104847.jpg
    442.6 KB · Views: 69
  • 20221207_115224.jpg
    20221207_115224.jpg
    431.8 KB · Views: 67
  • 20221207_133927.jpg
    20221207_133927.jpg
    415.2 KB · Views: 66
  • 20230129_182512.jpg
    20230129_182512.jpg
    325.1 KB · Views: 64
  • 20230130_121430.jpg
    20230130_121430.jpg
    296.4 KB · Views: 73
  • 20230130_123445.jpg
    20230130_123445.jpg
    438.1 KB · Views: 69
  • 20230130_124627.jpg
    20230130_124627.jpg
    393.9 KB · Views: 74
  • 20230202_090141.jpg
    20230202_090141.jpg
    347.5 KB · Views: 80
Then made the last bit to get the tips in the right place they are just tacked in place at the moment until the body is lined up in its final position so I can get them centred and looking right. I think it all looks cool but that is a matter of taste not going to be everyone's cup of tea

Also going to shorten the tips so they don't stick out as much
 

Attachments

  • 20230202_121816.jpg
    20230202_121816.jpg
    320.6 KB · Views: 85
  • 20230202_121626.jpg
    20230202_121626.jpg
    437.5 KB · Views: 91
  • 20230202_122835.jpg
    20230202_122835.jpg
    517.3 KB · Views: 125
  • 20230202_122950.jpg
    20230202_122950.jpg
    309.1 KB · Views: 97
  • 20230202_143859.jpg
    20230202_143859.jpg
    506.9 KB · Views: 121
Last bit of exhaust for a while I promise, these are the exhaust tips, i can't put them on until after iva as need rounded tips for iva for some reason personally think if you touch the exhuast its going to hurt anyway haha :D

You can electrically anodize titanium using water with bicarbonate of soda mixed in and it changes colour with the thickness of the anodizeing which you can change with voltage so got some gt40 logo stencils printed and anodized that at about 60v giving a goldy yellow and then removed the stencil and did the rest of the tip with a normal titanium blue sort of colour and I think they look ace really happy with them
 

Attachments

  • 20230203_144837.jpg
    20230203_144837.jpg
    337.1 KB · Views: 60
  • 20230203_121913.jpg
    20230203_121913.jpg
    315.1 KB · Views: 62
  • 20221031_200120.jpg
    20221031_200120.jpg
    353.1 KB · Views: 60
  • 20220810_154320.jpg
    20220810_154320.jpg
    289.4 KB · Views: 64
  • 20220810_154529.jpg
    20220810_154529.jpg
    327.5 KB · Views: 59
  • 20220810_160953.jpg
    20220810_160953.jpg
    394 KB · Views: 57
  • 20220810_160949.jpg
    20220810_160949.jpg
    402.4 KB · Views: 57
Couldn't find am off the shelf air filter solution so ended up making some

First I make a plug out of mdf painted it in primer then high gloss pattern coat from easy composites and then coated with chemical release agent and wax layed some gel coat on and made a fibreglass mould, unfortunately due to the air filter clip placement and the cylinder offset even though both sides are almost identical I had to make 2 seperate moulds

Then did resin infusion and 6 layers of carbon fibre left 24 hrs to cure and sperated from the mould and they turned out pretty well
 

Attachments

  • 20230207_162655.jpg
    20230207_162655.jpg
    577.3 KB · Views: 56
  • 20230216_115712.jpg
    20230216_115712.jpg
    452.5 KB · Views: 61
  • 20230221_121555.jpg
    20230221_121555.jpg
    406.3 KB · Views: 58
  • 20230224_153628.jpg
    20230224_153628.jpg
    527.9 KB · Views: 61
  • 20230303_172249.jpg
    20230303_172249.jpg
    573.5 KB · Views: 54
  • 20230304_132235.jpg
    20230304_132235.jpg
    414.3 KB · Views: 55
  • 20230308_152646.jpg
    20230308_152646.jpg
    511.4 KB · Views: 52
  • 20230310_152714.jpg
    20230310_152714.jpg
    636.7 KB · Views: 54
  • 20230314_112727.jpg
    20230314_112727.jpg
    503.5 KB · Views: 52
  • 20230314_113407.jpg
    20230314_113407.jpg
    415.4 KB · Views: 67
Some pics from when they were both finished dut to the tight radiuses on the mould there are a few spots where there are air pockets and dry spots but overall think they turned out well :)
 

Attachments

  • 20230524_122542.jpg
    20230524_122542.jpg
    532.9 KB · Views: 67
  • 20230524_122549.jpg
    20230524_122549.jpg
    511.9 KB · Views: 62
  • 20230524_122649.jpg
    20230524_122649.jpg
    304.3 KB · Views: 63
  • 20230524_122821.jpg
    20230524_122821.jpg
    521.8 KB · Views: 69
  • 20230524_122828.jpg
    20230524_122828.jpg
    510.8 KB · Views: 65
  • 20230524_122842.jpg
    20230524_122842.jpg
    305.9 KB · Views: 74
  • 20230524_122924.jpg
    20230524_122924.jpg
    364.6 KB · Views: 73
  • 20230425_202408.jpg
    20230425_202408.jpg
    397.7 KB · Views: 70
  • 20230425_202412.jpg
    20230425_202412.jpg
    541.4 KB · Views: 78
Some pics of the fuel system aswell decided to do hard line as love the look of it! And I used a carter low pressure rotary vane pump from each tank to a radium surge tank with a high pressure pump inside through a filter and that will then go via flexible pipe to the fuel rails which will return through the regulator back to the surge pot which has overflows to each tank with a solenoid valve each side so I don't pump one tank to the other :D
 

Attachments

  • IMG_20210501_170238_591.jpg
    IMG_20210501_170238_591.jpg
    313.1 KB · Views: 73
  • IMG_20210501_170238_665.jpg
    IMG_20210501_170238_665.jpg
    277.7 KB · Views: 67
  • IMG_20210501_170238_740.jpg
    IMG_20210501_170238_740.jpg
    202.7 KB · Views: 66
  • IMG_20210501_170238_688.jpg
    IMG_20210501_170238_688.jpg
    346 KB · Views: 77
  • IMG_20210501_170238_702.jpg
    IMG_20210501_170238_702.jpg
    286.7 KB · Views: 61
  • IMG_20210504_200136_541.jpg
    IMG_20210504_200136_541.jpg
    284.9 KB · Views: 66
  • IMG_20210504_200136_573.jpg
    IMG_20210504_200136_573.jpg
    321.6 KB · Views: 68
  • IMG_20210504_200136_624.jpg
    IMG_20210504_200136_624.jpg
    257.7 KB · Views: 63
  • IMG_20210504_200136_685.jpg
    IMG_20210504_200136_685.jpg
    24.5 KB · Views: 61
  • IMG_20210509_174758_515.jpg
    IMG_20210509_174758_515.jpg
    220.2 KB · Views: 66
What management system will you use?

I'm planning the wireing at the moment want to see what the specs are when they get round to releasing the link g5 voodoo also considering the ecu master Pro 16 as also thinking of using there power management unit to simplify the wireing and get rid of the relays and fuses and think that would make the integration alot easier
 
Back
Top