
You are using an out of date browser. It may not display this or other websites correctly.
You should upgrade or use an alternative browser.
You should upgrade or use an alternative browser.
chris gt40
- Thread starter chris goldsmith
- Start date

flatchat(Chris)
Supporter
Hope you're not having trouble with plumbing .......... :uneasy:
Hot in Ballarat ? did it get to 20°C ?
Hot in Ballarat ? did it get to 20°C ?

flatchat(Chris)
Supporter
Your workmanship is astounding we look forward to the progress
Chris,
That sounds nice! How about some figures? Will it be wearing EFI when it goes over the pits?
Cheers, Gus.
That sounds nice! How about some figures? Will it be wearing EFI when it goes over the pits?
Cheers, Gus.
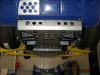
Hi Chris, outstanding job so far!!!! is that a flatslide setup on your car? its hard to tell from the pics, thanks, Neville.:stunned:well over 30 degrees chris
yes robin i doubt i will be able to keep up with your car
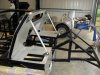
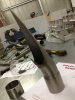
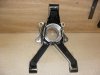
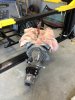
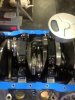
some more photos exhaust i made these by following
instructions from build r/f 105 i am sure we all know this
bloke
chris
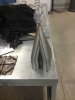
some more photos exhaust i made these by following
instructions from build r/f 105 i am sure we all know this
bloke
chris
Attachments
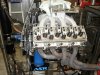
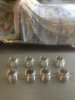
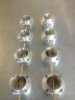
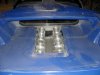
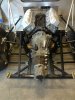
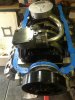
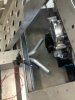
I believe that the best location for the injectors would be below the throttle plates.
This would reduce fuel reversion effect and also make for a more tidy package. Also if below, you would have less fuel able to wash down the throttle plates and shafts thereby leaking past the shaft bearings/bushings and onto the intake manifold..
This would reduce fuel reversion effect and also make for a more tidy package. Also if below, you would have less fuel able to wash down the throttle plates and shafts thereby leaking past the shaft bearings/bushings and onto the intake manifold..
Chris
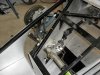
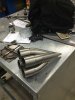
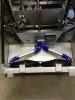
Great job on the collectors, you learn very quick my friend.
I see you haven't had the heart to let go of the brass shafts yet.
The body's look good. are you going to cut the shafts in half.
Separate body's.
For a streeter I would run inj under the b/fly as well.
If you can, point it at the back of the valve.
I can see that shop is filling up as well
Jim
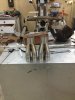
thankyou randy and jim for you advice will do as suggested
jim the brass shafts will give me something to polish and
will split bodys into singles not sure if shafts will run vertical
or horizontal i just make it up as i go not real smart i know.
yes the workshop needs a good cleanup if i could make one part
only once instead of half a dozen times i would not have as
much crap in the shed i hope i am not the only person that
butchers so much material.
chris
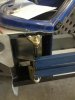
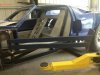
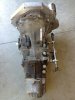
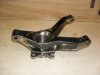
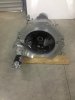
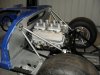
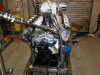
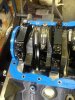
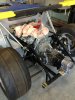
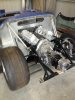
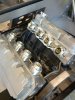
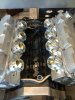
hello have had engine in and out and back in again over the last
couple of weeks also changed sump and rocker cover gaskets with
reusable ones that have brass inserts so idiots like me cant over
tighten
chris
couple of weeks also changed sump and rocker cover gaskets with
reusable ones that have brass inserts so idiots like me cant over
tighten
chris
Attachments
Similar threads
- Replies
- 2
- Views
- 1K