
You are using an out of date browser. It may not display this or other websites correctly.
You should upgrade or use an alternative browser.
You should upgrade or use an alternative browser.
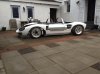
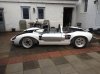
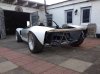
Converting a GT40 into a Dino 206SP
- Thread starter axelkloehn
- Start date

Re: German GT40 interpretation
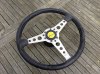
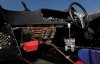
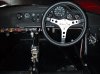
I have also found a nice steering wheel, a cool set of gauges, some nice mirrors and some other stuff, but my uploader just cracked, I will post them later!
I have also found a nice steering wheel, a cool set of gauges, some nice mirrors and some other stuff, but my uploader just cracked, I will post them later!
Last edited:
Re: German GT40 interpretation
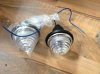
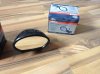
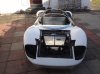
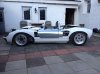
Here is the other stuff, uploading from a pc is much easier than using my ipad.
If you wonder about the condition of the stuff, I want the car to have patina. it shall look used and raced, like the pics from the original interior...
.
Here is the other stuff, uploading from a pc is much easier than using my ipad.
If you wonder about the condition of the stuff, I want the car to have patina. it shall look used and raced, like the pics from the original interior...
.
Attachments
-
 IMG_2572.JPG735.7 KB · Views: 303
 -
 IMG_2578.JPG653.3 KB · Views: 291
 -
 IMG_2588.JPG853.6 KB · Views: 350
 -
 IMG_2580.JPG681.2 KB · Views: 330
 -
 IMG_2571.JPG735.4 KB · Views: 320
 -
 IMG_2568.JPG708.8 KB · Views: 338
 -
 bigd.jpg130.2 KB · Views: 377
 -
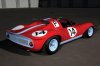
 ferrari-206-s-dino-spyder-1966-9.jpg175.7 KB · Views: 360
 -
 13.jpg93.3 KB · Views: 380
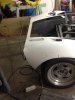
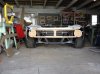
Re: German GT40 interpretation
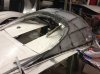
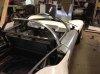
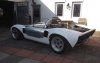
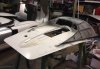
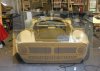
Worked on the hood yesterday, applied some formmetal for 3-dimensional shape, and worked out the frames for the windscreen and side-windows.
It makes a lot of a difference when the frames of the side-windows are installed, looks more like a car right away.
I welded sheet metal to the windscreen frame in the cylindrical shape of the glass, so the glass has a perfect base for installation. It does need some final cut of course.
.
Attachments
Re: German GT40 interpretation
Thanks Keith, I would like to, but I think I will have to keep the fiberglass front- and rear fenders because of missing tools for 3-dimensional sheet metal work!
Fantastic sheet metal skills there Axel... Looking good already. Will you have an all aluminium body?
Thanks Keith, I would like to, but I think I will have to keep the fiberglass front- and rear fenders because of missing tools for 3-dimensional sheet metal work!

Re: German GT40 interpretation
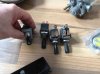
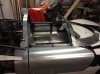
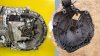
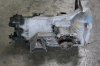
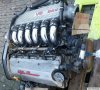
Hmm...still thinking about engine options, the older Alfa V6 where transaxle principle, engine front, gearbox rear, the newer ones where built in east/west with frontdrive. I have researched and found out that the Alfa Boxers like Alfa 33, 145/146 where mounted longitudinal with frontwheeldrive. :idea:
Their engines were up to 140hp, not much, but the gearbox looks conceptional right.
If I go for the newer Alfa V6 2.5 or 3.0 with around 190 to 220hp attached to the Alfa boxer-transmission I have an all-italian solution.
I still do need an adapter plate, but there is some hope that at least two or three of the holes match, and I can use Alfa components for flexplate and clutch...
The pics show the Alfa 164 tranny compared with the Boxer tranny, a boxer gearbox and the 3.0 engine..
May be not interesting for you guys, but sometimes it is good to share ideas, you'll never know what might come up in the future...
Attachments


Re: German GT40 interpretation
Very nice work, can't wait to see it finished ! Thanks for sharing.
Very nice work, can't wait to see it finished ! Thanks for sharing.
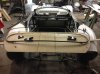
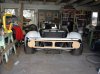
Re: German GT40 interpretation
Hi guys,
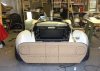
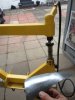
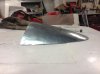
some updates, my planishing hammer arrived yesterday, and I did some testparts like a cover for the b-pillar inside, and the hoods for the bonnet.
It is amazing, when you start hammeringyou think "ok, this will be in the bin in a minute...", but when you keep hammering and smoothing it really turns out! The hammer is a china-thing, I paid about 120$ for it, but for that price it is really cool!
Hi guys,
some updates, my planishing hammer arrived yesterday, and I did some testparts like a cover for the b-pillar inside, and the hoods for the bonnet.
It is amazing, when you start hammeringyou think "ok, this will be in the bin in a minute...", but when you keep hammering and smoothing it really turns out! The hammer is a china-thing, I paid about 120$ for it, but for that price it is really cool!
Attachments

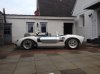
Re: German GT40 interpretation
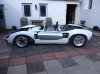
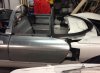
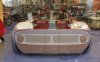
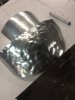
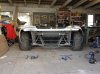
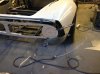
And I did the framework for the rear end, easy to weld it flat, but then it was really difficult to get the curvature in the topview...
Still mounted too high at the moment, but for the first try it turned out to be quite good!
And I did the framework for the rear end, easy to weld it flat, but then it was really difficult to get the curvature in the topview...
Still mounted too high at the moment, but for the first try it turned out to be quite good!
Attachments

Re: German GT40 interpretation
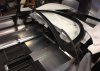
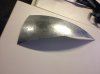
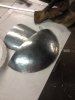
Some updates, finished the subframe for the rear end, and built the first spherical metal panels with the pneumatic hammer.
Now I am thinking about trying to build the body out of 100% metal and eliminating the fiberglass parts except the dash, might take a longer time until it's finished, but could be a fantastic challenge and a nice result.
I've bought an english wheel for metal shaping- should arrive tomorrow- and then I will see what I can do with the new toy.
Attachments

Re: German GT40 interpretation
Looking good Axel.
Are you annealing the alloy at any point in the forming on your test runs.
If you are not, soot it up with the acetylene only then set your torch and heat evenly till the soot is gone.
Let it cool then work it again it will be soft like butter.
Jim
Looking good Axel.
Are you annealing the alloy at any point in the forming on your test runs.
If you are not, soot it up with the acetylene only then set your torch and heat evenly till the soot is gone.
Let it cool then work it again it will be soft like butter.
Jim
Similar threads
- Replies
- 10
- Views
- 1K
- Replies
- 2
- Views
- 544