Converting a GT40 into a Dino 206SP

Re: German GT40 interpretation

Hi Jim, thanks for your advice,
I did heaten it up, but I did not do it acetylene only cause I don't have a gas welder, I use MIG welding (a pain in the a...s, I know)...
I am planning to buy a O/A gas welder soon, I am still in the beginner situation.
 
Re: German GT40 interpretation

Little update:

I installed the steering column and steering wheel, helps a lot moving the car in-and-out of the shop.
And I tested my new english wheel with some panels for the bonnet.

Huuuh...it's not like you buy that tool and you can do all kinds of double-curved panels immediately...there is a lot to learn, but it is amazing how easily it domes!
Sometimes it domes so fast, that you soon realize it is already too much curvature, and then there is almost no way back...! I ended up in cutting that panel and made an extra part for it!

.
 

Attachments

  • IMG_3194.JPG
    IMG_3194.JPG
    669.7 KB · Views: 381
  • IMG_3214b.jpg
    IMG_3214b.jpg
    553.1 KB · Views: 365
  • IMG_3216b.jpg
    IMG_3216b.jpg
    497.8 KB · Views: 386
Re: German GT40 interpretation

Axel you are doing well.

You can reduce the crown if you over shoot it.

a few hints ,you have your metal sheet cut to your panel shape , you have a picture frame around the outside (a border 20mm).
When you wheel within this border it will crown up, you are stretching all the metal inside the border but the border is still the same size that is where the crowning comes from.

if you go to far you use the wheel and stretch the border and the picture frame will get larger and the crown will reduce.
If you want to only reduce the crown on one edge just stretch that edge , when it starts to get a wave in the edge you are stretching you stop.
Know put the panel back in the wheel and with a very light upward pressure lift the panel so it is pushing on the top wheel move along the area you are trying to reduce "gentle gentle" .
You are know pushing the metal out to the stretched edge , when the edge goes tight you are done, if you need to take out more stretch the edge and go again.

One other thing that is simple but hard to figure if you don't know, you are wheeling a panel it will always curve down and away from you , but if you run a higher crown lower it will crown down on the sides as well.
If you are wheeling a panel and you have the right amount of shape one way you can put a lower anvil in to match it and it will not change in that direction (left to right) but will still go in the other direction (away and down)

Utube Lazze he has so good stuff.

Your panels look good.

Jim
 
Last edited:
Re: German GT40 interpretation

Thanks a lot for your help Jim, very good advices!
I did already learn a lot from Lazzes and others videos, but it will take some time to leave the beginners section.
Anyway, it is a great tool, and it's fun to work with it, never thought I would be able to shape metal like I did yesterday...!
 
Re: German GT40 interpretation

Did the other side this weekend, and it worked much better than the first side. You have to get used to the english wheel, and understand how it works, where to stretch the metal and and when to stop...and you get really smooth panels!

Beautiful sunny day yesterday, 21C (almost 70F), and this in beginning of march!
Strange, people with shorts and t-shirts everywhere outside, but all trees are wearing no leaves!
Took the car outside, nice to work in out there in the sun and not inside the damp workshop.
.
 

Attachments

  • IMG_3231.JPG
    IMG_3231.JPG
    646.5 KB · Views: 299
  • IMG_3232.JPG
    IMG_3232.JPG
    760.4 KB · Views: 327
  • IMG_3234.JPG
    IMG_3234.JPG
    685.8 KB · Views: 316
  • IMG_3245.JPG
    IMG_3245.JPG
    746.9 KB · Views: 340
  • IMG_3247.JPG
    IMG_3247.JPG
    684 KB · Views: 378
  • IMG_3237.jpg
    IMG_3237.jpg
    90.2 KB · Views: 325
Re: German GT40 interpretation

Metal experiments:

.
 

Attachments

  • IMG_3380.JPG
    IMG_3380.JPG
    623.4 KB · Views: 332
  • IMG_3384.JPG
    IMG_3384.JPG
    584.7 KB · Views: 309
  • IMG_3390.JPG
    IMG_3390.JPG
    548.4 KB · Views: 305
Re: German GT40 interpretation

That look real good Axel.
Nice flow on the panels.

Jim

Thanks Jim

I posted the same pics at allmetalshaping.com with a how-to-do-it question, the marking shows a planned transition to the raised center of the bonnet, and that is a very complex shaping process with my limited tools. I guess your expertise could be of help...
 
jim c

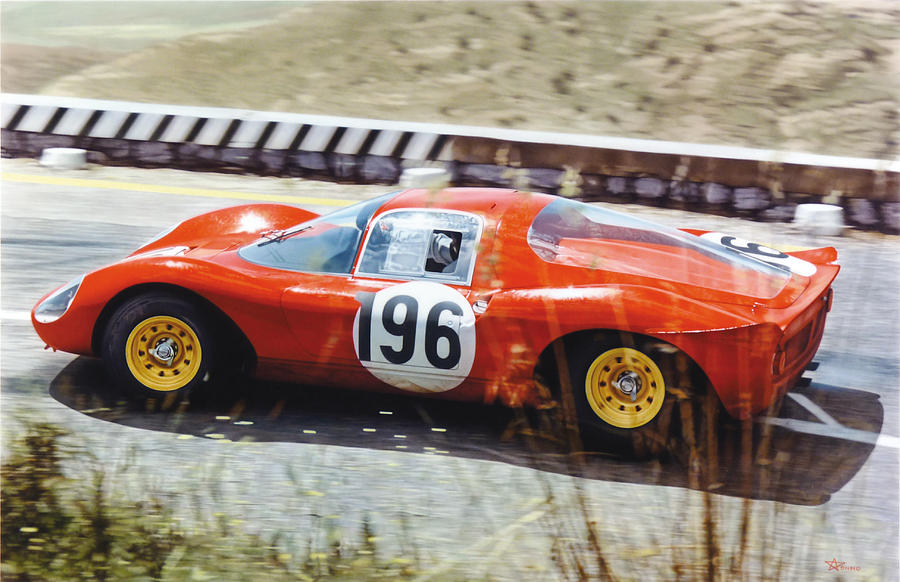
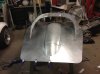
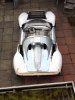
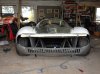
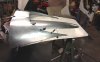
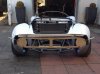
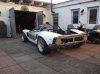
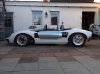
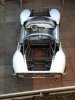
This is a better photo, the stripes on the pic you posted on AMS makes it hard to see the shape.

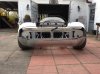
See what comes back on AMS ,lots of talent on that site.

I don't know how much info to give you as you seem to be doing well and have good skills.

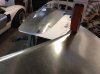
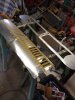
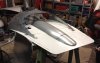
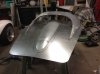
For me, looking at the panel it looks like it is in 2 sections and not welded yet, it needs to be welded.
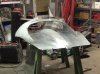
Your inner line at the blister I would cut it and take the centre out of the panel.
If the line down the side of that blister is straight I would use a long tube say 300mm long because it will help get a true line, If not a dolly with the correct radius.
You need a profile pattern or patterns as a guide.
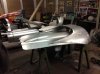
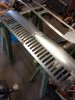
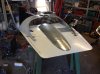
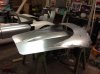
turn the sheet over , use a wooden slapper and work the edge of the sheet to form the rise up the sides of the blister.
Around the corners you would use a dolly and work it with the slapper or a radiused slapper, as it rises the radius is going to increase and to maintain the panel shape you will most likely have to stretch the outer edge , you can do this with a dolly and a metal planishing hammer, don't belt the shit out of it as it will make to much mess, gentle overlapping blows on the outer half of the flange, if you over stretch the whole panel will start to curve down from left to right.

You can do the same on the sides ,I can see a radius front to rear when you form the side rad for the blister it may take the radius out of the main panel, as you don't have a stretcher you can use the dolly and hammer and stretch it as well, take a few passes till you are happy and your pattern fits again.

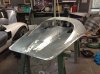
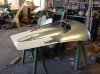
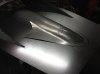
You have to get this looking right ,it maybe to big to put in the wheel or the air hammer to clean up ,you may have to use hand tools to get it into shape.
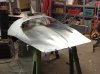
Clean the inner edge, you will have to put the tail on the blister and clean it up.
You then push the blister up from underneath and scribe it of ,cut close , recheck , cut close recheck, get it to fit then weld.
Do not weld in the bottom radius you wont get it clean , weld on the outside rad up the sides.
The radius you have formed is going to stop the panel distorting when you weld.
If you don't have a body a file buy one,(for aluminium, finest tooth you can).
Look on the AMS for clean up if you are not sure.

I weld the outside ,fuse the inside, clean the inside off , no lumps, Knock the welds up so they are easier to clean, clean the outside, knock the weld down after clean and tidy the panel up.
You will end up making slappers and hammers ,dollies to suit areas its just the way it is.
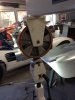
Buy a flipper they are good on clean up.

You could do the whole job in the plenishing hammer upside down if you have someone who works in unison with you, hard to find as they just don't seem to get it.
If you apply downward pressure on the sheet it will form the radius onto the lower anvil.
Play with some scrap.

You could do the blister in one piece ,look up shrinking forks or shrinking in a stump.
You cut a pattern and do some shrinking around the front end it would come up easy in the wheel.
The rear may need a little shrink but not much
You could even use a sand bag and a mallet.

Hope its clear enough
Hope its not to much info.
 

Attachments

  • 206s_02.jpg
    206s_02.jpg
    140.4 KB · Views: 384
Last edited:
Re: German GT40 interpretation

Thanks for your help, woow, that is a lot of input, Jim :)

The line down the side of that blister isn't straight unfortunately, now with your input I think about using an already curved tube as a guide.
You're right, it is too big for me handling it with the wheel, and no helping hand around.
I have some time this afternoon, as you suggested I will weld the pieces together and give it a try with the planishing hammer or manually.
My experience with hand tools isn't too good at the moment but no pain no gain, so I will try it gently cause I don't want this big metal sheet to be heading for the bin ;-)
Building one whole sheet up to get the blister sounds like the much better idea... if I mess this pieces up I will try to do it in one piece, I could start low and get the blister higher and higher with the wheeling process...
 

Jim Craik

Lifetime Supporter
Re: German GT40 interpretation

Axel,

I'm really enjoying this build, keep up the good work!

When I was a kid, my neighbor had a slot car track and the two cars that came with it were a 906 Carrara and a 206S, but this one had a large clear rear engine cover, much like the 906. It seems that most all the remaining 206S have the rear engine cover like your's.......

I was able to find photos of a 206 with this engine cover. I think the large glass (plastic) cover makes an incredably beautiful car even better! But the added cooling scoops, leads me to believe that heat had something to do with the change.

WM_Watkins_Glen-1968-07-14-021c.jpg

WM_Watkins_Glen-1968-07-14-021a.jpg


ferrari-dino-206s-1965-nurburgring.gif
 
Last edited:
Re: German GT40 interpretation

Thanks for the pics Jim. You're right, I also do love the glass engine cover very much. Although I decided to go for my engine cover in combination with the open top car, I actually can build a second glass engine cover and exchange them from time to time.

I did some tests yesterday with exchanging the solid wheel from my english wheel to a polyurethane one (pinched from a heavy load carrier), and the results were amazing.
I was able to easily bend the area around the blister, did the corners with the planishing hammer, and wheeled it afterwards with the solid wheel to partially stretch it and smooth it out.
I am pretty satisfied with the result, but have a look yourself!

.
 

Attachments

  • IMG_3396.JPG
    IMG_3396.JPG
    400.4 KB · Views: 295
  • IMG_3398.JPG
    IMG_3398.JPG
    577.4 KB · Views: 285
  • IMG_3401.JPG
    IMG_3401.JPG
    604.8 KB · Views: 298
  • IMG_3402.JPG
    IMG_3402.JPG
    636.5 KB · Views: 279
  • IMG_3404.JPG
    IMG_3404.JPG
    592.4 KB · Views: 282
  • IMG_3405.JPG
    IMG_3405.JPG
    386 KB · Views: 293
  • IMG_3406.JPG
    IMG_3406.JPG
    636.7 KB · Views: 290
Re: German GT40 interpretation

So I noticed that you don't have a engine installed how do you know that the loaded weight won't change the ride height of the body vs tires/ground ?
 
Re: German GT40 interpretation

So I noticed that you don't have a engine installed how do you know that the loaded weight won't change the ride height of the body vs tires/ground ?

You are right, but at the moment I have the front and aft springs with zero tension.
The frame and suspension is calculated for Audi V8 and 01E transmission.
I cut about 100lbs away from the frame, and I will go with a V6 engine instand a V8. That will be less weight as originally planned.
The suspension is fully adjustable, so I hope I don't end up with problems...
 
Re: German GT40 interpretation

Yea the other factor is using the correct tire size, these older cars had tall tires that filled the wells. Your doing some nice work. Will you be able to find the correct rims? What did these use a 14" Campagnolo on a Rudge Whitworth spline?

GT40 guys have it pretty simple as they have a large variety of rims and pin/splines to choose from. It's just a matter of picking them out of the catalog.
 
Re: German GT40 interpretation

Well, the focus is on the body at the moment, and with the GT40 wheelbase it is a 105% scale Dino.
The original Dino had 13" wheels, my mounted 17" are too tall, that's right. I will try to find some 15" which would be the right look for the 105% Dino body.
I hope I find some close to the Dino design...we will see!
 
Re: German GT40 interpretation

I finished the bonnet and put it on the car again, and this really looks like a step forward:
 

Attachments

  • IMG_3503.JPG
    IMG_3503.JPG
    660 KB · Views: 277
  • IMG_3579.JPG
    IMG_3579.JPG
    403 KB · Views: 313
Re: German GT40 interpretation

Then I started working at the lower rear panel with the 29 slots, I wheeled two pieces of sheet metal to threedimensional curvature and welded them together, and started to cut out the slots...what a pain in the a...!
...
but at the end I felt it was worth the work:
...
I was afraid that the panel will loose its stiffness with cutting that many slots in it, but amazingly it remained stiff, I guess due to the threedimensional curvature I gave it before!
 

Attachments

  • IMG_3546.JPG
    IMG_3546.JPG
    766.6 KB · Views: 271
  • IMG_3594.JPG
    IMG_3594.JPG
    424.2 KB · Views: 258
  • IMG_3595.JPG
    IMG_3595.JPG
    406.7 KB · Views: 255
  • IMG_3596.JPG
    IMG_3596.JPG
    695.1 KB · Views: 288
Re: German GT40 interpretation

After that I was working at the panels for the taillights:

I cut two pieces of wood with identical circular holes in them, and put the metal between them like a sandwich.
And than I was hammering by hand inside the circular top hole to give the metal a deflection for the integration of taillights and I was surprised it was really working out!
 

Attachments

  • IMG_3600.JPG
    IMG_3600.JPG
    719.3 KB · Views: 260
  • IMG_3607.JPG
    IMG_3607.JPG
    679.6 KB · Views: 344
Back
Top