Fat Larry's GTR Build

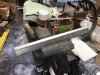
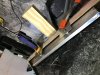
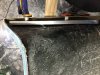
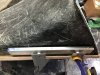
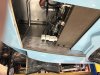
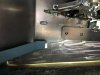
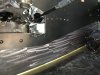
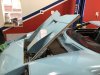
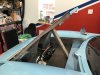
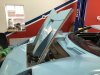
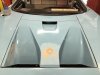
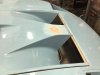
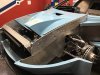
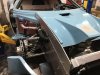
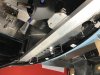
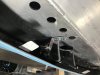
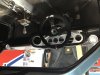
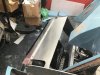
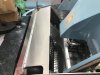
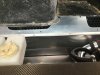
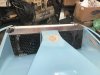
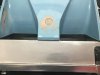
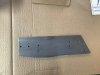
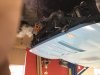
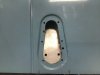
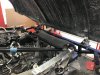
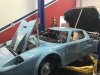
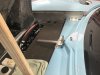
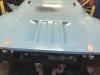
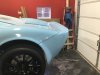
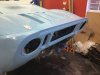
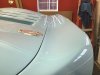
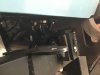
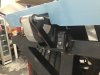
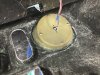
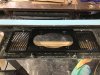
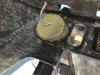
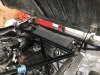
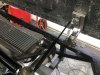
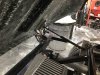
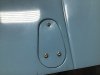
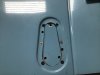
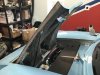
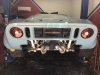
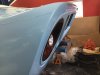
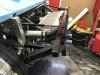
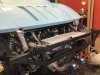
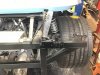
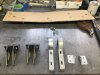
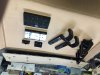
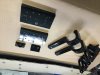
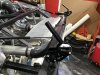
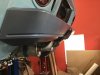
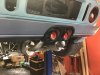
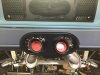
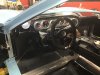
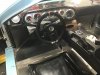
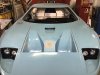
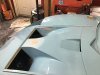
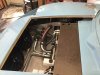
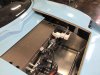
Ok so front hood detached from front clip now I need to install The raised alum side panels and install the hinges for a active hood still have a few ideas for the hood latch mechanism. Once done move to rear clam shell.
 

Attachments

  • BEAA8625-6071-4FC3-AAAE-00E37E5F72D5.jpeg
    BEAA8625-6071-4FC3-AAAE-00E37E5F72D5.jpeg
    297.5 KB · Views: 633
  • DA884716-0316-40A7-881E-0000796D60B7.jpeg
    DA884716-0316-40A7-881E-0000796D60B7.jpeg
    265.2 KB · Views: 598
  • C4F4BBAE-DF4E-47C8-8308-9A3B33FC5C6D.jpeg
    C4F4BBAE-DF4E-47C8-8308-9A3B33FC5C6D.jpeg
    311.8 KB · Views: 535
  • D26F0016-80A5-4166-A8C2-5DD59C25BABC.jpeg
    D26F0016-80A5-4166-A8C2-5DD59C25BABC.jpeg
    371.7 KB · Views: 482
  • BD376D41-CA09-462E-AFD7-2D3F8E03676F.jpeg
    BD376D41-CA09-462E-AFD7-2D3F8E03676F.jpeg
    371.8 KB · Views: 530
Ok started the day cleaning up after my newbey daughter the carpenter she decided to make raised vegetable gardens once I finished the cleanup I took a 12 inch long 1/2 thick x 1 1/2 wide alum bar 45 degree one side for the fiberglass radius and then drilled and tapped two 1/4 x 20 holes for mounting the hinge I used 3/4 od x 5/8 long round tubing for spacers and a piece of flat stock to hold everything in place I also drilled a series of 1/4 holes in the bar so the West Marine Six adhesive would flow into the holes and act as a dowel pin tomorrow I will do the aluminum panels for the front end
 

Attachments

  • B6544E99-9442-4A12-A164-940B27FE2201.jpeg
    B6544E99-9442-4A12-A164-940B27FE2201.jpeg
    452.9 KB · Views: 480
  • 75566665-AB50-4E7B-888F-A829427673B6.jpeg
    75566665-AB50-4E7B-888F-A829427673B6.jpeg
    447.2 KB · Views: 485
  • 17F08B6E-4307-48F6-87E0-DA6BCB26450B.jpeg
    17F08B6E-4307-48F6-87E0-DA6BCB26450B.jpeg
    480.2 KB · Views: 472
  • 201FABF9-F777-4987-93EA-7827137793C0.jpeg
    201FABF9-F777-4987-93EA-7827137793C0.jpeg
    425 KB · Views: 406
  • 9B97EF40-38DB-43A7-ADC6-B44FACC46C4C.jpeg
    9B97EF40-38DB-43A7-ADC6-B44FACC46C4C.jpeg
    539.9 KB · Views: 403
  • 6CB4E8E4-40A9-4B67-8CEB-2914C5959964.jpeg
    6CB4E8E4-40A9-4B67-8CEB-2914C5959964.jpeg
    566.5 KB · Views: 416
Ok got one of the side panels done will start working on the other side during the week
 

Attachments

  • CC49410F-BC15-4A60-80E2-0399DBEB3FF9.jpeg
    CC49410F-BC15-4A60-80E2-0399DBEB3FF9.jpeg
    362.7 KB · Views: 405
  • C914D32D-037C-4477-98EC-8188E190EA38.jpeg
    C914D32D-037C-4477-98EC-8188E190EA38.jpeg
    372.8 KB · Views: 382
  • E51F2920-02E6-4C91-AA13-D1F54BD73374.jpeg
    E51F2920-02E6-4C91-AA13-D1F54BD73374.jpeg
    388.3 KB · Views: 413
  • 4B8BB1CE-097A-44C3-A313-B3BF0C874C2F.jpeg
    4B8BB1CE-097A-44C3-A313-B3BF0C874C2F.jpeg
    367.7 KB · Views: 359
  • BED5906F-6380-487E-BDAB-5EE12B4DBA6B.jpeg
    BED5906F-6380-487E-BDAB-5EE12B4DBA6B.jpeg
    396.9 KB · Views: 386
Well worked on the hood hinges today I am close to finishing just a few more tweaks and should be good to go and then I will create a locking system for the hood
 

Attachments

  • 14FAD098-413A-41E0-A1AF-69A987CA38CE.jpeg
    14FAD098-413A-41E0-A1AF-69A987CA38CE.jpeg
    282.3 KB · Views: 413
  • 64337FCD-DB67-4314-94FB-890821F4F145.jpeg
    64337FCD-DB67-4314-94FB-890821F4F145.jpeg
    330.4 KB · Views: 421
  • 25E6A357-39F8-497B-9277-90C9606404A0.jpeg
    25E6A357-39F8-497B-9277-90C9606404A0.jpeg
    288.6 KB · Views: 358
  • 96EC153A-7F4F-4012-AAF1-7E6B0D40E4C4.jpeg
    96EC153A-7F4F-4012-AAF1-7E6B0D40E4C4.jpeg
    238.7 KB · Views: 408
  • 129E0532-7778-4C44-99C2-D2A1A06943F2.jpeg
    129E0532-7778-4C44-99C2-D2A1A06943F2.jpeg
    212.6 KB · Views: 389
Ok so it was a very productive weekend I was able to get the steering support in cut the holes in the dash for the gauges install the A/C vents and install the wiper motor this week and weekend on to some alum fab for the front radiator scopes I still don’t understand why some photos come in upside down
 

Attachments

  • 16D3ED91-AF41-4AAC-8FCE-482068E5F3A1.jpeg
    16D3ED91-AF41-4AAC-8FCE-482068E5F3A1.jpeg
    338.9 KB · Views: 415
  • 41EADFA9-DD26-4A72-93A7-C3C980AF8173.jpeg
    41EADFA9-DD26-4A72-93A7-C3C980AF8173.jpeg
    338.9 KB · Views: 402
  • 53CE2349-0682-4C02-AE28-0F891466B632.jpeg
    53CE2349-0682-4C02-AE28-0F891466B632.jpeg
    333.9 KB · Views: 332
  • A1FC26D7-FEFB-4BEB-BDC2-9153103B8BC7.jpeg
    A1FC26D7-FEFB-4BEB-BDC2-9153103B8BC7.jpeg
    313 KB · Views: 379
  • 04729CDE-DC8E-4D6D-8172-A610C487E418.jpeg
    04729CDE-DC8E-4D6D-8172-A610C487E418.jpeg
    382.1 KB · Views: 436
I still don’t understand why some photos come in upside down

I'm guess you are using an iPhone, it's a common problem. What I do is save the pictures to my laptop, open them with paint and save them to a new file name. This fixes the meta-data and allows them to orient correctly. Only takes a few seconds to open and save as.
 
Well finally got the cooling fan shroud built and in I think I will powder coat it later I need to order more hardware now moving on to the latch system
 

Attachments

  • 49429CEA-3EF3-499A-B071-6E8E9F799D2B.jpeg
    49429CEA-3EF3-499A-B071-6E8E9F799D2B.jpeg
    363.3 KB · Views: 503
  • AE24239C-1D5B-4140-9C76-4E05FBB1D655.jpeg
    AE24239C-1D5B-4140-9C76-4E05FBB1D655.jpeg
    328.7 KB · Views: 484
  • A1263AEC-E168-41BF-BEC3-700653B506C6.jpeg
    A1263AEC-E168-41BF-BEC3-700653B506C6.jpeg
    359.2 KB · Views: 375
  • 759263E9-4ECA-4CC3-8611-947A9DF90F93.jpeg
    759263E9-4ECA-4CC3-8611-947A9DF90F93.jpeg
    304.2 KB · Views: 473
  • E6577A25-38DA-44FD-B781-4098469587A3.jpeg
    E6577A25-38DA-44FD-B781-4098469587A3.jpeg
    201.7 KB · Views: 456
  • C7CE97D4-6239-4034-9100-DF828DAFFCDA.jpeg
    C7CE97D4-6239-4034-9100-DF828DAFFCDA.jpeg
    257 KB · Views: 361
So yesterday I spent the day making up the steel backing plates for the doors to allow for more adjustment and fine tuning of the doors now that this is done I can move onto the back clam shell. I received one of H‘s clam shell kits along with my rear lights on Friday perfect timing
 

Attachments

  • C5DC4CFB-184B-4672-8F4A-7D3CF6496DCC.jpeg
    C5DC4CFB-184B-4672-8F4A-7D3CF6496DCC.jpeg
    371.3 KB · Views: 478
Well this weekend was getting H‘s clam shell hinge kit mounted in which I had to modify because the boys at RCR cut out the rear locking clips center section so I had to make a couple of 1/4 alum plates to mount the alum blocks. I had to order wider aluminum blocks so I can pickup the original holes from the latch I also had to order some new shim blocks for mounting the hinges to the rear frame I also did some work on the rear lights and they will be ready once I bond in the rear housings One question for those who have already mounted the rear lights what is the thread size in the lense Also the rear clam shell to the spider I just can’t seem to get it perfect as you can see in one of the photos I assume we all are experiencing the same isue
 

Attachments

  • 820672BD-7418-41DD-A93F-2586BABC3136.jpeg
    820672BD-7418-41DD-A93F-2586BABC3136.jpeg
    280.1 KB · Views: 433
  • 992B0270-002B-4688-9F42-7495E7CFEAC6.jpeg
    992B0270-002B-4688-9F42-7495E7CFEAC6.jpeg
    262.3 KB · Views: 483
  • 18E65D36-7101-42B6-8825-92809E83F480.jpeg
    18E65D36-7101-42B6-8825-92809E83F480.jpeg
    492.4 KB · Views: 395
  • A3BEC506-B69D-4953-BE95-965737ED63C6.jpeg
    A3BEC506-B69D-4953-BE95-965737ED63C6.jpeg
    332.5 KB · Views: 478
  • 8D4CC9ED-4074-4881-92BA-3CDAF108216F.jpeg
    8D4CC9ED-4074-4881-92BA-3CDAF108216F.jpeg
    346.4 KB · Views: 487
  • 7A6969D3-7CA6-4C80-BA23-3943692EF08A.jpeg
    7A6969D3-7CA6-4C80-BA23-3943692EF08A.jpeg
    288 KB · Views: 485
  • 0FEE50FA-4F89-49B4-B06E-F3CEABFC39B7.jpeg
    0FEE50FA-4F89-49B4-B06E-F3CEABFC39B7.jpeg
    246 KB · Views: 481
Rufus yes already mounted just to double check the fit and make sure everything works
 

Attachments

  • 8BF21EBF-6EDE-4821-833F-178D08550B97.jpeg
    8BF21EBF-6EDE-4821-833F-178D08550B97.jpeg
    289.7 KB · Views: 489
  • FD5F3395-E89D-4D01-88EE-23B8A1F36889.jpeg
    FD5F3395-E89D-4D01-88EE-23B8A1F36889.jpeg
    306.6 KB · Views: 347
  • 7820DD81-0CE0-44EF-8F0A-5242E77E1CEC.jpeg
    7820DD81-0CE0-44EF-8F0A-5242E77E1CEC.jpeg
    269.5 KB · Views: 506
Just curious is anyone else having problems getting the Hella Mounting Brackets part # 157659007 I have had mine on order from Jegs for 2 months and are still backordered.
 
Ok so rear clam shell is done added Ford OEM struts an tack weld all of my support blocks once I do a final removal of the engine and trans prior to wiring I will paint and powder coat all the misc pieces now moving on to the front support strut.i also glued in the light buckets and license plate holder
 

Attachments

  • 9D96348C-CEDC-4895-8320-47084267F171.jpeg
    9D96348C-CEDC-4895-8320-47084267F171.jpeg
    288.8 KB · Views: 414
  • 9339DE1B-AD1F-4B41-94BF-4C0F88EA1062.jpeg
    9339DE1B-AD1F-4B41-94BF-4C0F88EA1062.jpeg
    294.5 KB · Views: 405
  • 9D7995B1-CA2A-4B46-BF41-02FAE74C92AA.jpeg
    9D7995B1-CA2A-4B46-BF41-02FAE74C92AA.jpeg
    559 KB · Views: 400
  • 99310B6E-6D3D-4117-9E66-26AF2D05528D.jpeg
    99310B6E-6D3D-4117-9E66-26AF2D05528D.jpeg
    444.5 KB · Views: 368
  • C076453B-29DE-4508-8D5F-DC7C8305ECCA.jpeg
    C076453B-29DE-4508-8D5F-DC7C8305ECCA.jpeg
    380 KB · Views: 417
  • D4E73585-9DC6-4943-AC2E-2E3C6F18F30C.jpeg
    D4E73585-9DC6-4943-AC2E-2E3C6F18F30C.jpeg
    507.7 KB · Views: 373
  • 56E37A9C-5550-4682-84DC-4EA5A6ADEC8A.jpeg
    56E37A9C-5550-4682-84DC-4EA5A6ADEC8A.jpeg
    455 KB · Views: 361
  • 73BD2077-BB63-4E2E-A899-254DC6887662.jpeg
    73BD2077-BB63-4E2E-A899-254DC6887662.jpeg
    458.6 KB · Views: 412
Here are the new alum mounting plates and how I had to bolt the clam shell to the plates
 

Attachments

  • 53EAF0F1-E117-47B6-BF64-C5F188161933.jpeg
    53EAF0F1-E117-47B6-BF64-C5F188161933.jpeg
    256.1 KB · Views: 413
  • 8BD90B40-3B6C-48CC-B2DA-D4C72021EB23.jpeg
    8BD90B40-3B6C-48CC-B2DA-D4C72021EB23.jpeg
    277.3 KB · Views: 379
  • B67B7965-BD87-43E1-B264-D3B6F2A55CC3.jpeg
    B67B7965-BD87-43E1-B264-D3B6F2A55CC3.jpeg
    455 KB · Views: 394
Ok lights are in license plate holder in front support strut in now onto finalize the rear bumper mounts and set fog lights and a host of other some choirs before wiring
 

Attachments

  • 6B074D5C-6E64-49E8-BED2-5F0B6EFB4DF4.jpeg
    6B074D5C-6E64-49E8-BED2-5F0B6EFB4DF4.jpeg
    360.5 KB · Views: 322
  • 80D4381A-9913-4F49-8D45-3FC246D9CD5D.jpeg
    80D4381A-9913-4F49-8D45-3FC246D9CD5D.jpeg
    330.5 KB · Views: 318
  • 6756323B-CB6D-40AE-B0D4-43C3801A6A53.jpeg
    6756323B-CB6D-40AE-B0D4-43C3801A6A53.jpeg
    254.4 KB · Views: 372
So today I had a day off from work and tomorrow also so it’s nice to spend the whole day in the garage I made up shim blocks for the rear clip instead of the 9,000 washers RCR sends with the car tomorrow will be powder coating the rear hinge kit and then reassemble I took a picture prior to powder coating
 

Attachments

  • A5CA7DDF-8CEF-4166-885C-EACE40DDC601.jpeg
    A5CA7DDF-8CEF-4166-885C-EACE40DDC601.jpeg
    443.4 KB · Views: 326
  • 703A2155-9156-42A2-82E9-69BFFC192D2E.jpeg
    703A2155-9156-42A2-82E9-69BFFC192D2E.jpeg
    361.6 KB · Views: 388
  • E54DB96C-8CB9-4242-99D5-F94D8AB95E43.jpeg
    E54DB96C-8CB9-4242-99D5-F94D8AB95E43.jpeg
    408.8 KB · Views: 331
  • 5826806B-B73F-4433-866C-317DA200D635.jpeg
    5826806B-B73F-4433-866C-317DA200D635.jpeg
    402.9 KB · Views: 405
So got up super early this morning couldn’t sleep so I did the powder coating on the clam shell hinges and parts.
 

Attachments

  • 84471D75-1091-482E-9381-1FD8DA183147.jpeg
    84471D75-1091-482E-9381-1FD8DA183147.jpeg
    317.7 KB · Views: 329
  • AB567B33-6C36-4E33-80CA-5B4235B845BE.jpeg
    AB567B33-6C36-4E33-80CA-5B4235B845BE.jpeg
    284.2 KB · Views: 323
  • C6FCD192-1A4D-4C0C-9516-9D406D00980C.jpeg
    C6FCD192-1A4D-4C0C-9516-9D406D00980C.jpeg
    439.5 KB · Views: 337
What’s that old saying never throw anything away I replaced my sons exhaust system on his 2016 Mustang recently and I saved the tail pipe ends thinking I could use them someday we’ll today was the day they fit perfect on my GTR
 

Attachments

  • 5A4FB8DF-4AA8-4D40-8496-7A96D994505E.jpeg
    5A4FB8DF-4AA8-4D40-8496-7A96D994505E.jpeg
    293.5 KB · Views: 347
  • 60684F3C-D907-4EC6-9F4E-4029ADCC2146.jpeg
    60684F3C-D907-4EC6-9F4E-4029ADCC2146.jpeg
    370.1 KB · Views: 333
  • 3D2C0CD5-4A32-40E6-ABF4-8EE7A0E35218.jpeg
    3D2C0CD5-4A32-40E6-ABF4-8EE7A0E35218.jpeg
    383.4 KB · Views: 397
So next step start back working on the center console and get the fog lights in getting closer to start wiring
 

Attachments

  • E86D2BDE-EE23-43EF-8BDC-EE6CB663EC13.jpeg
    E86D2BDE-EE23-43EF-8BDC-EE6CB663EC13.jpeg
    378.1 KB · Views: 399
  • 8D2148EB-0CFF-48A9-BAF8-8D9AABD02521.jpeg
    8D2148EB-0CFF-48A9-BAF8-8D9AABD02521.jpeg
    358.1 KB · Views: 375
Back
Top