Ford F3L and David Piper

Leopold,
On Ford engines/transmissions, the location of the starter in relation to the ring gear/flywheel is controlled by a sandwich plate between block/bellhousing. The starter bolts are NOT the method of index. In most cases with the SBF you would be using one of the three factory ring gear diameters & the appropriate sandwich plate for that.
When you use a non/factory ring gear dia then you would fabricate a sandwich plate to match that dia or fabricate an offset adaptor plate as you have, but still use the sandwich plate for location/index.
In your installation it would appear that the bellhousing has one of the original ford starter bolt positions and therefore one of the three ford sandwich plates should fit ( they are only about 2mm thick-steel or alloy ).
 
Jac, thanks for the hint - I wasn't familiar with that.
Well, anyway, I know it for the next time. Here I drilled for two bushings which are then inserted into the bolt holes. This method works quite well and now the play between starter gear and flywheel is correct (also the end position when engaged).
I came across those two other pictures of the aessembled body today, and thought I shall post them. Just some other perspective.


Attachments

  • DSCF0137.jpg
    DSCF0137.jpg
    36.3 KB · Views: 749
  • DSCF0155.jpg
    DSCF0155.jpg
    39.1 KB · Views: 1,065

Howard Jones

Supporter
I think that this is the finest bit of DIY I have every seen anywhere ! That kind of craftsmanship is so uncommon that when you see it, it's shocking. You have set the bar higher for every hot rod hobbyist on the planet.

If I could think of a higher praise I gladly say it... I can't

I am not referencing the blond.
 
Howard,
thanks a lot, I totally appreciate what you are saying. Personally I don't consider the craftsmanship alone as the most challenging part, it is more the combination of design, computational mechanics and craftsmanship that is really tough. But as long as man is able to finish a task, he is learning. The other case is frustration...

Sorry, but I don't have much exciting news from the progress, at the moment I am designing a lot of small and boring sheet metal parts for the monocoque. We have decided not to use the frame-chassis I already posted pictures of, because it is
1st: not the type of chassis used in the original, and
2nd: it is just missing elegancy in comparison to a well designed monocoque.
That is the reason why the working hours spent on the frame are now being considered as 'diligent learning', if you know what I mean.

I'll keep you updated when I have some more interesting screenshots.
 
..got some rear upright sets from a friend who did the casting.
They look fabulous and I just have to make the jig for machining to finish them. Thanks, G.!
 

Attachments

  • CIMG0025.jpg
    CIMG0025.jpg
    51.7 KB · Views: 859
...today I am doing the precipitation hardening of the rear uprights:

1. solution heat treatment for 4-5 hours, followed by
2. waterquenching in order to stop diffusion, and subsequent
3. artificial ageing for 12 hours to get fine disperse precipitations.

This process is quite common for good casting alloys and approximateley doubles yield/ultimate tensile strength.
 

Attachments

  • Kopie von DSCF0173.jpg
    Kopie von DSCF0173.jpg
    46.7 KB · Views: 812
...here is a snapshot of the current state of the monocoque development. It is not finished yet, as can be seen. This design is the starting point for me to numerically optimize wallthicknesses. After this step the monocoque is ready to be prepared for lasercutting.
 

Attachments

  • Fortschritt_091206.jpg
    Fortschritt_091206.jpg
    45.2 KB · Views: 1,070
Leopold:
Great looking uprights, am I correct in assuming that they are cast from 17-4 or some other PH grade of stainless?
Looks like a great deal of work on the molds for that shape.
Cheers
Phil
 
Phil,
the uprights are made of a precipitation hardening hypoeutectic aluminum alloy, not of stainless. The peened surface just doesn't look like aluminum.
Thanks, makin the moulds really was a pain in the ***, as you can see from the pictures, no surface is flat or easy to machine/fine-sand.
 
Hello!

As everybody said before, this is an AMAZING job!

I really appreciated all the steps exposed here from CAD to parts.

Would you take a little time to explain how you optimize the monocoque design?
Which loads, where...?

I'd also be interested in learnig more about the first way you calculated the frame (don't remember the method's name). Is it a Catia tool or is it a special FEM feature?

Considering the sheet metal work, did you use specific radiuses abaqus for the design?

And last question, maybe inconvenient, but could you tell something about the money engaged in this project?

Can't wait to see an update.

Regards

Olivier.
 
Olivier,

thanks a lot for the compliment. ;-)

The numerical methods I use for this project are rather intransparent. Catia is a quite powerful tool, but as far as FE is concerned, it is in my opinion really questionable. I use it for designing and nothing else.

At first I started with deriving a load collective ("acting" on the car). I took these loads and converted them (its just an inverse matrix operation) onto loads acting on the suspension pickup points. Then the major masses in the car have to be discretized in terms of C/G position and mass, which gives additional loads that stress the structure. The laod collective is very critical, because they affect all the results.

After this step I used a topology optimization (-> Hyperworks is quite good for this, also Nastran, but I find it more inconvenient, as it has no preprocessor) to find sensitive loading paths (in other words the optimal stiffness distribution).
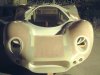
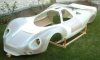
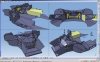
And now comes the really complicated step: To redesign the topology iso-surface into sheet metal parts. This sounds easy, but you always have to keep in mind the stiffnessloss because of rivets, bends,.. and even more important the manufacturability (I don't wanna use 20 different bending presses for example). After this step I have surfaces, but no good wallthicknesses. So i mesh them (-> Hypermesh, my absolute favourite) and set up a parametric optimization (as it is just to get stiffness right, which means linear elastic solutions, Nastran SOL200 proved to be really nice for this). This optimization is maybe going to run for 5 or 6 days, and the result will be the optimum wall thicknesses. Slight redesign can be made after this step, if eg some walls show to "disappear", last thing you have to do before fabrication is to wind all the sheets down into flat pieces, which are going to be nested for laser cutting.

It all sounds a little strange I think, but there is no tool in the world (and it will be never invented, I'm sure), that can do all that tasks for you in once. The computer makes some more sophisticated things possible, but in the end it is always the engineer in behind those things.

I don't understand what you mean with "specific radiuses abaqus". If you mean if I use Abaqus, then the answer is yes. It is perfect for nonlinear problems, like elastc-plastic material behaviour.

Money: I'm sure you will understand that I don't want to give numbers here. But I can tell you some other interesting facts: Our largest expenses until now were the engine and the gearbox. Mouldmaking wasn't that bad because I did 85% of it by myself, so there were the machine-hours and the material left to pay for. I had a discussion with quite some mouldmakers in the mean time, and if you would give them cad files and wanted to get moulds back, you surely would have to pay around $50G for a toolset for a carbody.

But let me tell you that the most important thing here is NOT the money.
I just want to mention the nearly 3000 engineering hours I've put in so far.

I hope this info answers your questions.
 
Hello Leopold.

THanks for the answers! Very interesting and instructive... Even if I'm a mechanical engineer, some words are pure chinese for me (maybe a translation problem :stunned:, or I should have spent less time in pubs and more studiying when I was at school :idea:)

3000 hrs? Ouch, I understand pretty much well why everything in your build looks neat and profesionnal! Very admiring!

Concerning abaqus, I wasn't speaking about the software. But about how you made the decision to set particular radius to a specific bend on your sheetmetal design. I have some "abaqus" (don't know the right word?) specifiying that for a given thickness, given material and given bending angle, the radius is supposed to be XX. Just wanted to know if you have the same thing. Important, as it may affect fitting of parts once cut and bent, if it's not well chosen before.

Well. Very clean work, very instructive.... I LOVE IT!

Waiting for the next update!

Olivier.
 
Olivier,

as far as the bending radii are concerned, you are absoluteley correct, theoretically you have to have a specific radius for each thickness, material type and angle, but those numbers are the minimal bending radii.
Means you can take this one or a larger one, and I take advantage of this in order to keep fabrication as simple as possible, it gets complex anyway by itself.

Thanks for your input!
 
Olivier,

thanks for asking,
I am currently covered with work in my main job, so I didn't have much progress the last month. The last two weeks I have been designing my hydraulic bending press for fabrication of the monocoque. Building it by yourself is cheaper than buying one, and besides I can make the layout just like I want and need. I will post some pictures when I have it done, as well as some progress pictures from the monocoque.
 
you might just be a god.... I would like to have 50% of your skills, and then i would be happy. I am doing som 3d cad work of myself but my work is on beginners level.
 
Back
Top