Ford F3L and David Piper

Hi Chris,

good hearing from you.
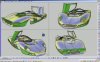
Yes, we want to reach something under 1700lbs, with our engine power of about 500 hp that should give a good p/w ratio. As far as the body is concerned, my calculations showed that our complete body set is gonna be 25lbs lighter than the original 30/1000" wall thickness alum body.
 
..of course that is theory, in reality you cannot pull a 900mBar vacuum all the time, you have to fill the edges with filler resin, and so on. But I am still very optimistic to stay way below the original body weight.
 
..finished air ducting. All parts except of the symmertical ones. The green parts are all composite custom made, the red connections will be aviation hoses.
The v-shaped sepeator close to the intake is designed to keep rain away from the cabin air and instead duct it to the front brakes.
The box forward of the engineering dummy of the heater accommodates the fresh air valve to shift from pure cabin air to cabin + ambient air.
 

Attachments

  • Fortschritt_090525.jpg
    Fortschritt_090525.jpg
    23.9 KB · Views: 828
..inner shell of the door, this is the last big mould that I have to fabricate. It is not yet 100% done, it has a little undercut in some areas that I have to correct, also in the pictures it is missing all the radii. Second picture shows the car with the opened door.
 

Attachments

  • Fortschritt_090527_01.jpg
    Fortschritt_090527_01.jpg
    36.4 KB · Views: 802
  • Fortschritt_090527_02.jpg
    Fortschritt_090527_02.jpg
    44.2 KB · Views: 981
..finished rear wheel casting pattern, (in the picture the machined/drilled wheel).
 

Attachments

  • Fortschritt_090530_02.jpg
    Fortschritt_090530_02.jpg
    34.4 KB · Views: 946

Brian Hamilton

I'm on the verge of touching myself inappropriatel
Oh my god. This is one of the coolest builds I have ever seen. Leo, my man, fantastic work!!! Please keep it up and thanks so much for including us in this process.
 
..after quite some trouble during the last few days I finally arrived at the machine shop and started cutting and glueing together Necoron blocks. I got some machining hours today, so there is the first visible progress: Inner shell of the right door, still missing some detail, but 90% done.
 

Attachments

  • DSCF0002.jpg
    DSCF0002.jpg
    46.2 KB · Views: 987
  • DSCF0005.jpg
    DSCF0005.jpg
    54.2 KB · Views: 920
This is one fantastic build. The knowledge and skill required to reach this level of fabrication is astonishing. GREAT WORK!
 
Thanks a lot guys. Your comments are very encouraging, seems I have to stop talking to the wrong people about what we are doing (especially women tend to misunderstand a project like this ;-). Just the other day a girl asked me "why would somebody do something like this?" After I told her that this would be the best I could think of spending my time with she was pissed. :D
But you surely can tell similar stories...

As far as the progress is concerned, Murphy wasn't sleeping the last few days: Broke one cutter, one time the cutter was pushed into the collet during machining and one time pulled out. Frustrating.
But in the end there are some results, even if there was quite some trouble. The inner door shell moulds and the dashboard mould are done. Today we started machining the casting patterns of the wheels, after putting a lot of thought in them to save machining time (just make use of three axes, not 5 simultanously). Notice the tool length of the small radius cutter: My friend was just shaking his head.... The wheels are machined in two and three steps, respectively. We glue the upper material discs on the lower machined ones, when these are done. I'll try to post some more pictures the next days.
 

Attachments

  • DSCF0009.jpg
    DSCF0009.jpg
    45.6 KB · Views: 749
  • DSCF0011.jpg
    DSCF0011.jpg
    20.4 KB · Views: 744
  • DSCF0012.jpg
    DSCF0012.jpg
    37.9 KB · Views: 796
  • DSCF0016.jpg
    DSCF0016.jpg
    30.3 KB · Views: 814
  • DSCF0018.jpg
    DSCF0018.jpg
    31 KB · Views: 1,018
.......
 

Attachments

  • DSCF0020.jpg
    DSCF0020.jpg
    33.1 KB · Views: 819
  • DSCF0021.jpg
    DSCF0021.jpg
    32 KB · Views: 753
  • DSCF0022.jpg
    DSCF0022.jpg
    17.5 KB · Views: 696
  • DSCF0023.jpg
    DSCF0023.jpg
    36.4 KB · Views: 1,172

Randy V

Moderator-Admin
Staff member
Admin
Lifetime Supporter
To say that I'm in awe would be an understatement...

Your work is spectacular....

Gents - this is one reason I never tire of this place. GT40s members have some of the most incredible talent in the world... A constant source of inspiration.. The bar being raised ever higher...

Fantastic!!! :thumbsup::thumbsup::thumbsup::thumbsup::thumbsup:
 
gents,
attatched you find some pictures of the current progress. The front wheel is done after troubling a lot, the rear is undergoing the last three machining programs right now as i am writing this.
Also you find some pictures of the redesigned, numerically heavily optimized rear upright and the breakdown for the core boxes and the casting pattern (colours are parting agles). These parts are gonna be next.
 

Attachments

  • 050709_01.jpg
    050709_01.jpg
    44.9 KB · Views: 785
  • 050709_02.jpg
    050709_02.jpg
    46.6 KB · Views: 921
  • DSCF0032.jpg
    DSCF0032.jpg
    23.5 KB · Views: 724
  • DSCF0034.jpg
    DSCF0034.jpg
    29.4 KB · Views: 746
  • DSCF0035.jpg
    DSCF0035.jpg
    25.2 KB · Views: 778
sorry guys, today there was not much progress, I think the devil was very close to our place. The sky looked like in the movie independence day, just before the UFO breaks through the clouds. Then hail nearly damaged my car and the heavy rain flooded parts of the floor of the machine shop. luckily nothing happened, except of a power failure. Meanwhile the fire fighters gave all clear call.
Attatched just two pictures of the wheels which I fine sanded today, notice the chip bags in the background, I've caused one and a half of them.
 

Attachments

  • DSCF0036.jpg
    DSCF0036.jpg
    18.8 KB · Views: 823
  • DSCF0037.jpg
    DSCF0037.jpg
    19.2 KB · Views: 762

Randy V

Moderator-Admin
Staff member
Admin
Lifetime Supporter
Hi Leopold -

What do you do with the wooden parts once your mold is made? Do they continue to be part of the process?

Glad that you had no problems other than a little water and a power failure. Where I live - this time of the year is very unsettled in the atmosphere. Storms with Hail and Tornados are common unfortunately.
I live in a large city and the Tornados don't land here very often (thank God) but hail does... :(
 
Randy,
unfortunateley you know what I am talking about. Just besides the machine shop is a large farm, the wheat which wasn't harvested yet is completeley ruined.

Well, as far as the moulds go: What I am using is NOT wood. This is a very high density mould and model making plastics (it is called Necuron). It does not deteriorate by any means, time moisture or whatever. It machines well and can directly be sealed by resin or e.g. two coats of spraypainting. In contrast to wood it is also isotropic, so it even behaves well in temperature changes.
Usually there are two possibilities to make a mold:
1. making a positive and fabricating a mould with fibreglass or fibreceramics, which is (quite) easy but you have to invest twice.
2. making the negative in e.g. Necuron, sealing it and using this directly for ply layup (which is what I do, except of the metal casting parts, these need to be positive, except of the core boxes). This is the cheaper, but more complicated way, because especially large moulds have to be designed very well.
Surely there are also other waays like machining foam, coating ith with resin and machining again, but these methods are not so common.
 

Randy V

Moderator-Admin
Staff member
Admin
Lifetime Supporter
Sorry to hear of the spoiled crop... :( An all too common problem here these days as well. Between the uncooperative weather and the insects due to the more stringent controls being placed on the farmers - they're having a tough time of it..

Sorry about the mistake on the mold materials.. I had seen another person use wood for his upright's ... Well - the material you're using does look like wood to the untrained eyes (mine).. :)

I would love to see more of your process and hope that you continue to post pictures along the way...

Thank you!
 
Randy,
don't worry about the mistake with the wood. This material looks so dam alike wood that even in reality you have to look closeley.
You are absoluteley right, casting patterns were usually made of quality wood, like mahagony. But as I can use plastics which is resistent to time, moisture and sun, I do.
Sorry, today I'm too tired to convert pictures, I will post some tomorrow.
Still have some programs waiting...
 
Back
Top