Frank's KVA Build

Removed the front an rear clip and it's looking beastly
Started on making a test setup for the steeringarms it's not rigid enough so i've got to change that,made some calls for the instrument to set up caster but nothing so still searching
 

Attachments

  • IMG_2840 (Small).jpg
    IMG_2840 (Small).jpg
    63.4 KB · Views: 1,128
  • IMG_2841 (Small).jpg
    IMG_2841 (Small).jpg
    63.4 KB · Views: 1,075
  • IMG_2842 (Small).jpg
    IMG_2842 (Small).jpg
    55.7 KB · Views: 1,071
  • IMG_2843 (Small).jpg
    IMG_2843 (Small).jpg
    55 KB · Views: 1,012
Frank,

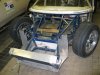
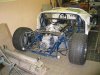
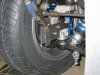
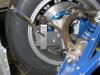
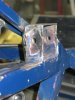
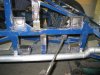
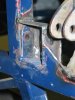
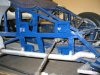
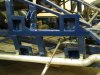
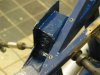
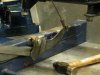
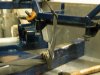
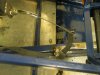
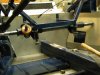
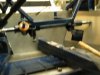
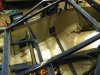
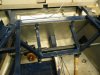
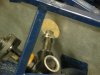
looking good, your fabrication skill shows!!

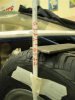
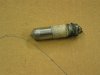
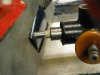
How do you calculate the length of the steering arm, ie the distance from th the kingpin to the the trackrod end centrelines??

Too short & the steering is too quick, too long & the steering is too lazy... ???

Regds,
 
Julian,
thank you
I don't know yet how long to make the steeringarm,the position it's on at the moment it will take one turn for max steering (don't know the right term)
If someone can tell me how many turn's or part's of a turn they've got all info welcome

Frank
 
Made a simple tool to see how the caster is
 

Attachments

  • IMG_2850 (Small).jpg
    IMG_2850 (Small).jpg
    35.8 KB · Views: 829
  • IMG_2851 (Small).jpg
    IMG_2851 (Small).jpg
    43.3 KB · Views: 835
  • IMG_2852 (Small).jpg
    IMG_2852 (Small).jpg
    28.3 KB · Views: 851
  • IMG_2853 (Small).jpg
    IMG_2853 (Small).jpg
    24 KB · Views: 816
I had some trouble with the steering rods, when the wheels were in droop the rods cam against the upper arms so i had two choices drop the steeringrack or putt the balljoints higher
because i did find it easier to make two bushes i first made the balljoints fit somewhat higher
and this is the result
picture one is the position at ride hight 12cm bottom clearance
picture two at 14,5 cm
third at max droop at 18 cm
 

Attachments

  • IMG_2854 (Small).jpg
    IMG_2854 (Small).jpg
    60.3 KB · Views: 742
  • IMG_2857 (Small).jpg
    IMG_2857 (Small).jpg
    49.5 KB · Views: 734
  • IMG_2858 (Small).jpg
    IMG_2858 (Small).jpg
    52.1 KB · Views: 731
  • IMG_2859 (Small).jpg
    IMG_2859 (Small).jpg
    44.1 KB · Views: 751
Frank, have you also checked that you have clearance at full lock each way in the full droop position. Going by your pics I wonder if the rack end may foul the w/bone as well.
 
Thought so, looks like you might have to lower the rack below that chassis rail & repeat the process. Before you do that make absolutely sure you are happy with ride height and other suspension geometry as it fitted now to avoid further rework.
 
I did mean that there is a little gap as thick as paper
The reason for first trying to sort it out this way is so that i don't have to lower the rack
and solve the problems which are coming whit this (pedalbox)
But you're right with sorting out the hight and geometry
 
I had to lower the rack due to the lack of clearance (Jac Mac you were right)
and are now working on the 'bumpsteer' issue so i can make my steeringarms
 

Attachments

  • IMG_2873 (Small).jpg
    IMG_2873 (Small).jpg
    56.2 KB · Views: 485
  • IMG_2872 (Small).jpg
    IMG_2872 (Small).jpg
    29.2 KB · Views: 471
  • IMG_2870 (Small).jpg
    IMG_2870 (Small).jpg
    37.5 KB · Views: 501
I've made the mountings from the suspension so there can't get water to the inside
and i bought a new tool
 

Attachments

  • IMG_2899 (Small).jpg
    IMG_2899 (Small).jpg
    60.3 KB · Views: 355
  • IMG_2900 (Small).jpg
    IMG_2900 (Small).jpg
    32.8 KB · Views: 330
  • IMG_2901 (Small).jpg
    IMG_2901 (Small).jpg
    30.3 KB · Views: 313
  • IMG_2902 (Small).jpg
    IMG_2902 (Small).jpg
    63.4 KB · Views: 420
  • IMG_2903 (Small).jpg
    IMG_2903 (Small).jpg
    62.5 KB · Views: 410
made some flares on it and gave it a colour
one side done !
frank
 

Attachments

  • IMG_2904 (Small).jpg
    IMG_2904 (Small).jpg
    65.6 KB · Views: 407
  • IMG_2905 (Small).jpg
    IMG_2905 (Small).jpg
    59.1 KB · Views: 336
  • IMG_2906 (Small).jpg
    IMG_2906 (Small).jpg
    39.9 KB · Views: 334
finished the handbrake mechanism only need to have the cable and rear attachment made
 

Attachments

  • IMG_2913 (Small).jpg
    IMG_2913 (Small).jpg
    39.9 KB · Views: 326
  • IMG_2914 (Small).jpg
    IMG_2914 (Small).jpg
    40.7 KB · Views: 320
  • IMG_2915 (Small).jpg
    IMG_2915 (Small).jpg
    48.3 KB · Views: 327
Started working on the inner panneling
 

Attachments

  • IMG_2907 (Small).jpg
    IMG_2907 (Small).jpg
    49.6 KB · Views: 320
  • IMG_2908 (Small).jpg
    IMG_2908 (Small).jpg
    61.9 KB · Views: 318
  • IMG_2909 (Small).jpg
    IMG_2909 (Small).jpg
    54 KB · Views: 339
  • IMG_2910 (Small).jpg
    IMG_2910 (Small).jpg
    37.9 KB · Views: 347
  • IMG_2911 (Small).jpg
    IMG_2911 (Small).jpg
    50.3 KB · Views: 362
  • IMG_2912 (Small).jpg
    IMG_2912 (Small).jpg
    47.9 KB · Views: 323
Thank's Bill
made the holes for the steering rack/rods
first made a little tool for positioning put it in the steeringshaft and made a marker on the panel.
drilled a little hole put the panel on the car again and cut the hole in the same line as the steeringrack
 

Attachments

  • IMG_2917 (Small).jpg
    IMG_2917 (Small).jpg
    36.5 KB · Views: 287
  • IMG_2918 (Small).jpg
    IMG_2918 (Small).jpg
    33.3 KB · Views: 323
  • IMG_2919 (Small).jpg
    IMG_2919 (Small).jpg
    37.9 KB · Views: 306
  • IMG_2920 (Small).jpg
    IMG_2920 (Small).jpg
    26.3 KB · Views: 280
Frank,

Keep the good work going, nice job!
See you the 11 of may at Zandvoort.
I think because of the Pinsterrace, i be before at the right of the tunnel.


Regards,

Lucas
 
Back
Top