Good bye Locost 7 Hello GT40!!

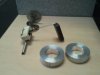
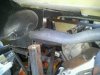
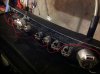
Started what looks to be a tremendous task. Wiring the dash. My gauges are Chuck and Ryan's old set they upgraded to the newer GPS set and helped me me along in the process. Thanks Guys!!!!!!They have some awesome documentation and photos on their build log. So I am using it?
My daughter Andie who is 11 helped a bit tonight. Cutting and fitting wires and shrink tubing. Reminded me of days gone by when my older kids helped me with my race cars.
One year I had my kids paint the roll cage on my street stock red. They had red rust oleum paint every where in their hair and ears. LoL .
 
Bored out the fuel guage tank mounting bosses today!
 

Attachments

  • gaugemnts.jpg
    gaugemnts.jpg
    41.5 KB · Views: 314
Dave:
Keep pluggin away, you are gonna catch me soon...I haven't had any time for the car in a couple of months.
If you have any trouble with that sender let me know, I have an awesome source for them.
Cheers
Phil
 
Thanks Phil!
I have been really working on this project by myself. I found myself thinking I really need some help to get this project going. I decided a while back that the color would be a Daytona blue pearl. It is close to the pearl blue Chip Foose uses. problem is you cannot buy that particular color because it is that new water base mix at the shop stuff. I am not a body man so I enlisted the help of a younger friend who went to school for paint and body .He just happens to work with me. Looking forward to getting up some momentum on this project in the next few months.
 

Randy V

Moderator-Admin
Staff member
Admin
Lifetime Supporter
Dave,

You might want to try contacting Chip Foose to see if he will share the formula for the paint you like. I've heard that he's quite approachable..
 
I found out awhile back that my rear clam shell fouls my headers. It actually held the clam about 10 inches above where it needs to be. I had even asked Fran at RCR if he ever had this trouble. He was very helpful and said no he had not but the packaging room is very tight. But on a build thread for an RCR 40 I found the answer.
My clip came with the internal structure in place. It also includes the brake ducts for the rear brakes. I had to trim about a foot off the internal splash guard it let it set down almost in place. Cutting all the header tubes was not a good option to me. I will post some photos soon
 
Here are the photos from yesterday's post. The clip sets a lot lower now. If I were running a 302 or 289 block clearance would not be an issue now.
 

Attachments

  • image.jpg
    image.jpg
    89.7 KB · Views: 360
Worked a bit more on the GT today. Ran the ground wire for the gauge lights.Also added the wires for the fuel gauge sending units. Set the dash in place to see what it will look like.
 

Attachments

  • image.jpg
    image.jpg
    165.9 KB · Views: 302
Dave:
Looking good, I am in the process now of doing headers and as you mentioned space is at a premium.
I made a small aluminum perimeter frame that fits inside the rear body work where I thought space was tight. It clamps up to the chassis and I stay within those limits trying to also allow myself enough room for the obvious heat that will be generated.
Get that dash wired and it will be a big step forward.
Cheers
Phil
 

Randy V

Moderator-Admin
Staff member
Admin
Lifetime Supporter
I like Phil's idea of the perimeter frame..

Dave, where did you source the headers from?
 

Randy V

Moderator-Admin
Staff member
Admin
Lifetime Supporter
Maybe relocating the offending tubes would be the right answer Dave. This might be the reason they were not on another car!
 
One of the things I am blessed with is using some of the machines at work. So I always have a couple things or more going at once.
Started work on the fixture for holding the rear uprights as I weld them together.
 

Attachments

  • fixture.jpg
    fixture.jpg
    42.4 KB · Views: 248
Well Thanks giving day is over I awoke from my Turkey induced coma this morning and realized Hey I do not have to go to work and not much on the honey do list either!
So I fired up the heater in the garage while the frost was still white on the grass.
I managed to get the A/C unit mounted behind the dash had to weld in a piece of 1" x 1" tubing. Drilled a couple holes and bolted it in place.
 

Attachments

  • image.jpg
    image.jpg
    73.8 KB · Views: 273
Had to cut a 2" hole in front of chassis for the coolant line to go to the radiator
 

Attachments

  • image.jpg
    image.jpg
    85 KB · Views: 265
Pulled the front clip off the wall today to check if the lower mounts for the radiator I made yesterday would work. Looks like all clears with room to spare. I will have to trim the lower piece of the dual nostril panel to fit. Spent some quality time rearranging the garage a bit.
 
Dave:
Looks like you have the radiator about right....mine clears with just a 1/2" or so at the top and I believe some of the builds have a foam or some type of weatherstrip up top to stop or at least restrict air flow..lookin good.
Although we have different chassis I believe the mounting location is the same and mostly dictated by the front clip.
If you need some numbers give me a yell.
Cheers
Phil
 
Back
Top