
You are using an out of date browser. It may not display this or other websites correctly.
You should upgrade or use an alternative browser.
You should upgrade or use an alternative browser.
Homemade CFRP mid engine sports car
- Thread starter Paul Bristo
- Start date
Chris Kouba
Supporter
...It would be very interesting to see some detail in process shots of how these were created...
Rob- He's got a good start to that post 34 and 36:
Homemade CFRP mid engine sports car
I’d just screw in a long plastic mud-flap and remove it after inspection.... But I admittedly have a hard time following inanely stupid rules...
www.gt40s.com
Homemade CFRP mid engine sports car
I’d just screw in a long plastic mud-flap and remove it after inspection.... But I admittedly have a hard time following inanely stupid rules...
www.gt40s.com
Way cool indeed!!!
amazing level of fabrication here, very cool. One comment on open front design - I think it will generate significant lift at speed, all that air will pack into the wheel wells as there is a choke point between the tires and the chassis that will not allow easy escape. A rigid flap in front of the wheel, with an air extractor at the top, going through the fender surface, would allow the air to escape without creating a high pressure zone under the body work.
Hi Tom, yes I had been wondering the same. I'll likely either add a vent over the fender, or adjust the trim line for the hood to pull it outboard nearer the tyre, let the air bleed round the side. I'm also concerned about the rear, the engine bay is very open, lots of drag, and not very practical, but for me this was an important styling feature. Its still kinda hard for me to visualise the overall styling, how it will look in the flesh, I expect once it starts coming together I might change my mind here and there.
Mesa - I plan to laminate another CF layer on a wishbone this weekend, i'll take some photos as i go.
Mesa - I plan to laminate another CF layer on a wishbone this weekend, i'll take some photos as i go.
Mesa - Here's some snaps showing the process. First, make sure you have everything prepped. Once you start you'll have sticky hands and the clock will be ticking so I get all the plies cut out and counted, find a good movie to put on and open a beer all before the epoxy is mixed. step 2, mix the epoxy and paint it over the part, then apply the CF ply, then apply more resin, brush all over and place the next ply, etc. This evening I was putting down 5x plies of 200gsm UD all over, which gives me just over 1mm of CF. It took me two and a half hours to get all 5 plies down all over which is all the time I have before the resin starts to gel, so I'll need to repeat this activity several more times on other days. This is layer 2 of 5 layers that I will put down, theis UD sits at the middle of the stack. Once all plies down, I wrap in perforated release film, then in breather fabric. Any excess resin will bleed into this. Then into the vacuum bag to compress it down .. then check for air leaks .. this is the part I dread, at this stage i'm tired and I don't enjoy hunting for air leaks. Once airtight I clamp off and take the part inside the house to cure in the warm. Once cured i'll unwrap and tidy up the surface, sand off any resin flash between the crinkles in the release film and abrade the CF ready for the next layers to go down.
Once all structural plies are down, I sand the part smooth, any bad lumps I might use filler, then I stick a final cosmetic CF fabric over the top with spray adhesive. Then lots and lots of resin over the top, sand down the grits until ready to be polished to gloss.
This part I also need to drill and tap holes and insert helicoils. I use a 3D printed jig to align where to drill so I can find the Ali inserts embedded in the part OK.
Mesa - Here's some snaps showing the process. First, make sure you have everything prepped. Once you start you'll have sticky hands and the clock will be ticking so I get all the plies cut out and counted, find a good movie to put on and open a beer all before the epoxy is mixed. step 2, mix the epoxy and paint it over the part, then apply the CF ply, then apply more resin, brush all over and place the next ply, etc. This evening I was putting down 5x plies of 200gsm UD all over, which gives me just over 1mm of CF. It took me two and a half hours to get all 5 plies down all over which is all the time I have before the resin starts to gel, so I'll need to repeat this activity several more times on other days. This is layer 2 of 5 layers that I will put down, theis UD sits at the middle of the stack. Once all plies down, I wrap in perforated release film, then in breather fabric. Any excess resin will bleed into this. Then into the vacuum bag to compress it down .. then check for air leaks .. this is the part I dread, at this stage i'm tired and I don't enjoy hunting for air leaks. Once airtight I clamp off and take the part inside the house to cure in the warm. Once cured i'll unwrap and tidy up the surface, sand off any resin flash between the crinkles in the release film and abrade the CF ready for the next layers to go down.
Once all structural plies are down, I sand the part smooth, any bad lumps I might use filler, then I stick a final cosmetic CF fabric over the top with spray adhesive. Then lots and lots of resin over the top, sand down the grits until ready to be polished to gloss.
This part I also need to drill and tap holes and insert helicoils. I use a 3D printed jig to align where to drill so I can find the Ali inserts embedded in the part OK.
View attachment 110165View attachment 110166View attachment 110167View attachment 110168View attachment 110169
end of year update .. finished the moulds for the LH door now. Next i'll be working on the RH door and finally the upper structure - that should take me up to the spring. Then I can give the garage a proper clean out and get ready for the next stage.


Neat build! Pretty amazing.
I don't know if you have seen this guy's YouTube channel, but he has a ton of videos about moulds and composite layups. Lots of tips and tricks for the garage builder. Definitely a redneck approach to composite body panels but he gets the job done...Maybe you already are a pro... I've learned a bit from him.
I don't know if you have seen this guy's YouTube channel, but he has a ton of videos about moulds and composite layups. Lots of tips and tricks for the garage builder. Definitely a redneck approach to composite body panels but he gets the job done...Maybe you already are a pro... I've learned a bit from him.
Thank Dave, I'd not seen that particular one but I think I've seen another video of the same guy forming his own screens from polycarbonate. Lots of good ideas ..
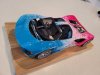
So .. finished the car .. sort of. Painted up the 3D printed scale model that I had already made as a task I could finally actually do with the kids. I asked them what colour it should be, one said blue one pink .. so its half n half.


progress update, got the RH door off now too. All thats left of the original buck will now be the main upper structure. Bit of a fiddly part this one as I need to get the flanges offset just right as they will be mounting the door seals, so offset distances need to be right.


its been a while since my last update but things are still ticking over slowly. Finished making the all of the moulds for the outer body, and have made the main upper structure part.
I tested a better way of doing the aluminium inserts (the cross-beam at the rear has 4 fixings for seat belt harness eyes). I pre-drilled and tapped them before putting them into the mould, filled the holes with plasticine, then infused the part. Then once cured it was simple to drill out the opening and clean out the plasticine .. much easier than trying to accurately drill an tap from the large finished part.
Again I have some resin rich corners from bridging, but will not affect structure worthiness, is a cosmetic issue. It needs a good sanding to sort out the mould lines, and there's some dry areas from imperfect infusion that need a bit of rework, but other than that its now done .. and I can start work on the tub !
found another little thing for the kids to get involved with .. dismantling of the old buck .. they enjoyed this part of the project


started making the pattern for the tub mould, mostly plywood with a few local 3d printed sections for details. The main tub only extends as far in as the top of the sills (rockers), I'll make separate patterns to make moulds for the sill inners.
i'll be making it on a rotating rotisserie because i'll need access to all sides when making the mould.
started checking alignment with the upper structure, after that next step is to place the rear clip back against it to check that still aligns too.


i'll be making it on a rotating rotisserie because i'll need access to all sides when making the mould.
started checking alignment with the upper structure, after that next step is to place the rear clip back against it to check that still aligns too.
got up off the ground and able to spin
now more filling and sanding and sanding and sanding and polishing !


now more filling and sanding and sanding and sanding and polishing !
Main tub pattern now primed. Fair bit of sanding to do now .. see you in a few weeks


Finished sanding and polishing the pattern for the main tub, just waiting on some polypropylene sheet to arrive so I can make the flanges for the mould splits and then i can get fibreglassing the first section. Once the moulds are made I will have missed the warm weather window for infusing the actual tub part, so i'll have to find some other area to work on till next spring.
View attachment 117588
In parallel decided to get the 3d printer working on a much larger scale model of the car. I made a 1:12 scale model, it took about 2 weeks of non-stop printing of parts. Now it has pride of place on my desk to remind me what i'm working toward. I might try thermoforming some thin clear plastic to make the screens if I get time.
Attachments
oops, some problem with the photo, try again ..

October update, mostly finished with the tooling now for the main tub. I'll let the moulds sit for a while to cure some more before taking them off the pattern.
I think I will have a bit of a wait now before I can use them, the weather is too cold now to cure epoxy parts in the garage. I will experiment with IR heaters hung from above to see what kind of tool surface temperature I can reach, but I suspect that's it now till the spring. I still have more moulds to make for the smaller inner tub panels so I won't be idle over the winter")


I think I will have a bit of a wait now before I can use them, the weather is too cold now to cure epoxy parts in the garage. I will experiment with IR heaters hung from above to see what kind of tool surface temperature I can reach, but I suspect that's it now till the spring. I still have more moulds to make for the smaller inner tub panels so I won't be idle over the winter