I have accomplished a bunch of other stuff but I have not taken any photos of most of it and you know what they say, "if you do not have photos it did not happen." I need to go around with the camera soon to document some of my other accomplishments.

You are using an out of date browser. It may not display this or other websites correctly.
You should upgrade or use an alternative browser.
You should upgrade or use an alternative browser.
Jonathans RCR 40 Build
- Thread starter jonathans
- Start date
The condenser is just a little smaller than the radiator.
I believe that Vintage Venom put his compressor on the left side, but he is using different front trim than I am. I am using an Explorer pump and cam cover. This is the shortest trim available. I could not mount the compressor on the left side because of the lower hose on the Explorer pump that I am using. The hose prevents a low mount and the compressor would not fit in front of the head for a high mount. That left a low mount on the other side. There also was a handy boss on the block to bolt to on that side. I think you can work around the oil filter either way.
By the way I have moved my alternator since those shots. I need to post some new pictures of my front trim.
Rob
Lifetime Supporter
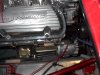
Correct Johnathan, I mounted on the LH side. I too have the shorty water pump with the pump inlet on the LH side. This was certainly a consideration, but I was able to work around it. It's tight..no doubt, but the hose snakes between w/o issue. see pics.
Attachments
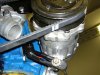
Rob, I think your pump is a little longer than mine. I am also running a serpentine belt. I do not believe I could mount the compressor on that side with my front trim. I don't think there will be two RCRs built the same.
Rob
Lifetime Supporter
I've been told this before.... 
No issues mate... of course there are no two the same. Just sharing what I did. However, I do "think" there "may" be enough adjustment in the RCR bracket to accomodate mounting with S-belt on LH side. Of course... w/o knowing how much shorter your pump is than mine... this is total speculation. From the pic you can see there is some, but not a lot of available room to move aft.
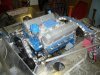
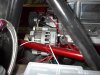
Looks like you did a very commendable job with fabrication of the tubular brackets. Only potential concern is the Alt height, for fear of clearance concerns with the bulkhead. If you have already considered this... then life is good, and good job on the fab work.")
No issues mate... of course there are no two the same. Just sharing what I did. However, I do "think" there "may" be enough adjustment in the RCR bracket to accomodate mounting with S-belt on LH side. Of course... w/o knowing how much shorter your pump is than mine... this is total speculation. From the pic you can see there is some, but not a lot of available room to move aft.
Looks like you did a very commendable job with fabrication of the tubular brackets. Only potential concern is the Alt height, for fear of clearance concerns with the bulkhead. If you have already considered this... then life is good, and good job on the fab work.
Attachments
Rob, you are right on the alternator height. That was an old picture. I have already lowered the alternator and added an idler pully on the alternator side. I need to post a few new photos.
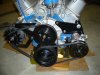
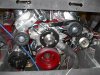
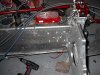
Here are some shots of my final front trim:
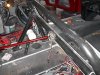
If you look close you can see the AC compressor is pretty far back. You can also see the alternator, which is shorter than the AC compressor just barely fits. Also the radiator hose is actually in the plane of the belt. I'll route the belt over the pump and down onto the alternator so that the belt does not pass over the hose.
I did not like the way my other alternator bracket looked anyway. This sticks to my tube theme. The other one was too small to make using tubes and it looked cobbled together.
My entire bracket set came in just a little over 2 pounds without the alternator tensioner and it seems pretty stiff. I still need to weigh the alternator tensioner.
I also added a tube on the AC compressor side to keep the throttle cable out of the belts.
Attachments
I have also modded my AC plenum from Fran. I wanted to add two center vents on the dash. I also mounted my evaporator before I had the plenum and the two did not line up so I had to add a bulge to the plenum. Here are some shots:
Attachments
Rob, out of curiosity what is the measurement from the mating surface of the block and the cam cover to the furtherst forward part of the pulley grove on your water pump (in other words the front of the fan belt). The Explorer trim is 5.5 inches.
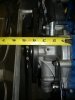
Rob, our front trims are going to be pretty close. I was measuring from the back of the cam cover and not the back of the pump. I believe that some of the cam covers are different thicknesses.
The last two weekends I did not get as much done on the car as I hoped. Two weeks ago I ran the Dragon (318 curves in 11 miles in the Smokey Mountains) in my Cobra with a group of twenty other Cobras, including a real 289. A RF40 was in the group as well.
Attachments


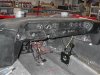
Man that photo of the dash really shows the dust. The paint is pretty good that is just dust. I have also put a C notch in the seat belt bar on the roll bar to give the distributor some more room and clearanced the frame for the starter. The motor is nearly ready to be reinstalled.
Attachments
Similar threads
- Replies
- 14
- Views
- 2K
- Replies
- 29
- Views
- 5K