Jonathans RCR 40 Build

Chris Kouba

Supporter
Jonathan-

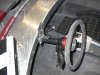
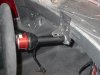
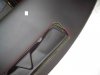
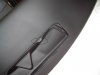
Could you post a few more details or pics regarding the steering column and turn signal switch. I have been pondering this exact concept and would appreciate the info.

Looking great.
 
It is pretty simple. It is a 6" piece of 1.5" round stock that I welded a bolt to. I welded a piece of angle iron to the bracket that the pillow block is on to bolt it to. I slotted the angle iron to allow adjustment. I'll post some pictures tonight.
 
Here are some shots of the column. As I said, it is pretty simple. I am a firm believer in the KISS principle:
 

Attachments

  • IM000700.JPG
    IM000700.JPG
    105.9 KB · Views: 1,289
  • IM000699.JPG
    IM000699.JPG
    87.6 KB · Views: 1,295

Chris Kouba

Supporter
Thanks Jonathan. Looks like you've thought this one through for me. Much appreciated.

Is that one of the VW Beetle switches from JCW? Do you have the p/n?

Looks great!
 
These shots are for Bill. He was looking for more information on the alterations to the dash to make a '65 Mustang dash vent work. The first shot shows the revisions to the opening. The areas boxed in red were filled. The areas boxed in yellow were relieved using a router. Some of the areas that were relieved needed to be built up on the back side prior to relieving them to avoid going all the way through the dash:
 

Attachments

  • IM000702f.JPG
    IM000702f.JPG
    36.4 KB · Views: 1,049
I also built up two tabs both from the front and behind to give the mounting screws something to bit into. I built these up using fiberglass and resin to give it strength. These are circled in black:
 

Attachments

  • IM000702t.JPG
    IM000702t.JPG
    34.1 KB · Views: 983
And last i needed to cut two slots for tabs on the Mustang vent to lock into. These allow you to attach the vent with just two screws on the front. These are circled in yellow below:
 

Attachments

  • IM000703s.JPG
    IM000703s.JPG
    34.2 KB · Views: 953
Thanks a bunch Jonathan. And I got your PM reply. Thanks again

I will print these pictures and send them to the body man along with the grille.
 
I finally have all my accessories so I could fabricate my brackets. I went with Explorer front trim so all the brackets had to be made from scratch. Everything is tight. The AC compressor would only fit on the bottom passenger side (LH Drive) and the alternator had to go on the driver side top. I started with a 93 Mustang alternator but it would not fit where I wanted it. I found a GM truck alternator fit fine. Here are some pictures:
 

Attachments

  • IM000704.JPG
    IM000704.JPG
    94.7 KB · Views: 1,029
  • IM000706.JPG
    IM000706.JPG
    103.6 KB · Views: 957
  • IM000705.JPG
    IM000705.JPG
    92 KB · Views: 972
  • IM000707.JPG
    IM000707.JPG
    90.6 KB · Views: 932

Bill Hara

Old Hand
GT40s Supporter
Jonathon

It's probably only the perspective of the last photo, however it looks like the alternator pulley is not parallel with the crank pulley. Would pay to check it, although I'm sure you have already done this.
Great looking motor though and an awesome build overall!

Cheers

Bill H
 

Randy V

Moderator-Admin
Staff member
Admin
Lifetime Supporter
Very nice Jonathan!!!

Are you trying for the BUMPless Bulkhead? I'd really like to find out what the right combination is to get there.. I'm not crazy about the electric waterpump route either..
 
I have found you cannot "eyeball" pulley alignment. It takes a straight edge. The alternator is pretty close but not perfect. It is a lot closer than that photo looks though. It will require a little more tweeking.
 
I should be putting the motor in later this week. I will let you know if it is bumpless. The combination is pretty simple. It is an Explorer front cover and water pump. This requires the use of an Explorer harmonic balancer and pump pulley since there are not a lot of aftermarket parts for this combination. The pump pulley is only $12 from ford. The harmonic balancer is pretty easy to get as a cast off from a crate motor. I think I paid $15 for the balancer.

This is only about a 1/4 inch shorter than 95 Mustang parts which has a lot more aftermarked support.
 
I have not updated my site for some time. I have actually had quite a bit of progress but I have not taken the time to update my site. I have the motor back in for mock up again and I have painted all the links in the rear suspension to match the body color:
 

Attachments

  • IM000713.JPG
    IM000713.JPG
    129.1 KB · Views: 912
I have also mocked up most of the AC system. Here are some photos:
 

Attachments

  • IM000714.JPG
    IM000714.JPG
    116.3 KB · Views: 842
  • IM000716.JPG
    IM000716.JPG
    118.9 KB · Views: 809
  • IM000717.JPG
    IM000717.JPG
    113 KB · Views: 829
I have also been doing some polishing on the suspension. Here is a good before and after shot of the front lower control arms:
 

Attachments

  • IM000721.JPG
    IM000721.JPG
    89.2 KB · Views: 810
  • IM000720.JPG
    IM000720.JPG
    104 KB · Views: 798
  • IM000719.JPG
    IM000719.JPG
    96.1 KB · Views: 794
Back
Top