Jonathan just installed in the wrong location.....due to the Audi transaxle having low output shaft locations and some miscommunication from my my end...no problems .

You are using an out of date browser. It may not display this or other websites correctly.
You should upgrade or use an alternative browser.
You should upgrade or use an alternative browser.
Jonathans RCR 40 Build
- Thread starter jonathans
- Start date
Jonathan, Looking good and I love your paint color. I'm looking forward to your engine install and clearance checks. Why the relief for the distributor?
On a different note, did you notice "heightened police presence" on the Tail of the Dragon run? I was reading a biker forum that was full of complaints and pictures of what appeared to be pretty heavy handed tactics, but then it was on the Internet so who really knows!
On a different note, did you notice "heightened police presence" on the Tail of the Dragon run? I was reading a biker forum that was full of complaints and pictures of what appeared to be pretty heavy handed tactics, but then it was on the Internet so who really knows!
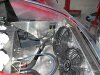
I used a MSD distributor, which is pretty big. My distributor hit the roll bar before my water pump hit the firewall, so I put in the relief to move the engine further forward. I discussed this with Fran first and he said others have done it as well. I have less than an inch of misalignment fore and aft on the axles now and no bulge in the firewall.
There certainly was a police presence on the Dragon this year. We saw about 5 going up and 7 going down. That about one officer every 2 miles. I bet there is not anywhere else in the country getting that level of coverage.
We did 30 MPH the whole way needless to say. I doubt that the cops have needed to resort to heavy handed tactics. There are plenty of legitamate violations to be ticketed there.
We did 30 MPH the whole way needless to say. I doubt that the cops have needed to resort to heavy handed tactics. There are plenty of legitamate violations to be ticketed there.
Dragon + Harley + "A little spill" = Fibia with plate and 8 screws.
I wish I could say I accomplished a lot this weekend. With the three day weekend I thought I would get the engine and transaxle installed and be ready to fire up the engine for the first time. I got the engine installed but I got nowhere with the transaxle. On the first attempt I got the clutch and transaxle installed then I went to turn over the motor by hand and it did not turn freely. Not good.
After some investigation I discover the input shaft for the transaxle is bottoming out in the pilot bearing adaptor. I figure I must not have pressed it in far enough. I remove it to check for obstructions. I find a bit of a curl on it so I figure it must have been a little crooked. I clean it up and press it in again. Still not deep enough. So I repeat the process but freeze it first. I succeeded in getting it in further but still not far enough.
Now I cannot press it in further and it would no longer come out using the hydraulic method. Off to the store to buy a pilot bearing puller. Of course it will not work because the arms are not long enough.
In the mean time I call KED and they said they sent the wrong part. The hole should have been bored out bigger than the input shaft the full length so that the input shaft would not bottom out. They said they would mail the replacement today. That still left me with the problem of removing the old one.
Three hours of fabrication later I made a new pilot bearing puller from scrap I had laying around. The only part from the store bought puller I used is the C shaped bridge. After about 10 minutes my home made puller had the adaptor out. I’ll post a photo of my puller later.
This has been the biggest challenge in the build and it was to take something apart.


After the coolant I moved on to the oil system. I went to add a dipstick and that took a full day. The bung was obstructed. I though I could just bend the dipstick tube but the stick would not pass through the bends. That meant dropping the pan and welding in a new bung. Then I primed the oil system and discovered that my AN fittings were leaking. I ordered a replacement fitting from Sumit and the FedEx man left it on someone else’s porch. I finally got impatient and went to a local store to get the part and TODAY I STARTED THE ENGINE.
It absolutely sounds like no other car I have ever heard. I love the sound of the cross over pipes. It sounds like an indy car.
It absolutely sounds like no other car I have ever heard. I love the sound of the cross over pipes. It sounds like an indy car.
Congrats, you are getting close! Your car is gorgeous!
")
I recorded some video with my camera but it really does not do it justice. I'll try to figure out how to post it later.
Looking good!
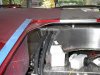
Question regarding the heater hoses. I noted the "T" fittings for the heater hoses to connect to the radiator tubes. I plan to use the same system. Don't yet have the fittings. Did you obtain the "T" fittings from Fran, a third party vendor, or fabricate them yourself???
Chuck
Question regarding the heater hoses. I noted the "T" fittings for the heater hoses to connect to the radiator tubes. I plan to use the same system. Don't yet have the fittings. Did you obtain the "T" fittings from Fran, a third party vendor, or fabricate them yourself???
Chuck
I fabricated them myself.
Another question, this one related to your radiator fans. Referring to the picture posted February 2007, I note four brackets on each plastic fan shroud secured with a bolt to the aluminun shroud. I also note some sort of device connecting the two fans together. I have the exact same fans with my RCR, but there was no hardware whatsoever with the fans. No clips. No brackets. No nothing. Did those little bracket / clips come with the fans or did you find another supplier?
The black plastic brackets came with the fans. The aluminum fan shroud I fabricated.
OK, here it is. A video of the first start. The sound does not do it justice. The mike on the camera is tuned more to the frequency of the fans than the engine.
YouTube - First Start
YouTube - First Start
Similar threads
- Replies
- 14
- Views
- 2K
- Replies
- 29
- Views
- 5K