
You are using an out of date browser. It may not display this or other websites correctly.
You should upgrade or use an alternative browser.
You should upgrade or use an alternative browser.
KCC Restoration
- Thread starter Willy81
- Start date
Thanks Jimmy. I appreciate the kind words. That's what it's all about. Having a bit of fun and getting stuck into it when we can. Plus it's a great family project.
I am looking forward to the next installment of this. I am still a good 700km away so not putting in any work myself but I got some pictures today of it down to the body off stage.
Will be interesting to see where to from here!
Will be interesting to see where to from here!
Dad's comment yesterday summed it all up "What have we done?" Hahaha. As you can see from this photo, we carried out some pretty drastic work to the car.
I dunno what Ben is doing with the light here. Starwars light sabres?
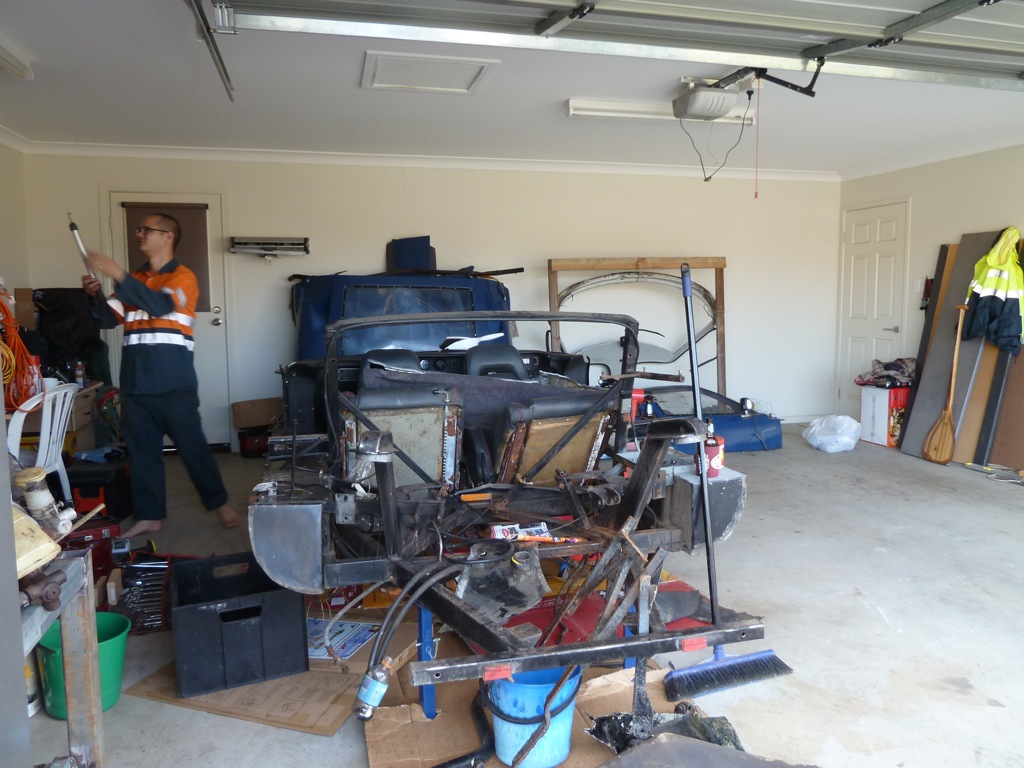
So yesterday was quite a productive day. My mate Danny came around to help Dad and I out. We got stuck into removing the body and interior. First up, one door was gone. 4 bolts and that's sorted..
Next up, seats..
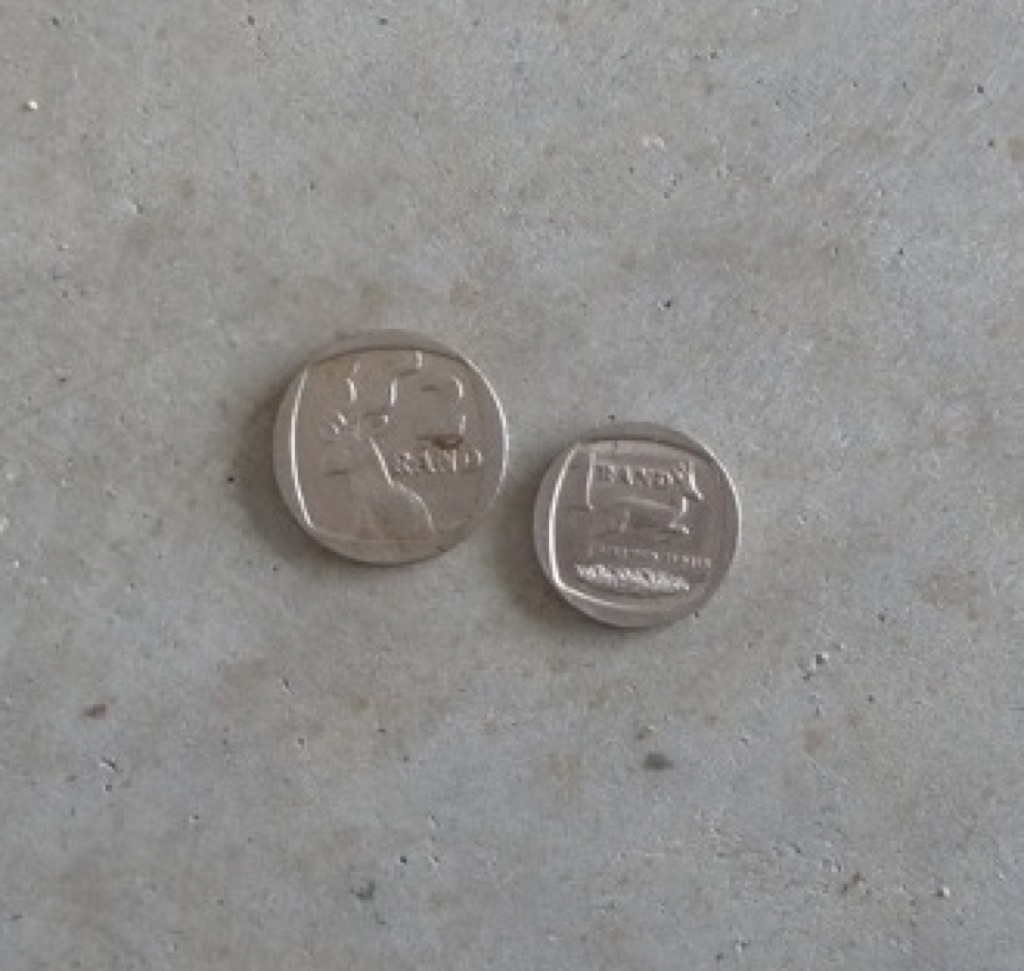
It was probably a good thing we removed these. The seat mounts are not in great shape. Of course, it's always interesting to see what random stuff has made it's way under the seats over the years. We discovered a 1/4" socket (I wonder how long the previous owners searched for this?) and 3 South African Rand (about 35c Australian). Why could it not be some gold bar from South Africa?
Anyway, so after pulling out the seats and the doors, we attacked the windscreen. Attacked being the operative word here... inevitably we cracked it, despite being careful. Doesn't matter. It was an SA standard windscreen and needed to be replaced to meet Australian regulations anyway.

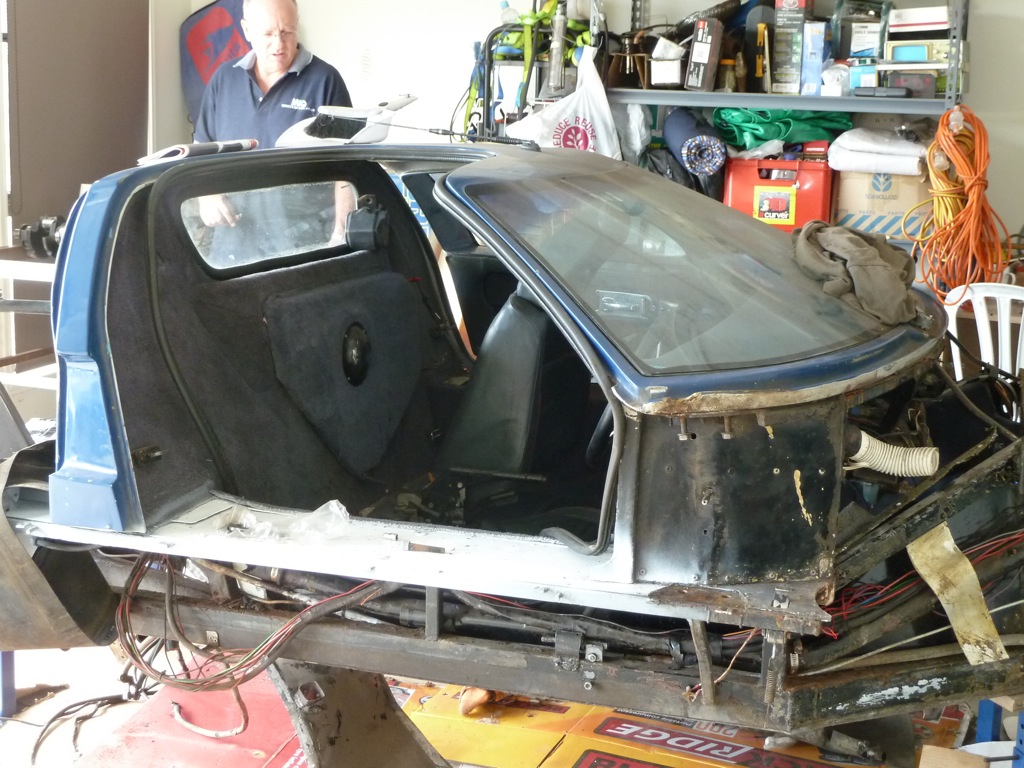
Next it was time for the body (commonly referred to as the Spider). Once we unscrewed a whole load of screws, it came off pretty easily.
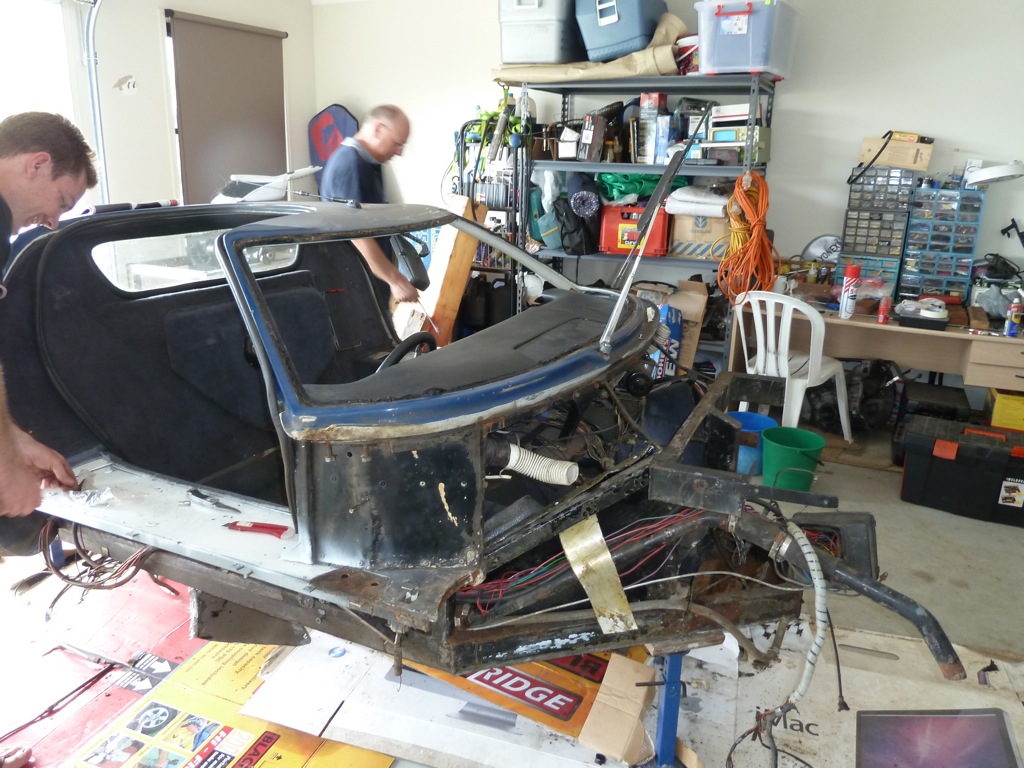
Danny looks like he's having some serious fun here
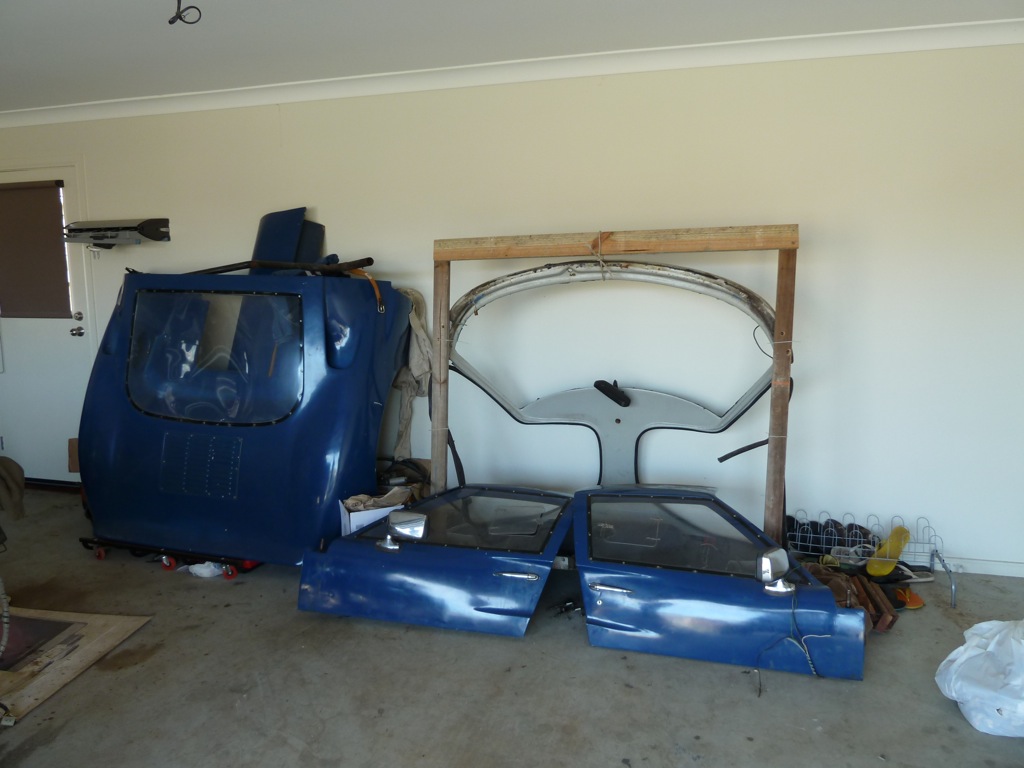
These spiders are pretty flexible once they are off the car. We knocked up this rack to hold it firmly. The garage is filling with GT40 stuff again..
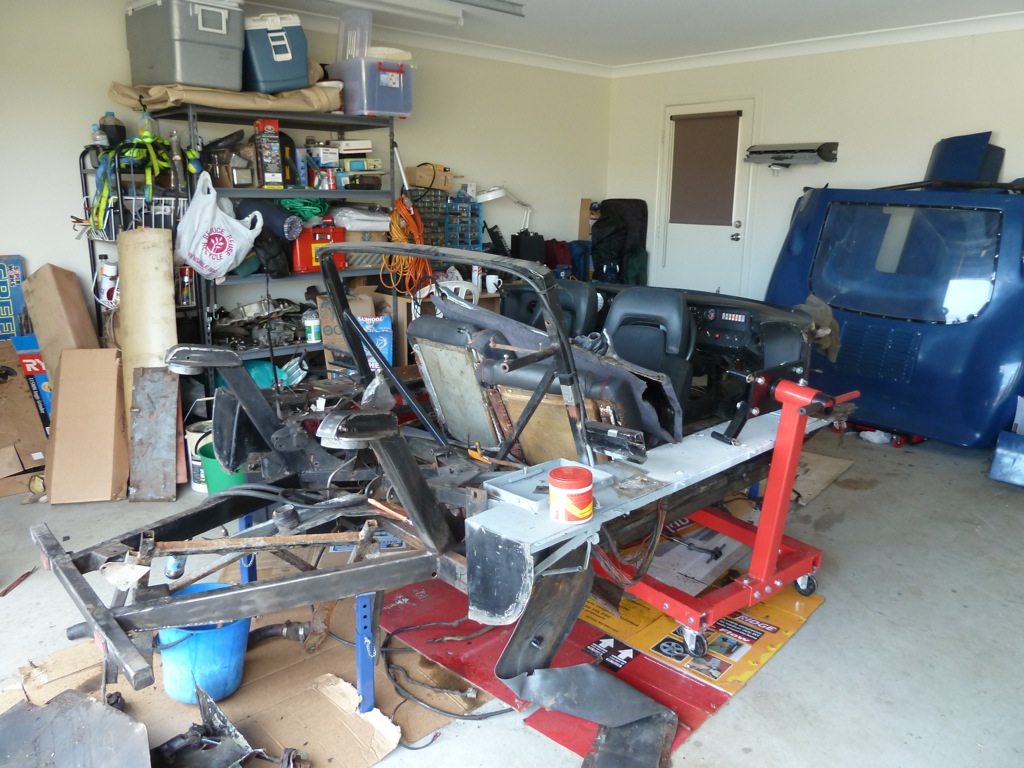
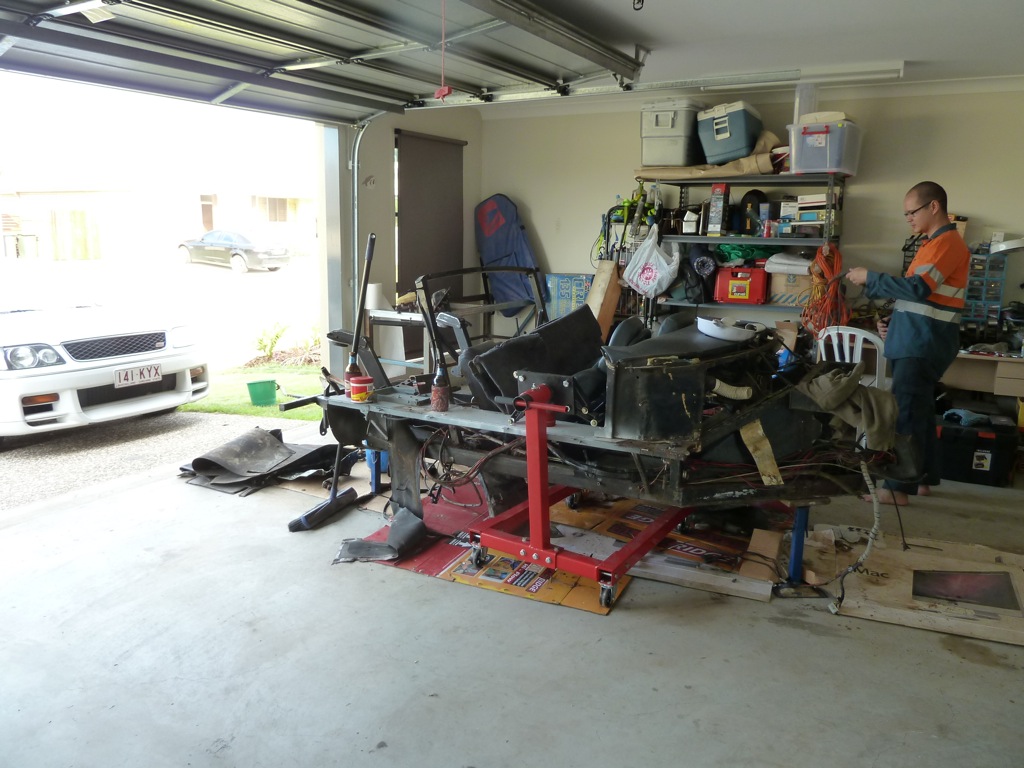
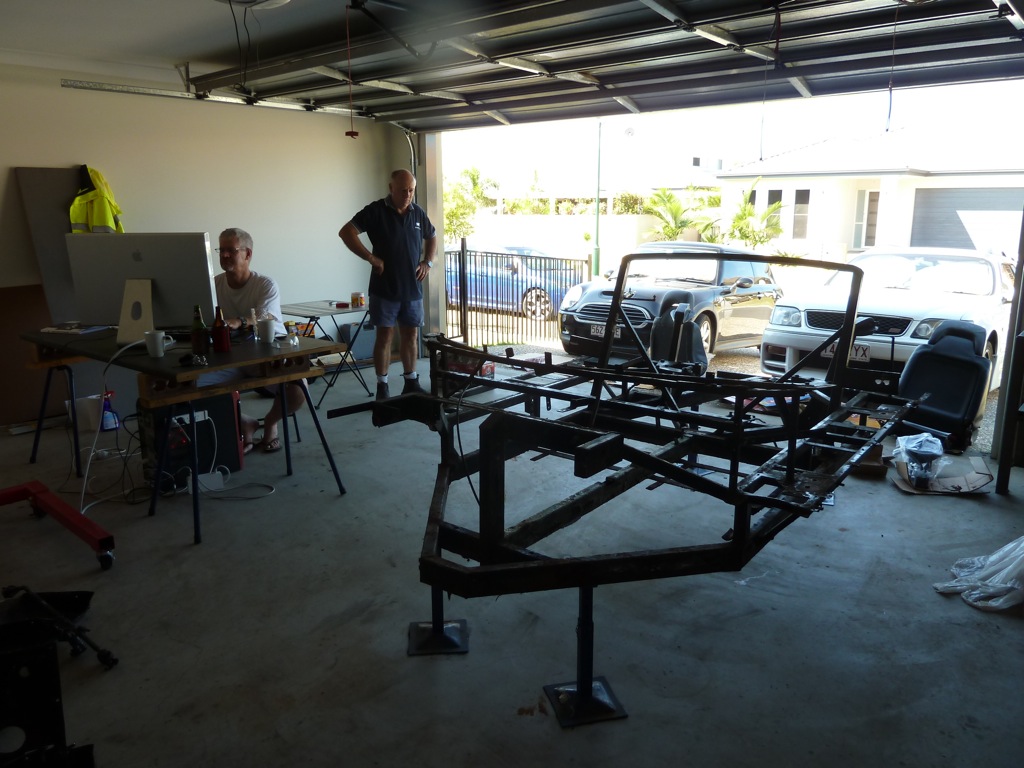
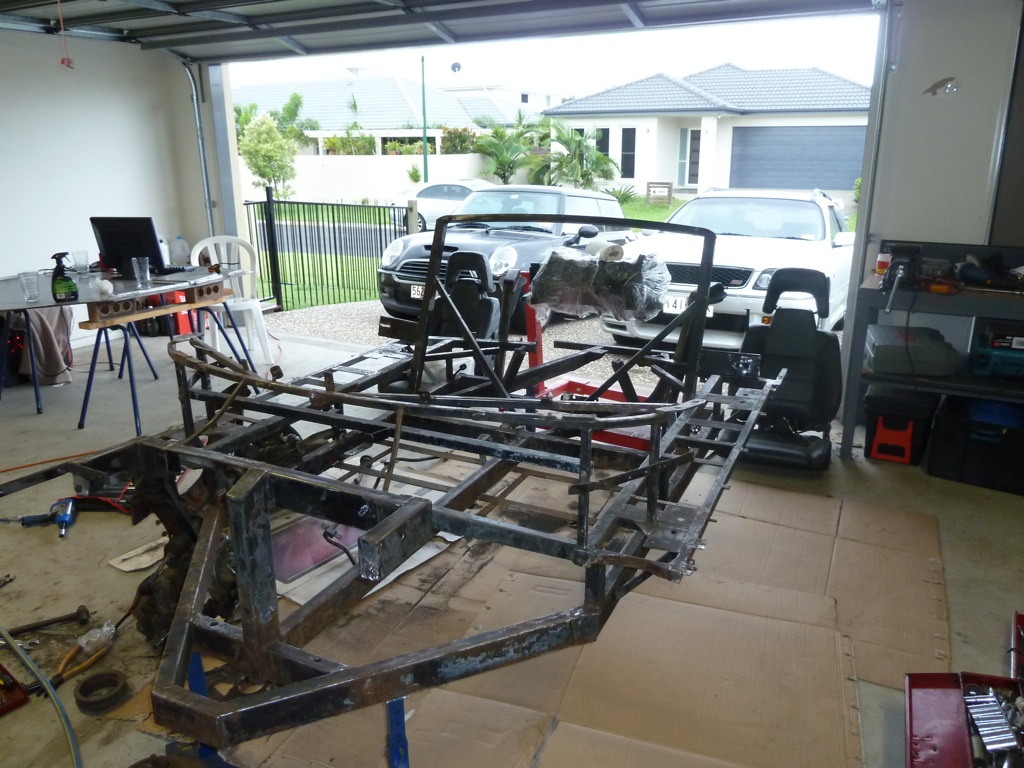
So all that's left now is a chassis, floor pan and dash. The random guy in the back is my mate Ben. He arrived from Townsville at about the time we were lifting the Spider off the car. As soon as he arrived he got in his work gear. Thanks Ben")
What's going on with the engine?
Yesterday morning we also paid a visit to the machine shop. Before we left, I said to Dad "Do you think we'd better give him a call to make sure it's ready to pick up?". Dad's reply, "Nah, he's had it for months now, he'll be ready". Surprise, surprise, we rocked up and it still wasn't finished. The shop is run by an old guy, who's obviously an engine enthusiast, but not so enthusiastic about job cards, etc. So the cam bearings have arrived, but they haven't got around to pressing them in yet. He said he'd do it Saturday arvo. We told him no hurry. We're certainly not ready for it yet anyway.
Dad also spent a few hours working on the crank journals yesterday. One more job done. Thanks Dad.
So next weekend, we should finish stripping this thing down and now it's time to start tidying it up and rebuilding it.
I dunno what Ben is doing with the light here. Starwars light sabres?
So yesterday was quite a productive day. My mate Danny came around to help Dad and I out. We got stuck into removing the body and interior. First up, one door was gone. 4 bolts and that's sorted..
Next up, seats..
It was probably a good thing we removed these. The seat mounts are not in great shape. Of course, it's always interesting to see what random stuff has made it's way under the seats over the years. We discovered a 1/4" socket (I wonder how long the previous owners searched for this?) and 3 South African Rand (about 35c Australian). Why could it not be some gold bar from South Africa?
Anyway, so after pulling out the seats and the doors, we attacked the windscreen. Attacked being the operative word here... inevitably we cracked it, despite being careful. Doesn't matter. It was an SA standard windscreen and needed to be replaced to meet Australian regulations anyway.
Next it was time for the body (commonly referred to as the Spider). Once we unscrewed a whole load of screws, it came off pretty easily.
Danny looks like he's having some serious fun here
These spiders are pretty flexible once they are off the car. We knocked up this rack to hold it firmly. The garage is filling with GT40 stuff again..
So all that's left now is a chassis, floor pan and dash. The random guy in the back is my mate Ben. He arrived from Townsville at about the time we were lifting the Spider off the car. As soon as he arrived he got in his work gear. Thanks Ben
What's going on with the engine?
Yesterday morning we also paid a visit to the machine shop. Before we left, I said to Dad "Do you think we'd better give him a call to make sure it's ready to pick up?". Dad's reply, "Nah, he's had it for months now, he'll be ready". Surprise, surprise, we rocked up and it still wasn't finished. The shop is run by an old guy, who's obviously an engine enthusiast, but not so enthusiastic about job cards, etc. So the cam bearings have arrived, but they haven't got around to pressing them in yet. He said he'd do it Saturday arvo. We told him no hurry. We're certainly not ready for it yet anyway.
Dad also spent a few hours working on the crank journals yesterday. One more job done. Thanks Dad.
So next weekend, we should finish stripping this thing down and now it's time to start tidying it up and rebuilding it.
Jeez I love this forum. Mark Clapp on this forum contacted me and said he has a KCC GT40 like ours. He also has the original build manual and a magazine article from the time, so he scanned them in and sent them to me. Very interesting to read and will no doubt come in handy in the future. Thanks Mark. Very much appreciated.
Yep our weekend involved stripping and modelling. You never know what's going on in the Willis garage...
Now, by stripping and modelling I was referring to the car. Of course.
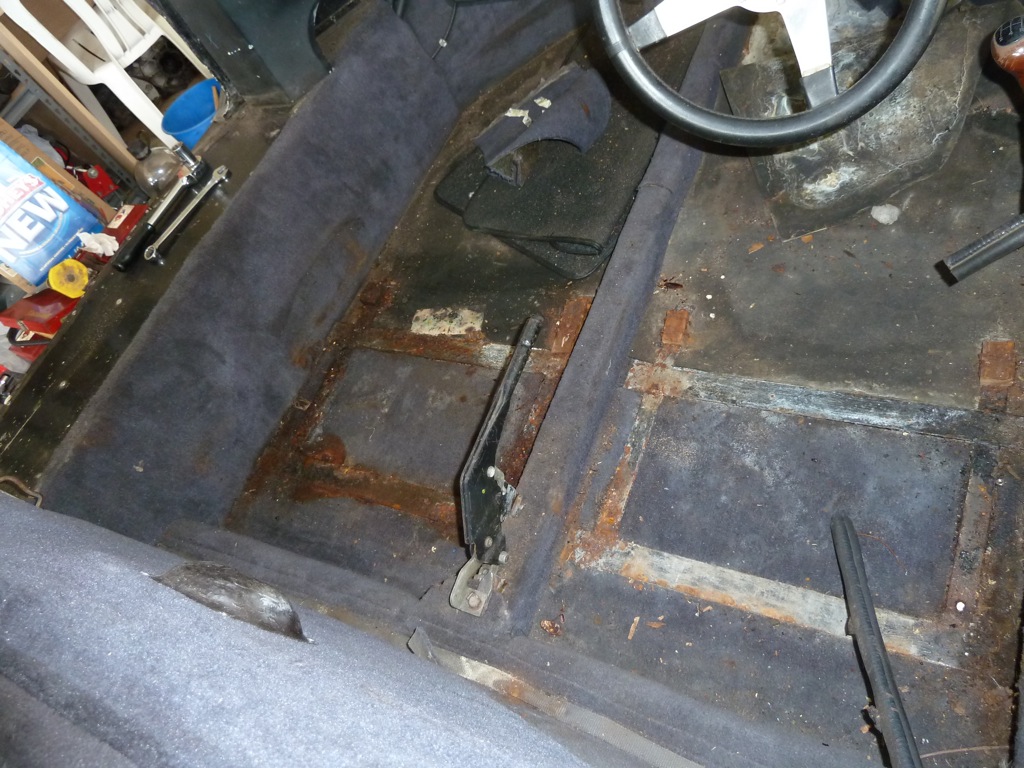
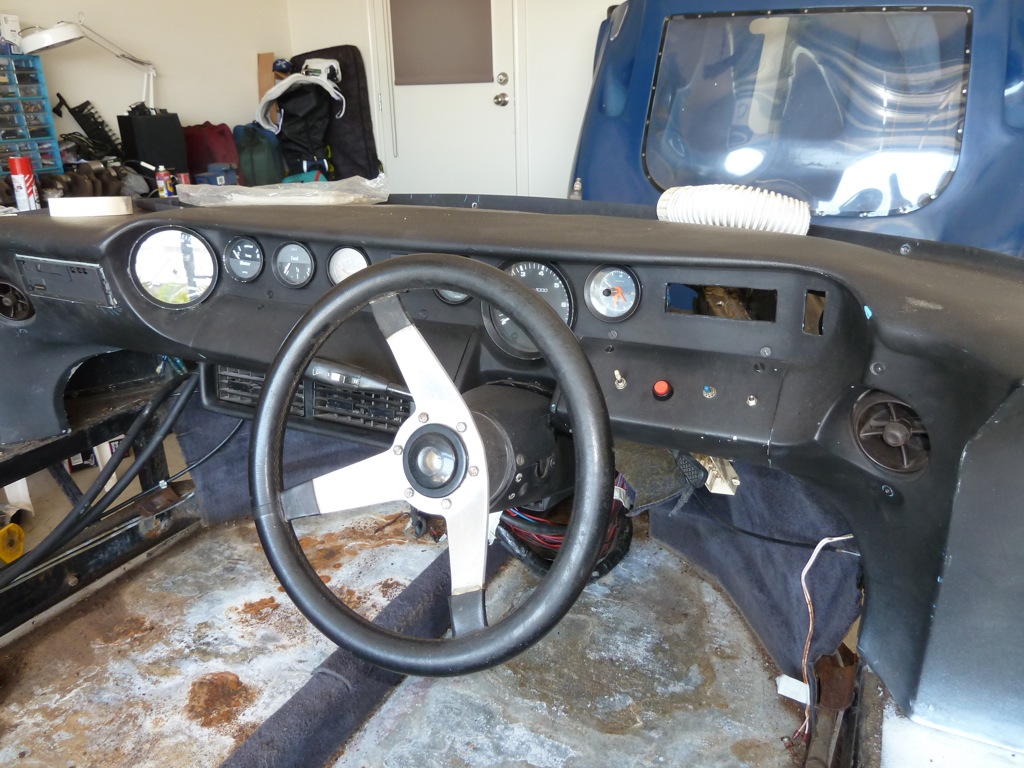
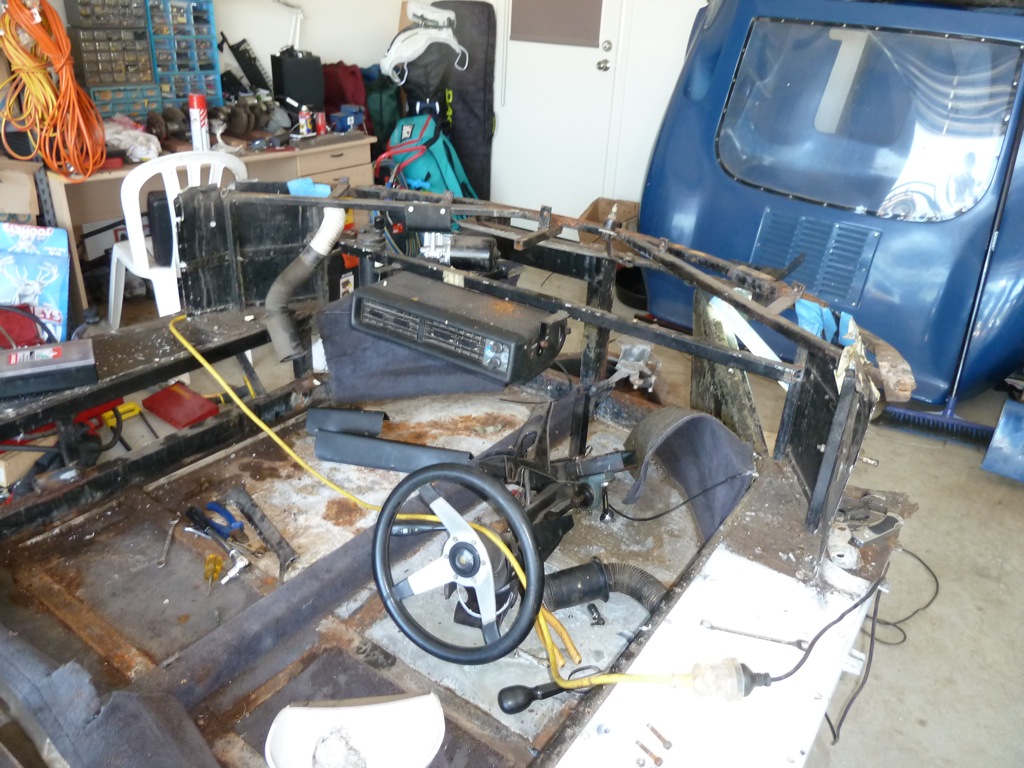
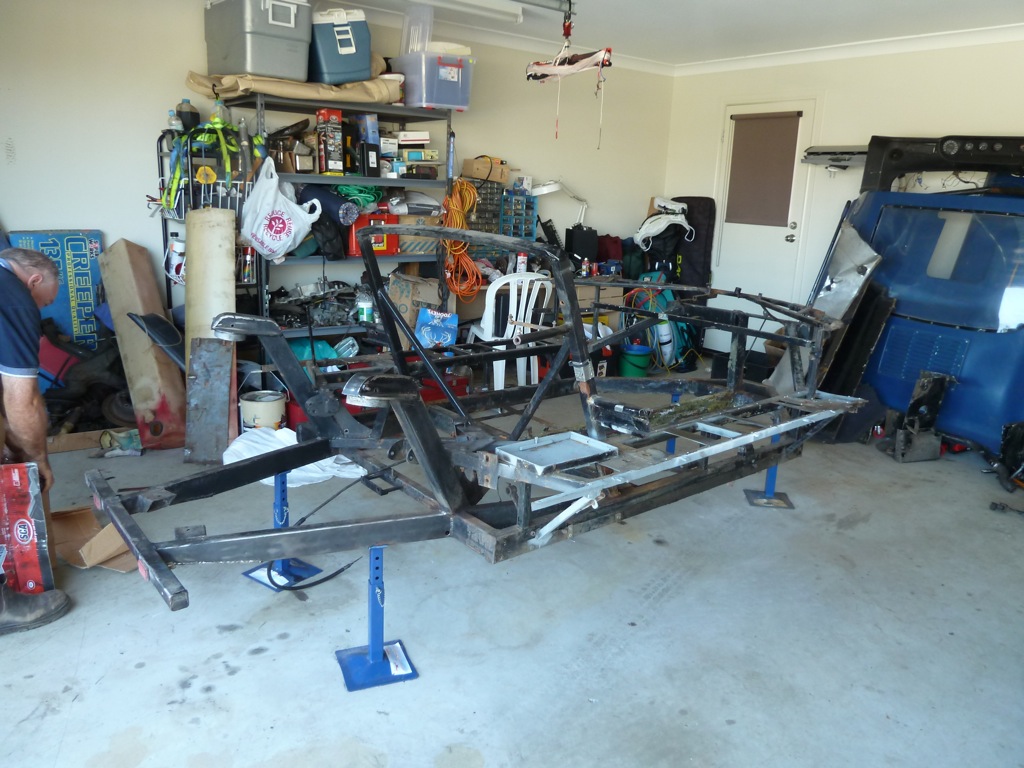
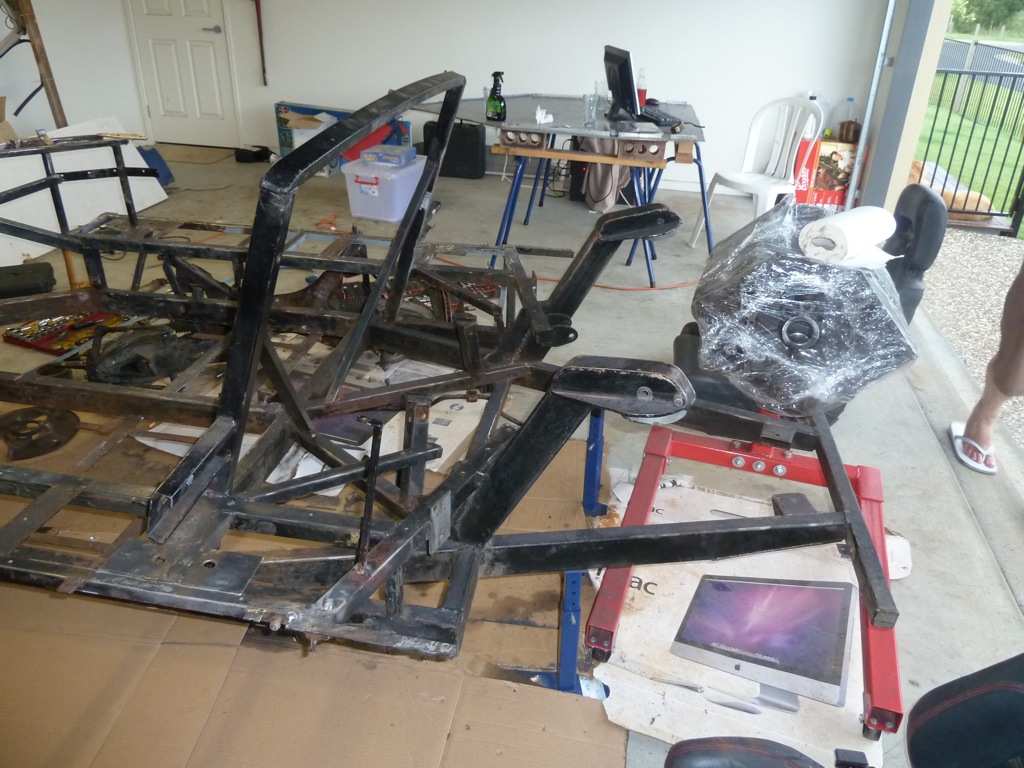
So, after the last blog we were down to a chassis with a dash. It looked something like this.
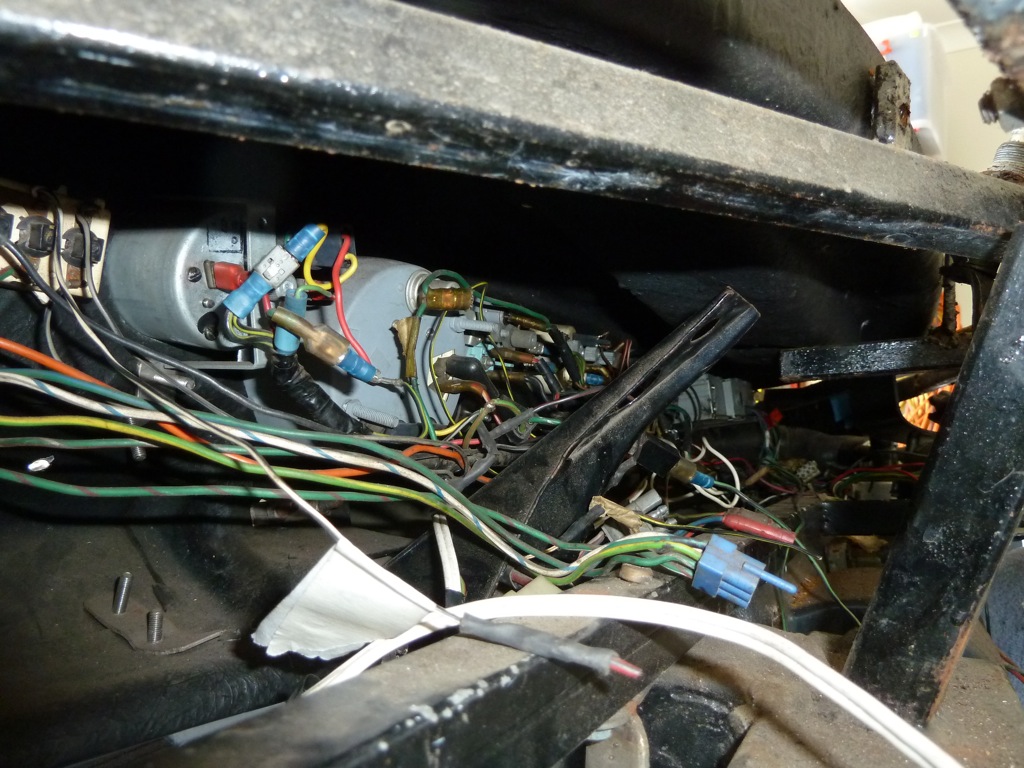
First up, I attacked the wiring. I labelled as much as I could, but there were a few wires that had me scratching my head. I'm sure that won't bite me in the future..... much.

Mid-way through the de-wiring
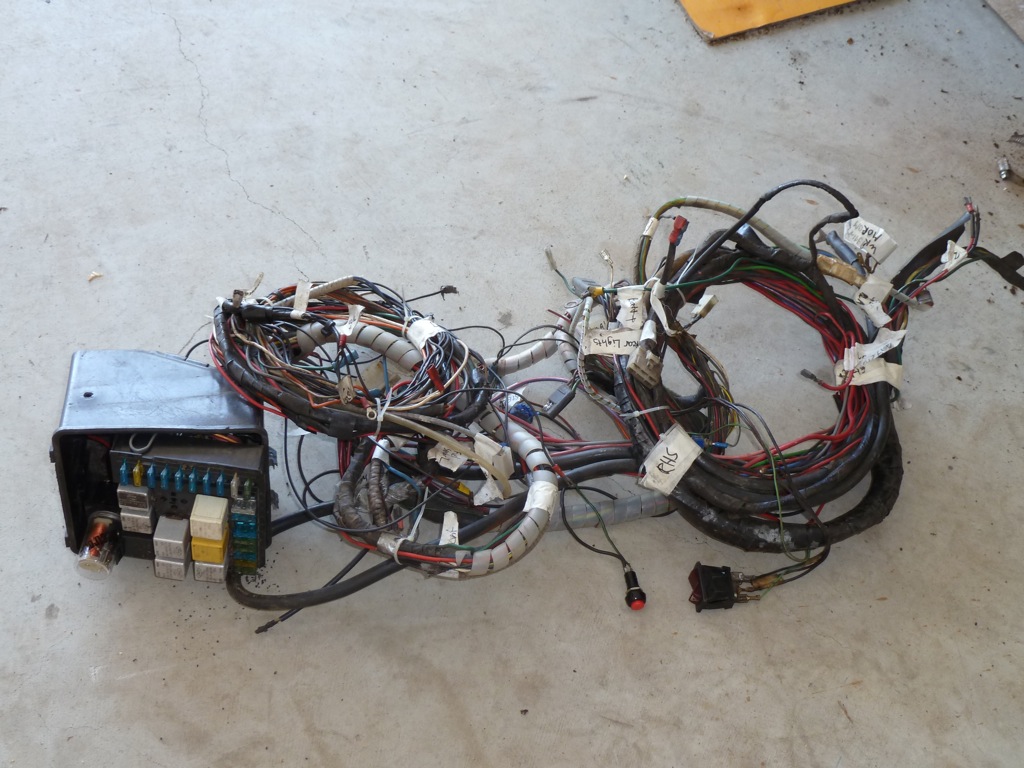
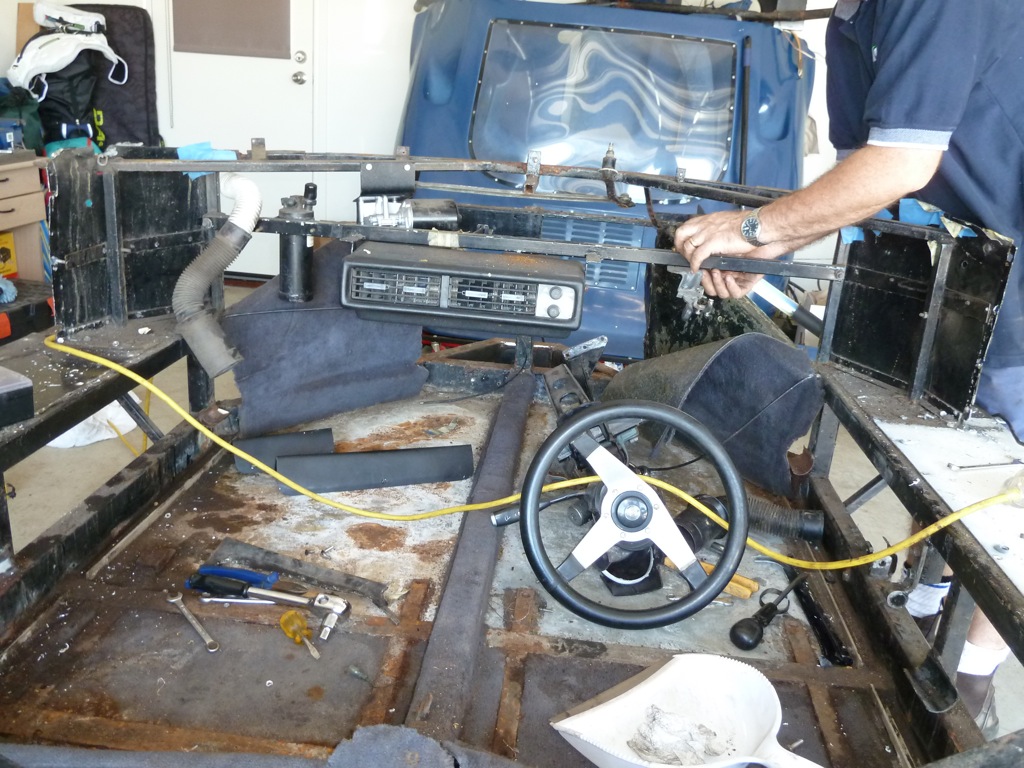
Here's what the back of the dash looked like after I'd unplugged everything. Fortunately, the previous owner had put plugs on most things so I only need to snip a few wires. Champion! Here's what the dash looked like after "de-wiring" and here's the loom I removed.
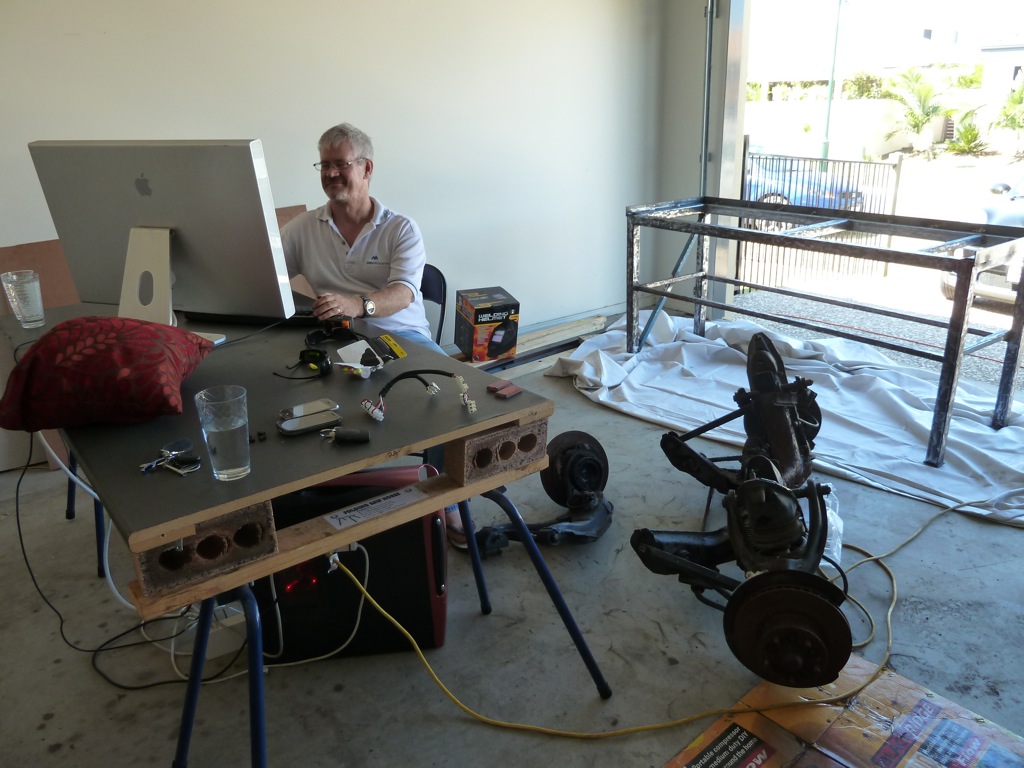
It was at this point in the day that my mate Jim Groutsch sent me a text saying "I'm on my way with my computer. Set up a desk for me". Now Jim is a Process Engineer who is also a self-confessed petrol head and has his own Porsche-powered kit car. Over the course of the week, Jim and I had been discussing chassis design. We came to the idea of creating a 3D model of our GT40 that we can use later for chassis and suspension development. Fortunately, Jim is an experienced user of Autodesk Inventor which he has used for years for work at MetEng.
I figured Jim was bringing his laptop, so I got out a camping table for him. Little did I know, he would show up with a 30" monitor and a full desktop! This necessitated a quick desk solution.
Now we're looking serious
OK, so Jim plugged away with his computer and tape measure, while Dad and I got stuck into the car.
Soon the dash was gone.
Like the "temporary" storage location for the dash?
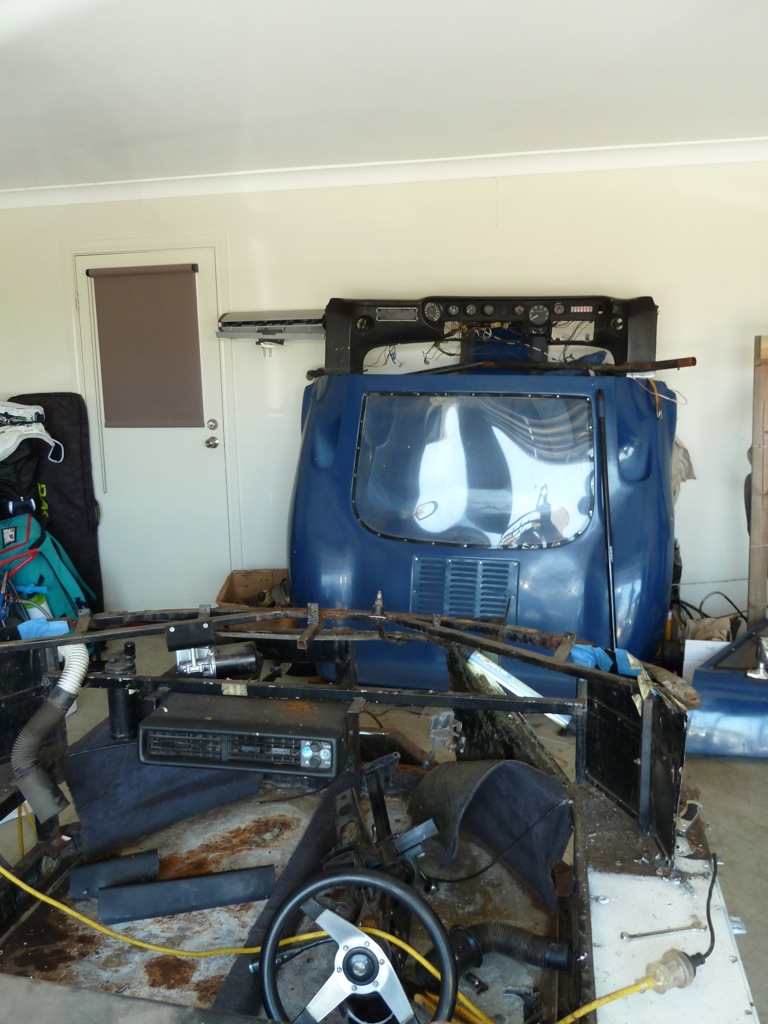
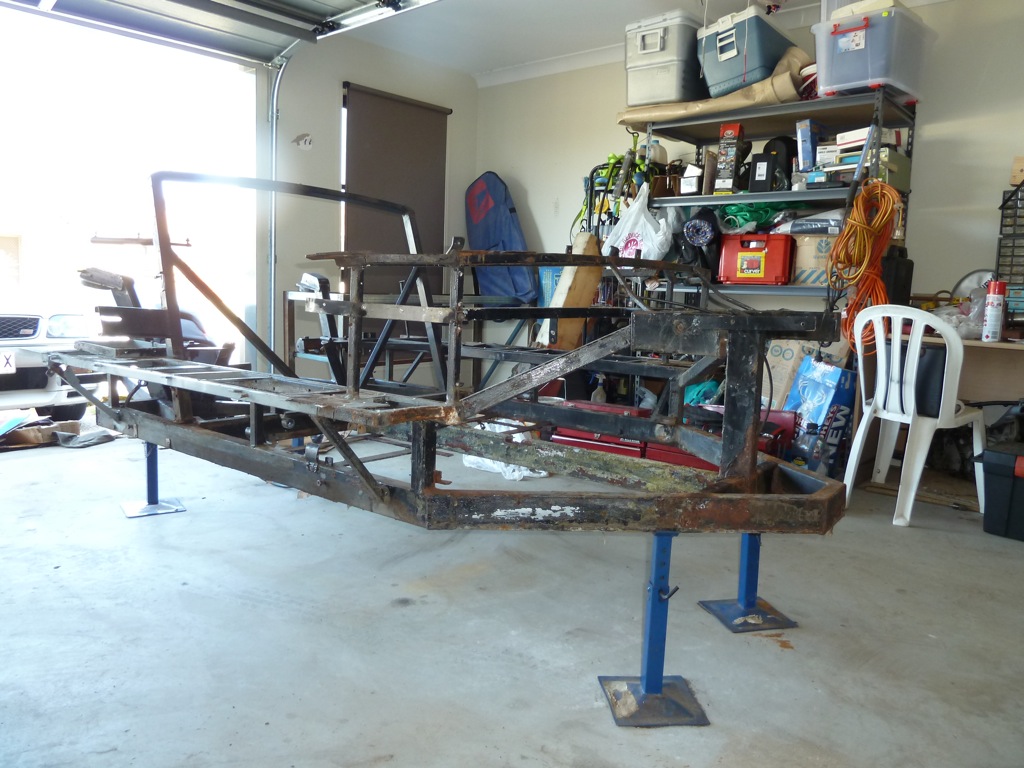
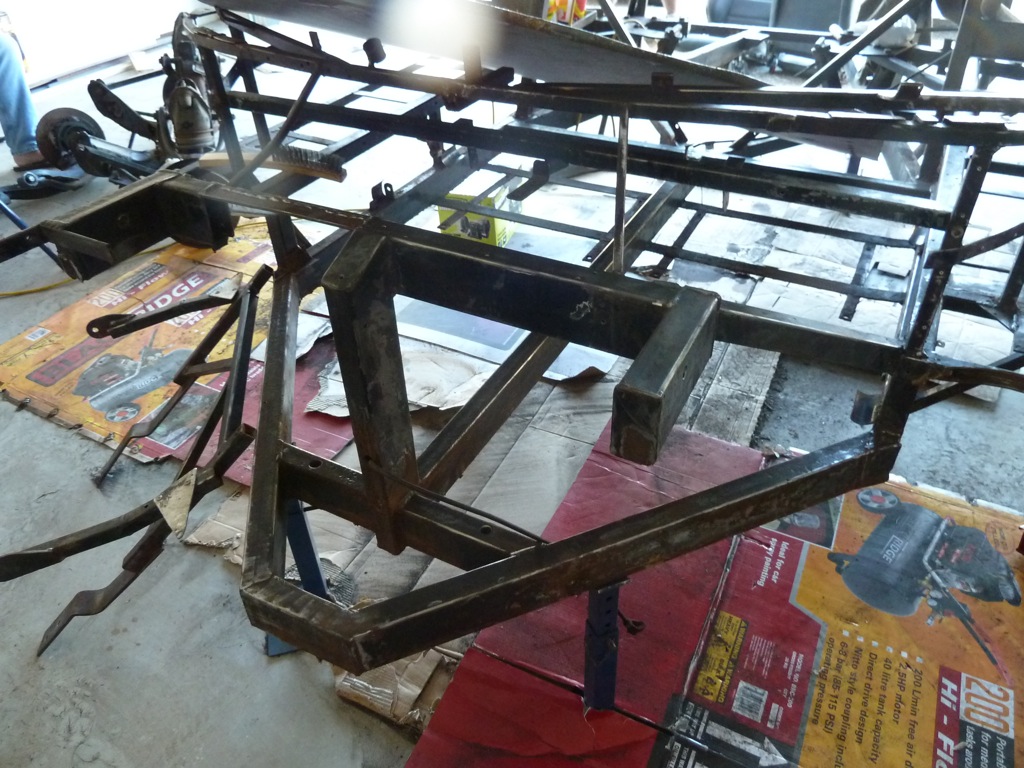
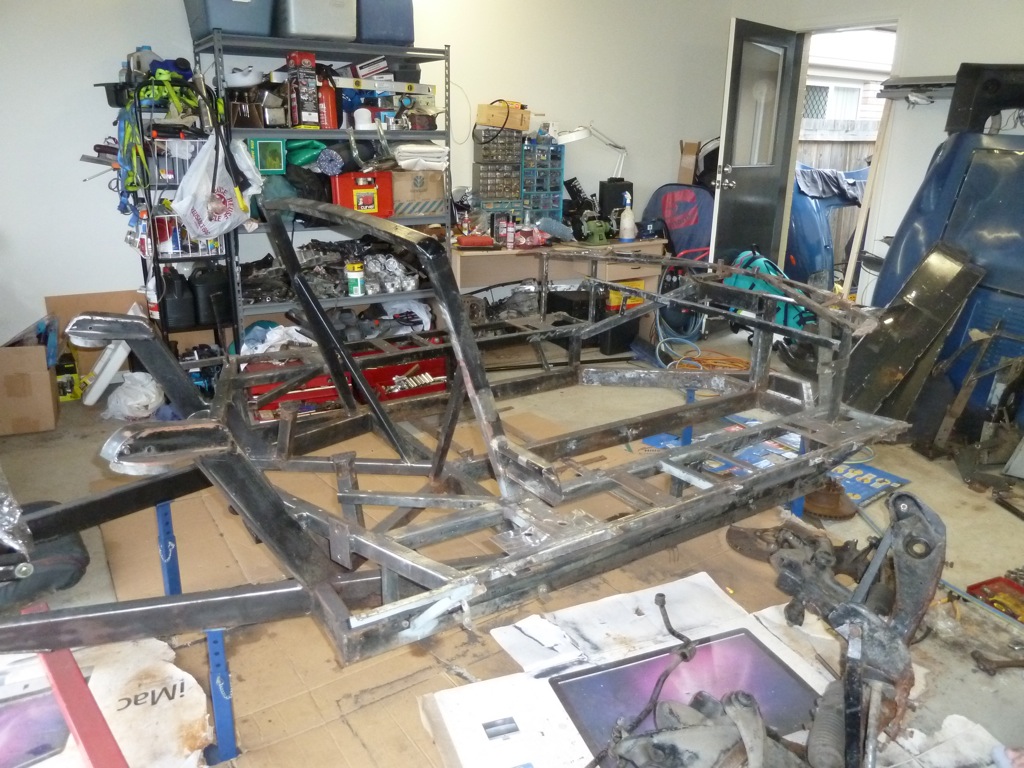
Next we attacked the side panelling and floor. Before we knew it, we were down to a raw chassis. Horray!
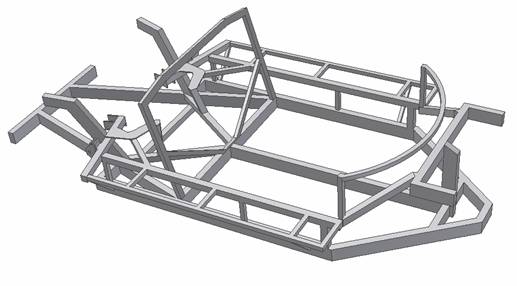
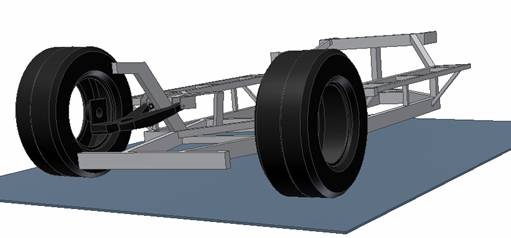
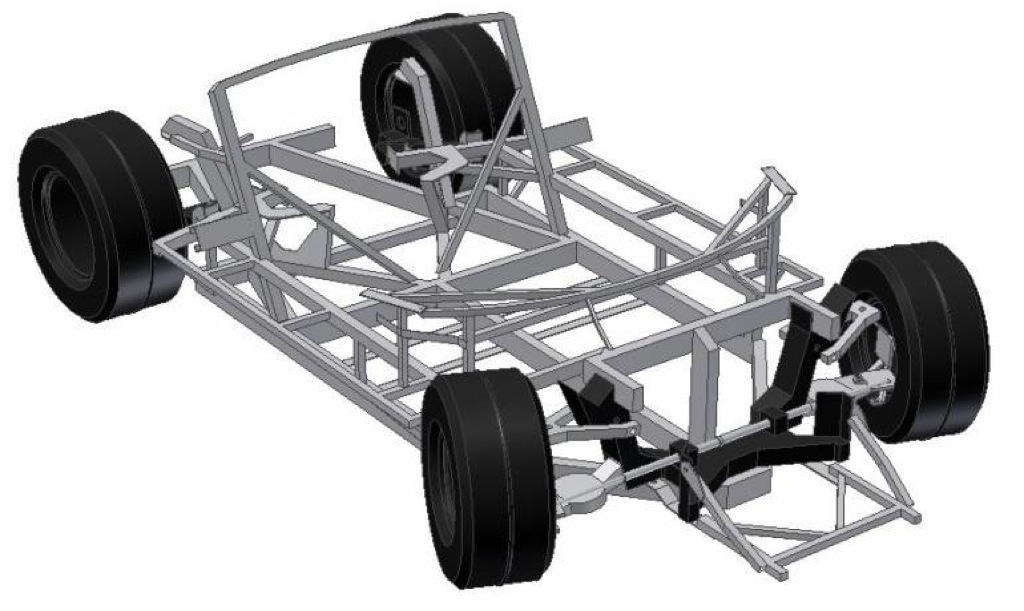
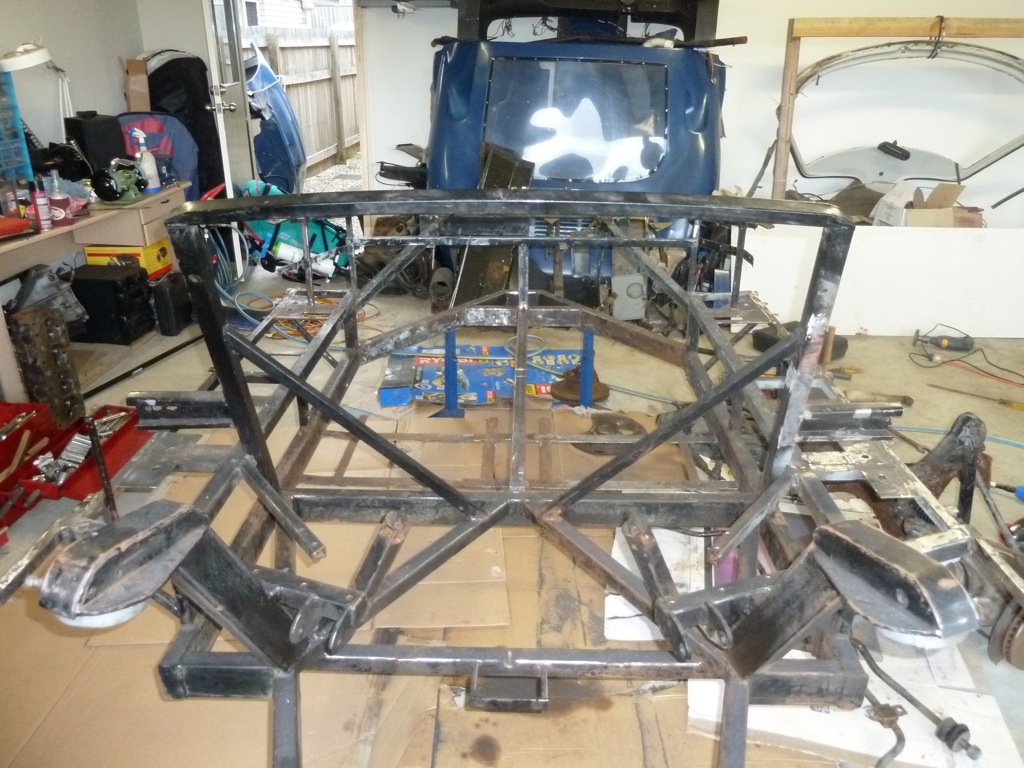
This is how far Jim had got after a few hours. The chassis is pretty much finished. He has started working on the rear trailing arms. The ones below are not exact. Just a test.

3 degrees body roll.
So that's where we are at the moment. Things are coming along nicely. It's now time to clean up that chassis. Oh yeah, another fantastic thing happened to me last week... I received an original manual for the car. More on that in a few days. I'm sick of typing and you're probably sick of reading.
Now, by stripping and modelling I was referring to the car. Of course.
So, after the last blog we were down to a chassis with a dash. It looked something like this.
First up, I attacked the wiring. I labelled as much as I could, but there were a few wires that had me scratching my head. I'm sure that won't bite me in the future..... much.
Mid-way through the de-wiring
Here's what the back of the dash looked like after I'd unplugged everything. Fortunately, the previous owner had put plugs on most things so I only need to snip a few wires. Champion! Here's what the dash looked like after "de-wiring" and here's the loom I removed.
It was at this point in the day that my mate Jim Groutsch sent me a text saying "I'm on my way with my computer. Set up a desk for me". Now Jim is a Process Engineer who is also a self-confessed petrol head and has his own Porsche-powered kit car. Over the course of the week, Jim and I had been discussing chassis design. We came to the idea of creating a 3D model of our GT40 that we can use later for chassis and suspension development. Fortunately, Jim is an experienced user of Autodesk Inventor which he has used for years for work at MetEng.
I figured Jim was bringing his laptop, so I got out a camping table for him. Little did I know, he would show up with a 30" monitor and a full desktop! This necessitated a quick desk solution.
Now we're looking serious
OK, so Jim plugged away with his computer and tape measure, while Dad and I got stuck into the car.
Soon the dash was gone.
Like the "temporary" storage location for the dash?
Next we attacked the side panelling and floor. Before we knew it, we were down to a raw chassis. Horray!
This is how far Jim had got after a few hours. The chassis is pretty much finished. He has started working on the rear trailing arms. The ones below are not exact. Just a test.
3 degrees body roll.
So that's where we are at the moment. Things are coming along nicely. It's now time to clean up that chassis. Oh yeah, another fantastic thing happened to me last week... I received an original manual for the car. More on that in a few days. I'm sick of typing and you're probably sick of reading.
Great update Simon... You boys are doing great!!!
I have to imagine that when you step back and look at that bare chassis it's a bit breathtaking where you are... When she goes back together again, I have a feeling she'll be a much more sound car than even the original manufacturers had hoped for...
I have to imagine that when you step back and look at that bare chassis it's a bit breathtaking where you are... When she goes back together again, I have a feeling she'll be a much more sound car than even the original manufacturers had hoped for...
Simon,
I'm in full agreement with Randy's observation...that being, this car will be a far better machine once you and your mates have completed their work. I'm enjoying your posts so keep them coming. Just curious....do you have a time line for completion? I'm sure you're not in a rush because good things come to those who wait....
I'm in full agreement with Randy's observation...that being, this car will be a far better machine once you and your mates have completed their work. I'm enjoying your posts so keep them coming. Just curious....do you have a time line for completion? I'm sure you're not in a rush because good things come to those who wait....
Thanks for the comments guys. We have certainly gone much further than we expected with the stripping, but we all agree that it has been worthwhile for piece of mind. Yep, we'll be trying to improve it wherever we can.
No time line for completion. We'll just keep plugging away from here.
No time line for completion. We'll just keep plugging away from here.
Simon, are you planning on retaining the semi-trailing arms at the rear? These can work quite well, but are not as sophisticated in their geometry as the real 40 set-up.
Yeah, I think we'll be retaining the semi-trailing arms. It's good to know they work reasonably well. I'd love to get rid of them and go to a traditional 40 set-up, but I think it'll be too complex and too expensive to do.
Man you've really ripped it apart now!!. Did you end up getting your stuff back from Northside Cyl Heads?. . .i can ask John to track down what he knows of it if you like and get the real story of its progress??. If you need any aluminium ceramic coatings done try these people, they have done motorbike frames and parts, heads, inlet and exhaust manifolds for me over the years. Thermal Edge Coating - The Ceramic Coating Specialists - Cermakrome, Lubricating, Thermal Barrier and Turbo Coatings Just down at Virginia tucked behind the shell servo on Sandgate Rd
Nah, we still haven't got our stuff back from NCH. We were in there a few weeks back and he said 1 week. It's probably done and waiting for us, but we've been too busy with the chassis to go and pick it up. Maybe this weekend. Thanks for the Ceramic coating guys. That might come in handy down the track.
My apologies to the neighbours
My sincere apologies to the neighbours, Saturday was a very loud day. It was the day of cleaning up the chassis. It just so happened that Tim finally returned from a few months out bush to lend a hand, too. About time...
So all up, we had Dad and Tim on angle grinder and "Rapid Stipper"on drill. Plus me welding and angle grinding on the workbench and yet somehow, Jim managed to continue work on the model despite all the noise.
Jim at work on the K-frame model
Chaos in the garage
This is how the chassis is looking after a few hours of work. It looks 100% better, but there is still more work to be done. Tim reckons that everytime he turned around he found something else to attack. We've managed to destroy one of those knotted wire wheels on the angle grinder and have pretty much disintegrated the drill-driven "Rapid Stripper" disc.
Get this, Tim finally returns from out bush and we catch him sucking back on a stubby. Just can't get the staff these days
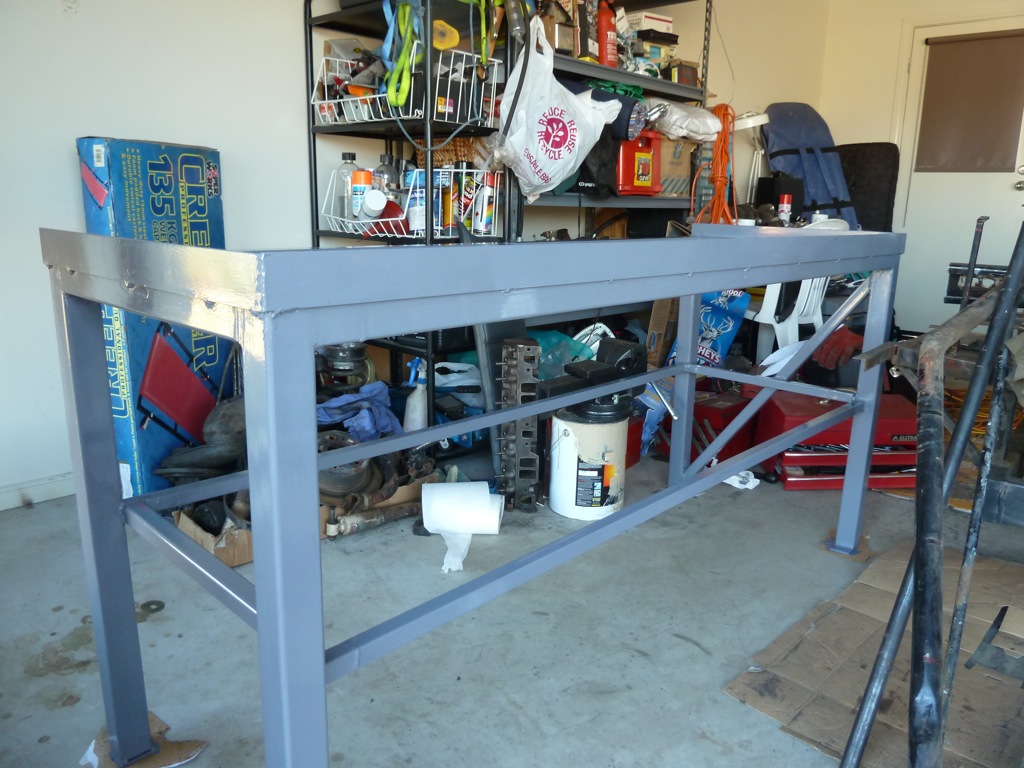
In the mean time, I finally managed to finish welding the workbench. This has seriously taken me months, since I have been busy with work and enjoying GT40 stuff instead of workbench stuff in my spare time (plus I suck at welding). I'm actually really happy with how it turned out. It's been a good lesson in metal fabrication.
A coat of fresh paint makes any crappy old steel look professional.
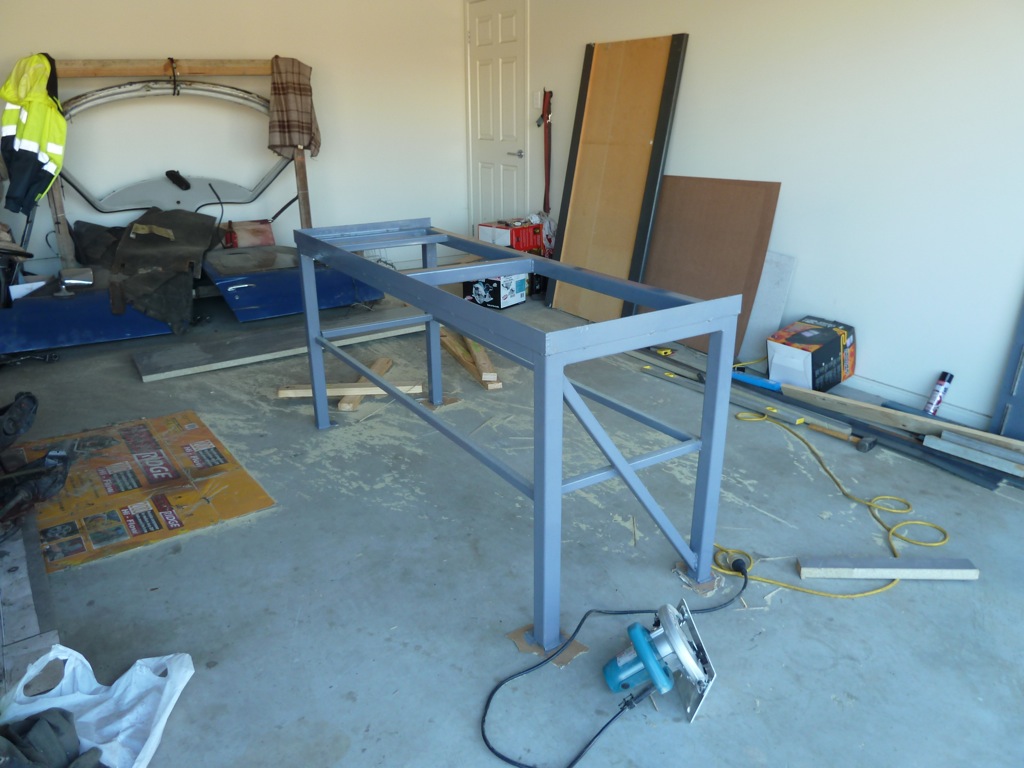
On Sunday I got stuck into the bench tops. I soon put saw dust through the whole house. Unfortunately Jim's makeshift desk has now been turned into the bottom shelf of my bench.
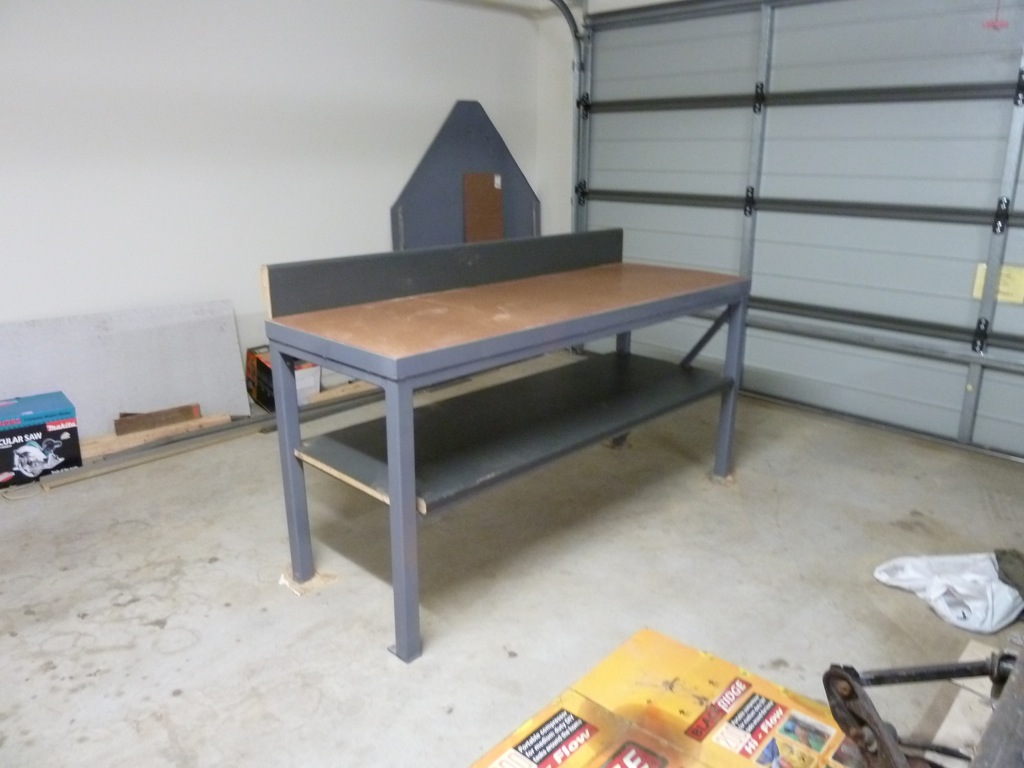
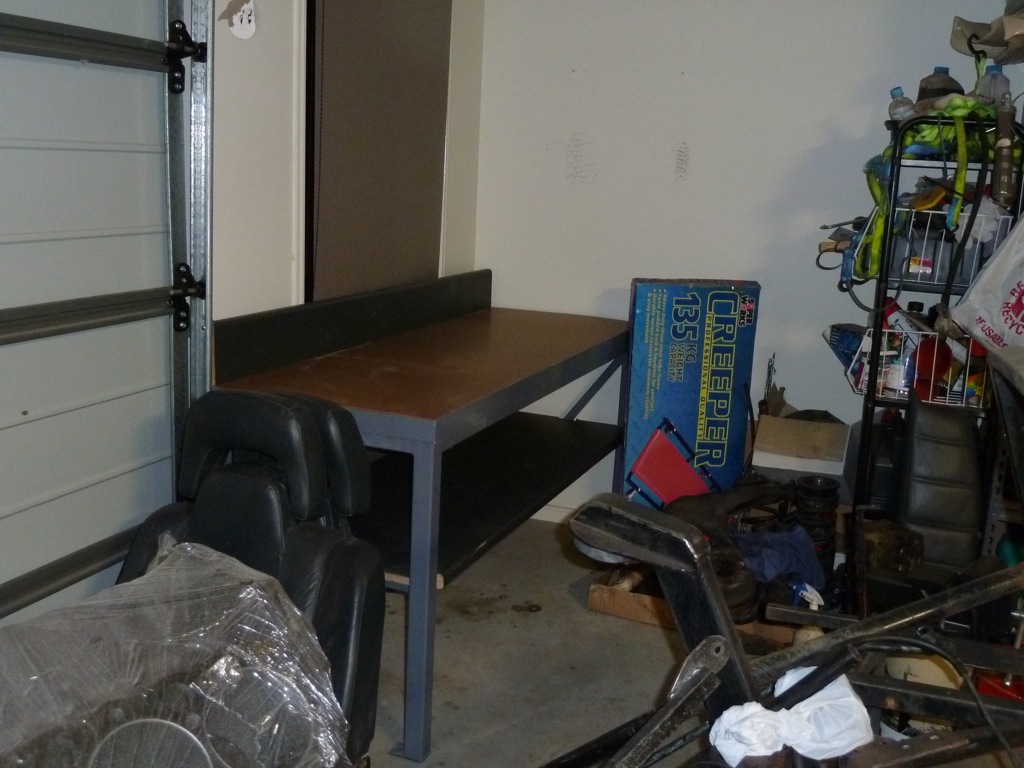
And here it is in it's final resting place. I had to get my mate Jarrod around to help me move it. My wife Kristen couldn't lift it. I guess that's what you want in a good workbench...
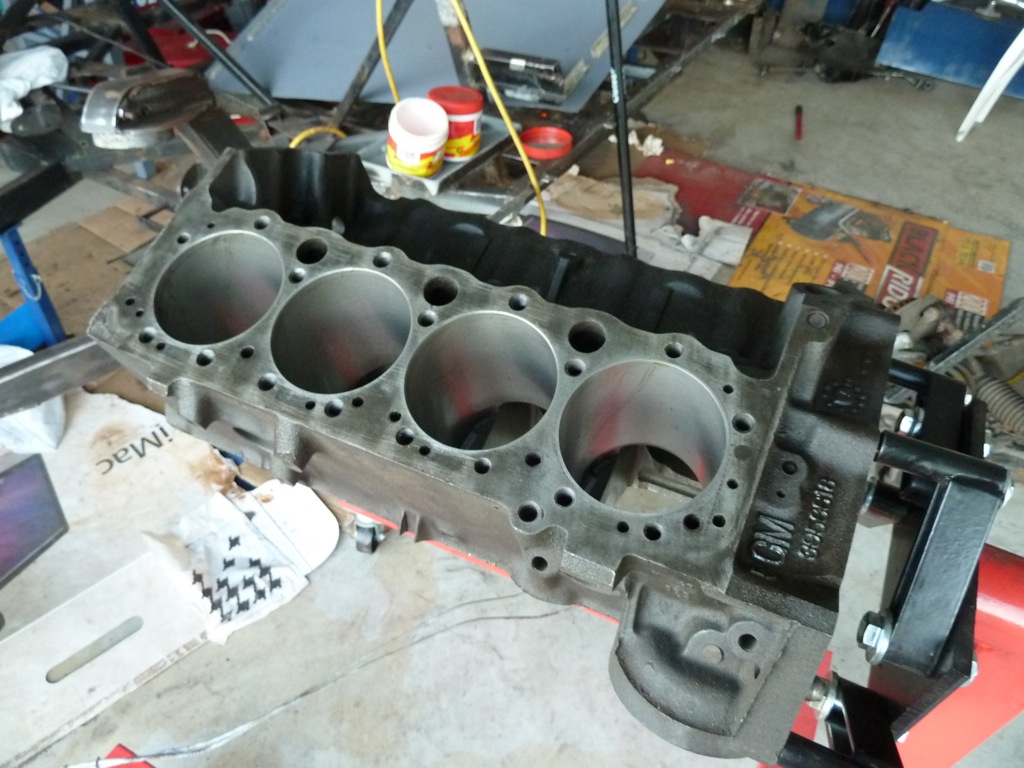
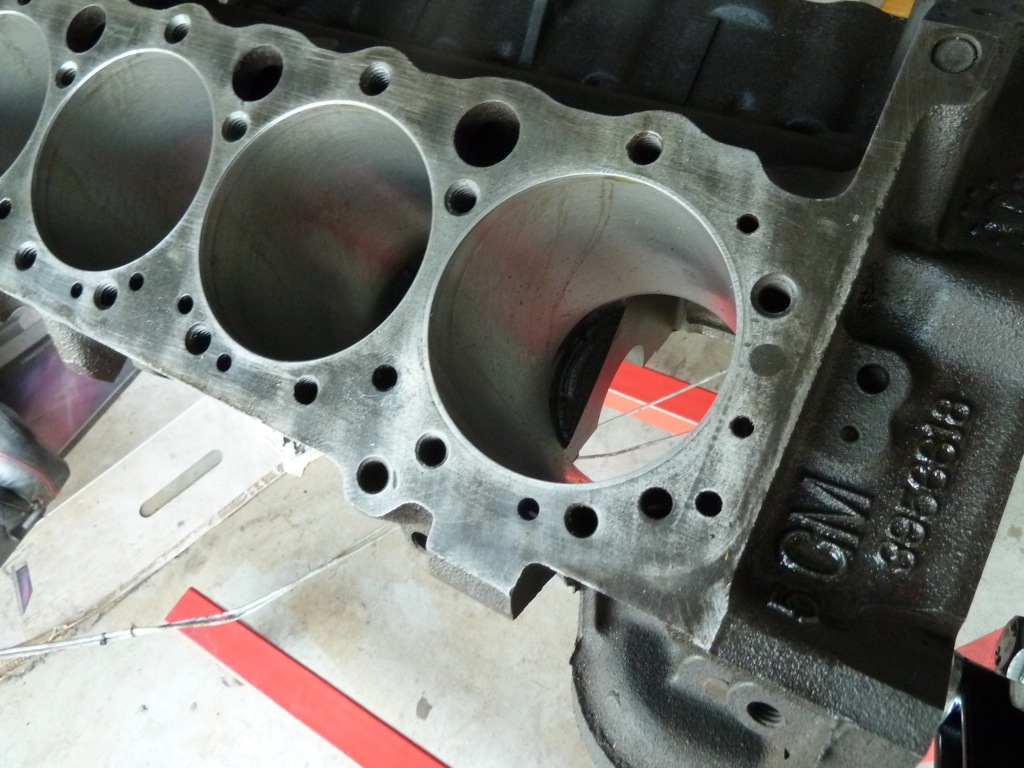
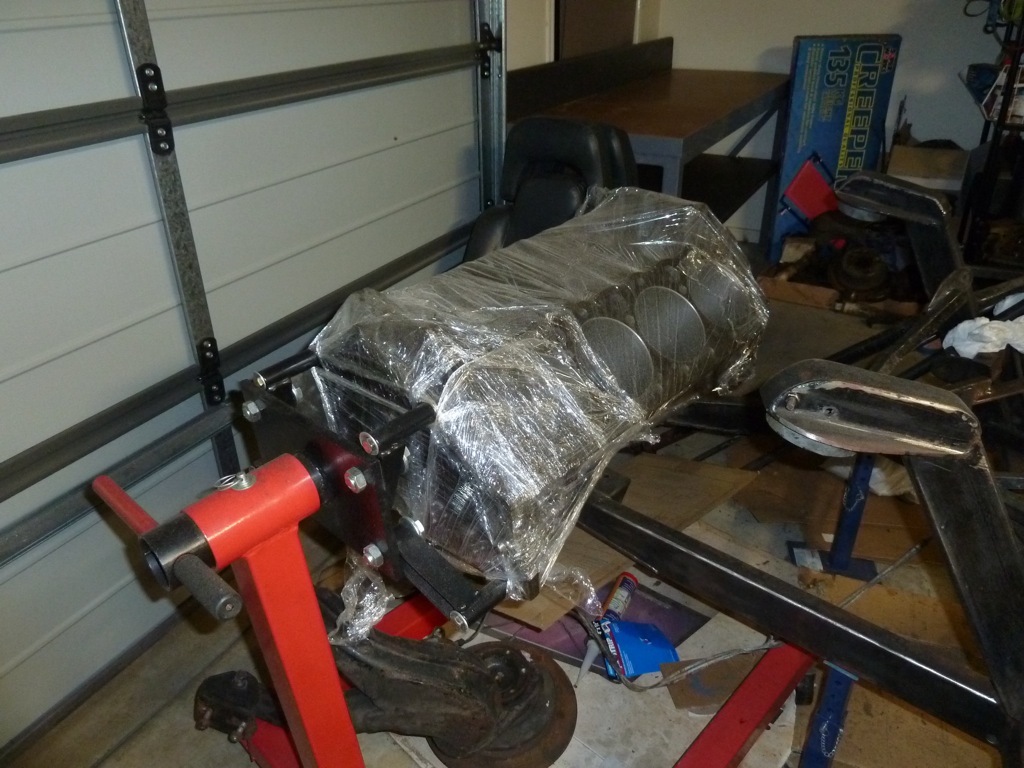
The engine block is back!
Now in other news, you're not gonna believe this, but the engine block is back! We dropped around at the engine shop on Saturday and got the normal response (it's not ready). To make up for it, the guy dropped the block around to our house that afternoon. Horray! It's nice to have it back. The downside is, that it's one more thing that's waiting for us to work on.
Believe it or not, the cylinder on the right is the one that was sleeved. It looks excellent now.
"No Bella, I have no idea what happened to all the Cling Wrap"
The model is progressing
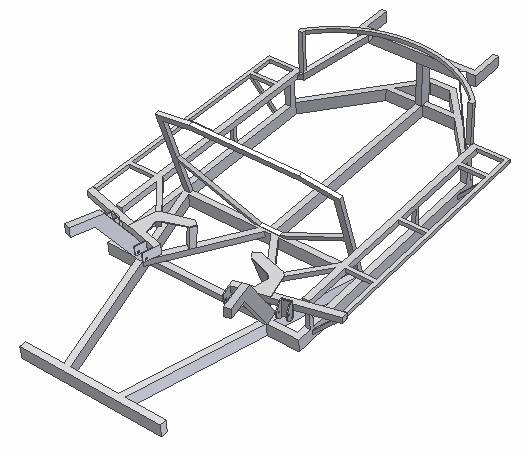
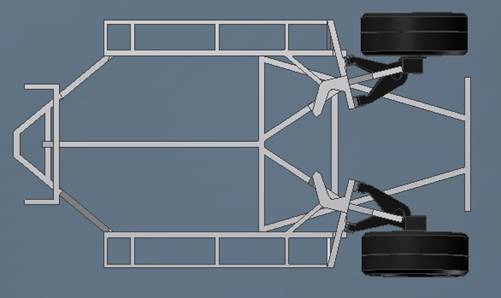
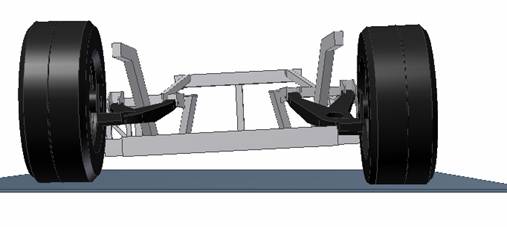
Jim has done an awesome job with the model. First up on Saturday, he finished measuring and modelling the chassis, next up he modelled the rear semi-trailing arms. Following that, he hit the intricate K-frame. It took a fair bit of remeasuring to get that modelled correctly. The main problem being that the model gave too much negative camber. It wasn't til we took to the K-frame with some straight pieces of timber that we discovered that there actually is a fair bit of camber there.
On further thought, I remembered reading in the KCC GT40 manual that when you change the hubs to Ford Granada 5-stud type, you must move the mounting hole of the lower control arm outwards by 12mm to compensate. We trialled this with the model and it made it worse. Moving it inwards, however, gives close to 0 degrees. Maybe they got this wrong or maybe we have made a mistake. Either way, we'll leave it to a wheel alignment shop to get baseline measurements before we mess with it.
Jim at work

Here are some pics of the model and how it looks now.
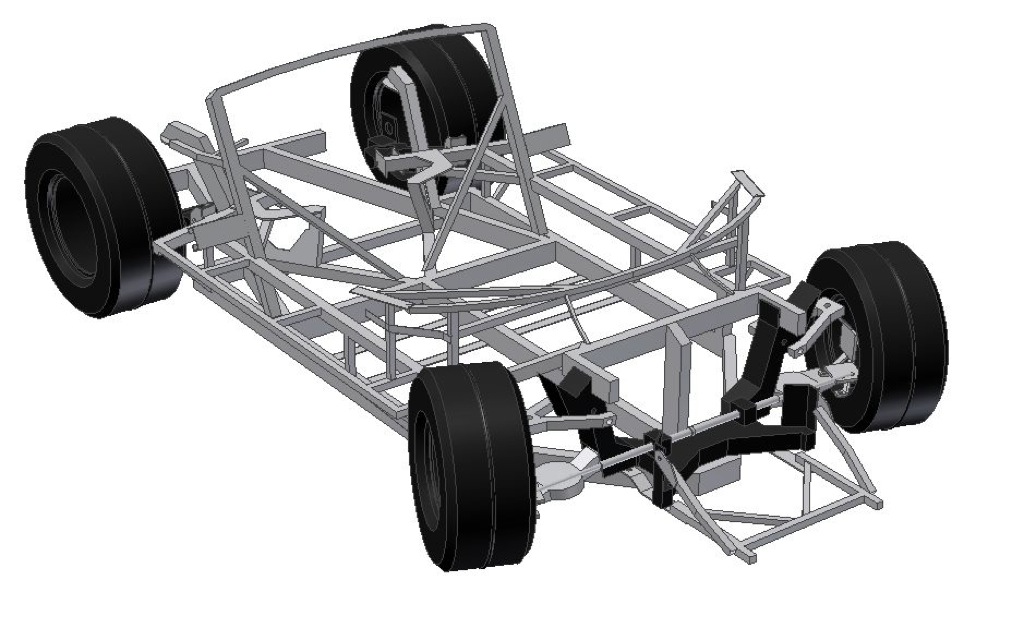
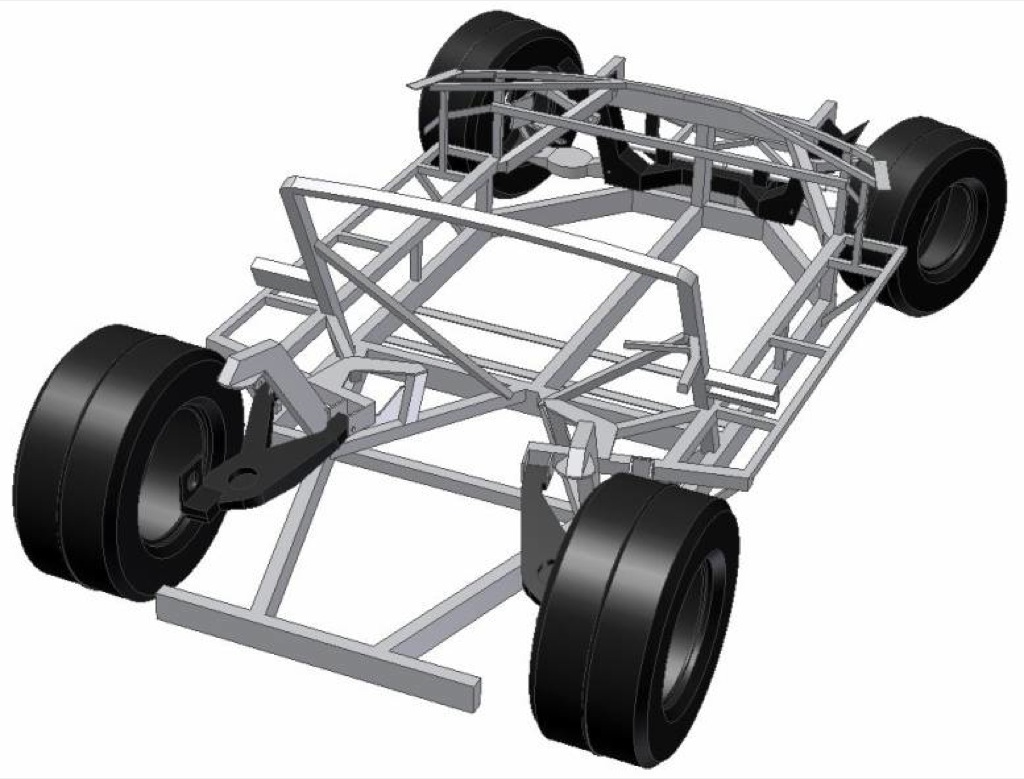
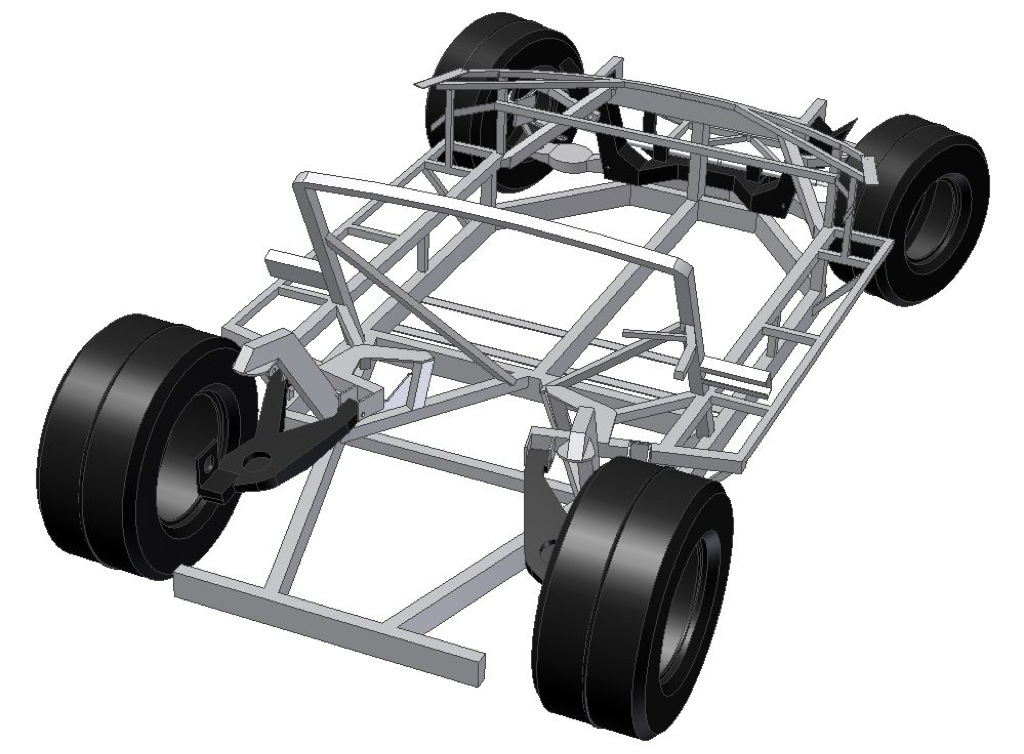
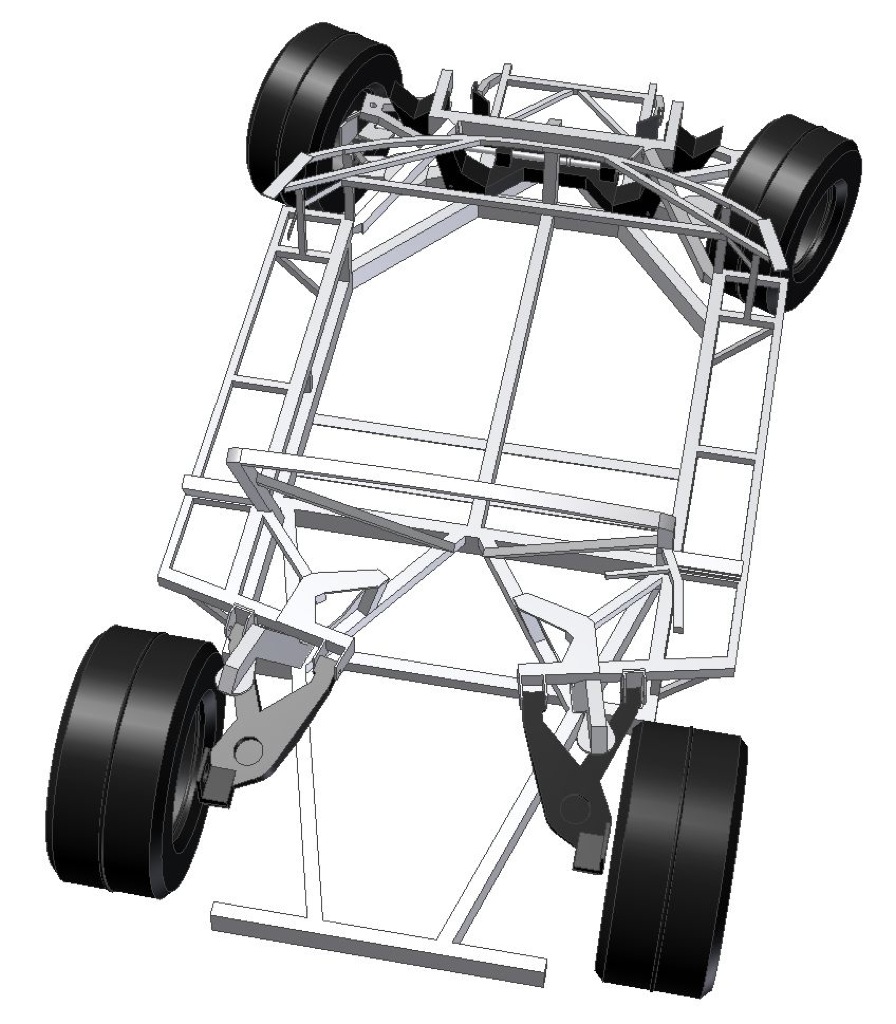
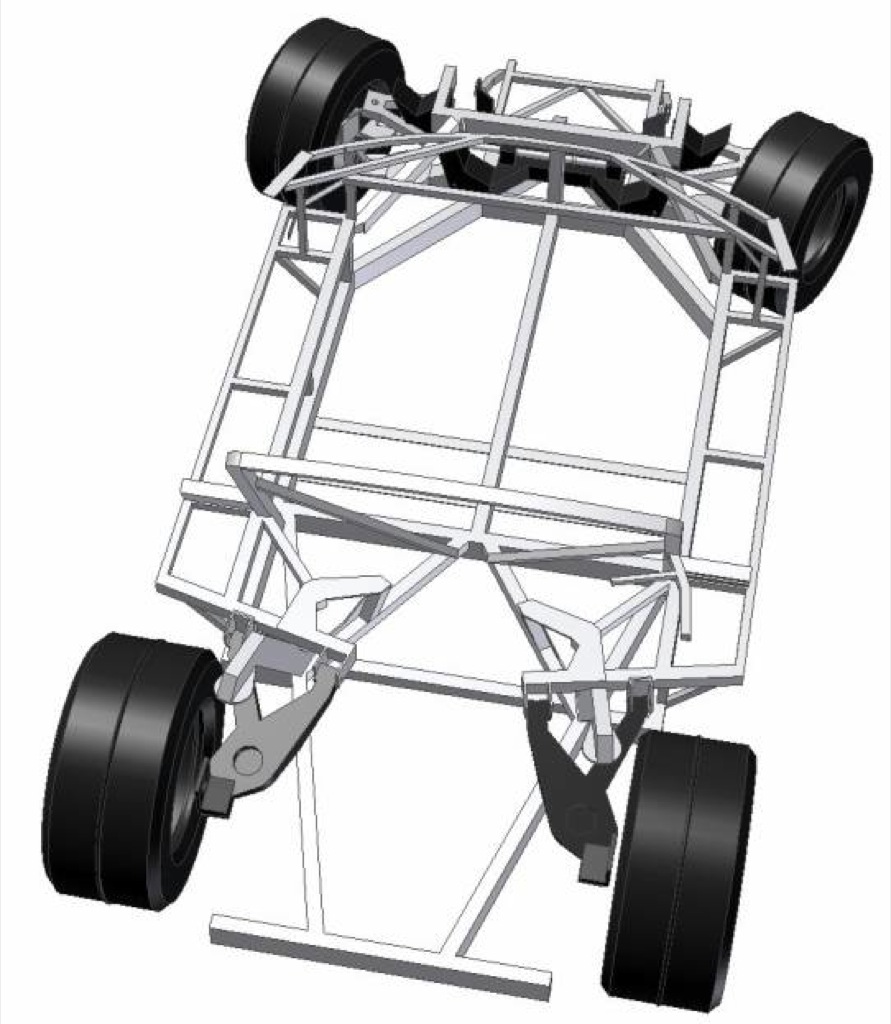
Jim has now started looking at steering angles and bump steer (which don't look great) so far. A few guys on the various forums have been trying to convince us to convert the rear to GT40-style suspension. In fact, one guy has even sent me plans of an exact GT40. What a legend! How far we go with the chassis is a tough call to make. The chassis is currently in the prime state to do these sorts of mods, but it's gonna add considerable time and cost to the project. There really is a lot we can do at this stage in the form of rear suspension, front suspension, bracing and roll bars. We're a bit worried that the extra time and money will cause us to lose motivation. What are your thoughts?
My sincere apologies to the neighbours, Saturday was a very loud day. It was the day of cleaning up the chassis. It just so happened that Tim finally returned from a few months out bush to lend a hand, too. About time...
So all up, we had Dad and Tim on angle grinder and "Rapid Stipper"on drill. Plus me welding and angle grinding on the workbench and yet somehow, Jim managed to continue work on the model despite all the noise.
Jim at work on the K-frame model
Chaos in the garage
This is how the chassis is looking after a few hours of work. It looks 100% better, but there is still more work to be done. Tim reckons that everytime he turned around he found something else to attack. We've managed to destroy one of those knotted wire wheels on the angle grinder and have pretty much disintegrated the drill-driven "Rapid Stripper" disc.
Get this, Tim finally returns from out bush and we catch him sucking back on a stubby. Just can't get the staff these days
In the mean time, I finally managed to finish welding the workbench. This has seriously taken me months, since I have been busy with work and enjoying GT40 stuff instead of workbench stuff in my spare time (plus I suck at welding). I'm actually really happy with how it turned out. It's been a good lesson in metal fabrication.
A coat of fresh paint makes any crappy old steel look professional.
On Sunday I got stuck into the bench tops. I soon put saw dust through the whole house. Unfortunately Jim's makeshift desk has now been turned into the bottom shelf of my bench.
And here it is in it's final resting place. I had to get my mate Jarrod around to help me move it. My wife Kristen couldn't lift it. I guess that's what you want in a good workbench...
The engine block is back!
Now in other news, you're not gonna believe this, but the engine block is back! We dropped around at the engine shop on Saturday and got the normal response (it's not ready). To make up for it, the guy dropped the block around to our house that afternoon. Horray! It's nice to have it back. The downside is, that it's one more thing that's waiting for us to work on.
Believe it or not, the cylinder on the right is the one that was sleeved. It looks excellent now.
"No Bella, I have no idea what happened to all the Cling Wrap"
The model is progressing
Jim has done an awesome job with the model. First up on Saturday, he finished measuring and modelling the chassis, next up he modelled the rear semi-trailing arms. Following that, he hit the intricate K-frame. It took a fair bit of remeasuring to get that modelled correctly. The main problem being that the model gave too much negative camber. It wasn't til we took to the K-frame with some straight pieces of timber that we discovered that there actually is a fair bit of camber there.
On further thought, I remembered reading in the KCC GT40 manual that when you change the hubs to Ford Granada 5-stud type, you must move the mounting hole of the lower control arm outwards by 12mm to compensate. We trialled this with the model and it made it worse. Moving it inwards, however, gives close to 0 degrees. Maybe they got this wrong or maybe we have made a mistake. Either way, we'll leave it to a wheel alignment shop to get baseline measurements before we mess with it.
Jim at work
Here are some pics of the model and how it looks now.
Jim has now started looking at steering angles and bump steer (which don't look great) so far. A few guys on the various forums have been trying to convince us to convert the rear to GT40-style suspension. In fact, one guy has even sent me plans of an exact GT40. What a legend! How far we go with the chassis is a tough call to make. The chassis is currently in the prime state to do these sorts of mods, but it's gonna add considerable time and cost to the project. There really is a lot we can do at this stage in the form of rear suspension, front suspension, bracing and roll bars. We're a bit worried that the extra time and money will cause us to lose motivation. What are your thoughts?
I think it all depends what you want out of the project and how you plan to use the car when it's finished (road use/track use etc). As you say now is the time to make any chassis changes, the only worry is where do you stop. Before you know it you'll end up making a new chassis from stratch.
Thanks Trev. That's certainly the big question. We are definitely keen to take it to the track. Probably not fully competitive. More to have fun and to try and improve on our own times.
Hi Simon,Conrad here from down south in Melbourne.A buddy and I have bought a car,rolling chassis and body,body moulds,chassis gig, suspension gigs,and other tooling/patterns from a guy in Sydney.Started the long project of building a couple of cars.I have decided to make a new body from the body moulds which are average to say the least,and now have been fitted to the chassis.The panels have been sliced ,diced ,twisted and beaten imto submission,and now fit.I am now filling and sanding them straight,once primed and finished a new set of moulds will be made.I like your work and approach to your project.I like cad modelling of the chassis/suspension so you can evaluate what you have.Changing to an original GT40 type supension would be a duanting task.If what you have works well or can be improved or tweaked ,thats the way i would g ur car uses what looks like an "original" style suspension lay out.Double whishbone front with cortina rack,rear reverse "A" arms with single top link and twin trailing arms,what a mouth full.I have hunted high and low to try to find original supension design blue prints/plans to see if what we have is close to the orignal,good ,maybe not so good.My ears pricked up when you mentioned a member of another forum sent you original plans for GT40 supension.Would you have some contact details or could forward on his email.Keep up the good work as i will be following this one.Cheers Conrad.
ur car uses what looks like an "original" style suspension lay out.Double whishbone front with cortina rack,rear reverse "A" arms with single top link and twin trailing arms,what a mouth full.I have hunted high and low to try to find original supension design blue prints/plans to see if what we have is close to the orignal,good ,maybe not so good.My ears pricked up when you mentioned a member of another forum sent you original plans for GT40 supension.Would you have some contact details or could forward on his email.Keep up the good work as i will be following this one.Cheers Conrad.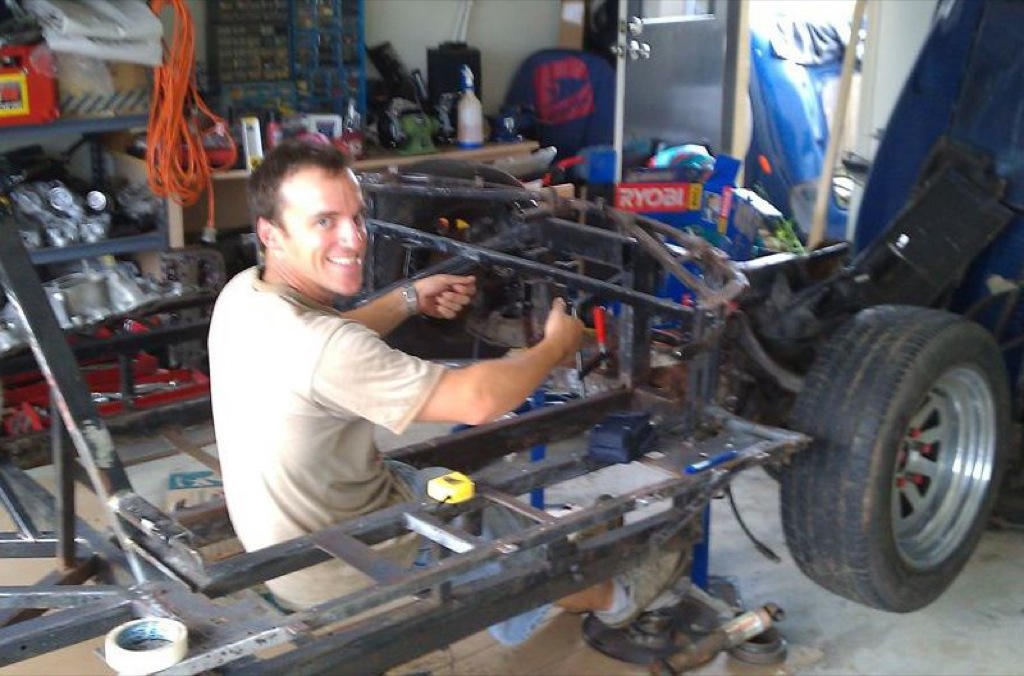
I just realised that it's been a long time since my mast blog post. So what the hell is going on?
After a few trips away, we're back and getting stuck into the GT40 once again. The team are motivated and it's time to get on with it. The past few months have been a bit crazy for us. We all headed to the UK for Christmas. Tim and I and the girls spent a few weeks in Japan on the way back. I won't brag too much, but since this is an automotive blog I thought I might mention that we visited the Tokyo Autosalon and saw the Mazda 787B quad rotor Le Mans car in action.
Tim and I managed to get front row for the warm-up procedure. It is probably the best car I have ever heard and possibly the best automotive experience I have had. I took this video of the warm-up. If you watch when the car starts up the camera jumps. Yep, that was me crapping myself...
Anyway, what do we care about dirty rotaries, right? What about the GT40?
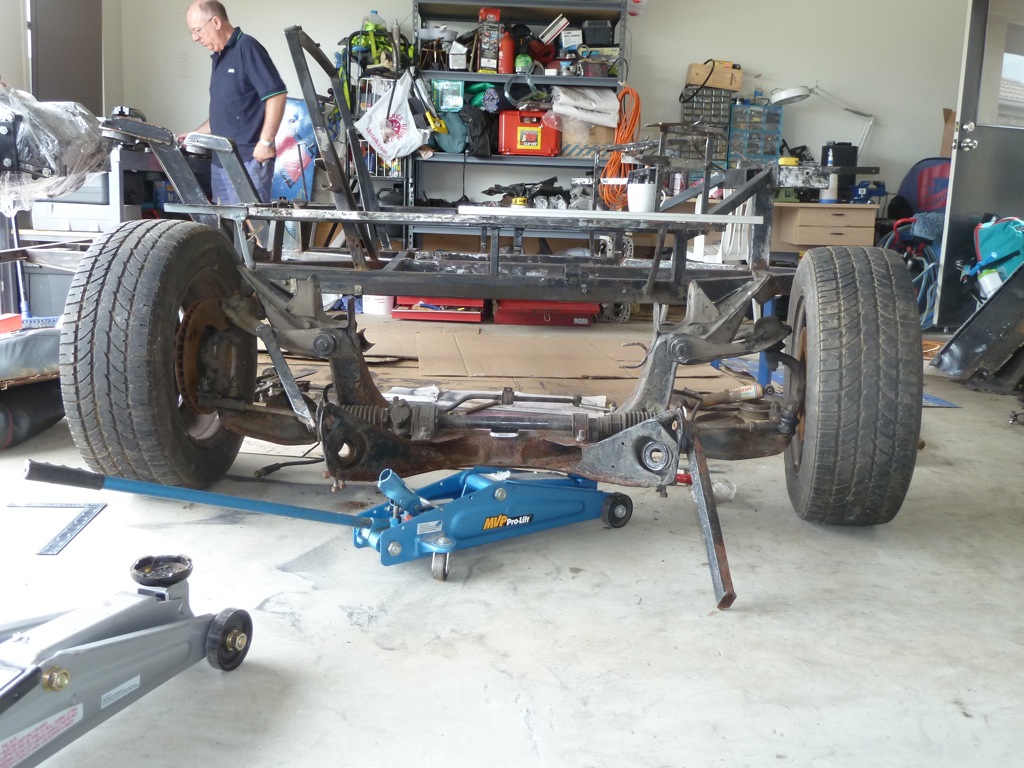
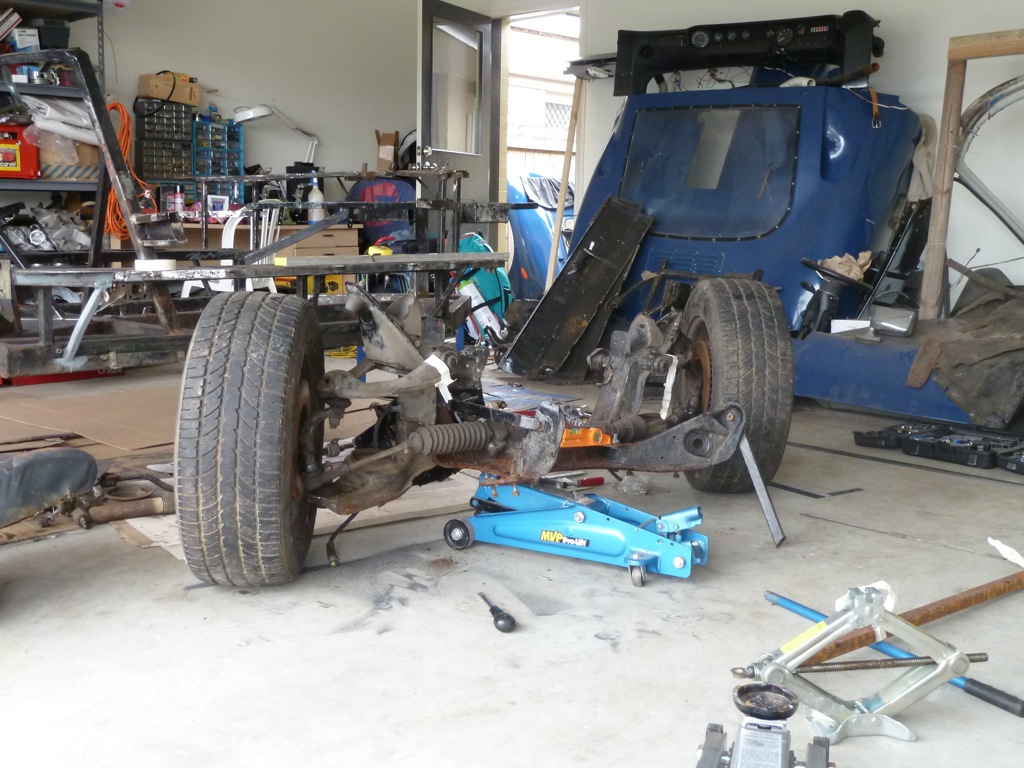
OK, well here's how it was looking a weeks ago. Yep, nothing left on that chassis whatsoever.
We've spent many hours with wire-wheels and have come to the conclusion that this is an endless task and we should send this thing away to be sandblasted, so that's the plan for the chassis.
Dead Welder
Unfortunately my Rossi stick welder blew up last weekend. It was just idling and suddenly went pop. It was 18 days out of warranty! It was an ebay purchase from AGR Machinery. I contacted them in the hope that they might offer some sort of compensation, instead their reply went along the lines of "Your product is out of warranty. You can purchase a new one on our website". What a joke! I replied with "I will be buying a new welder, but not from you guys. Thanks for nothing". So does anyone have any recommendations for a new welder? I'm thinking I should upgrade, since I'll have plenty of work for it on this project.
Front Suspension
In the mean time, Jim and I have been investigating the front suspension. When Jim developed the 3D model a few months back, he looked at the screen and said "this isn't gonna work". The model predicted that the camber would go positive under compression and negative under droop. This is not good for handling. Jim convinced me to remove the springs and do some tests.
I think I'll go into the technical details in another blog entry, but just briefly... Our suspension is from a Ford Cortina, but has Ford Granada stub axles. This is recommended in the original KCC build manual, since it gives you ventilated brake discs and larger calipers. What we discovered is that the Granada stub axle has different geometry to the original Cortina one. Here are a few tests we did last weekend. The tests confirmed exactly what the model was telling us. Not pretty...
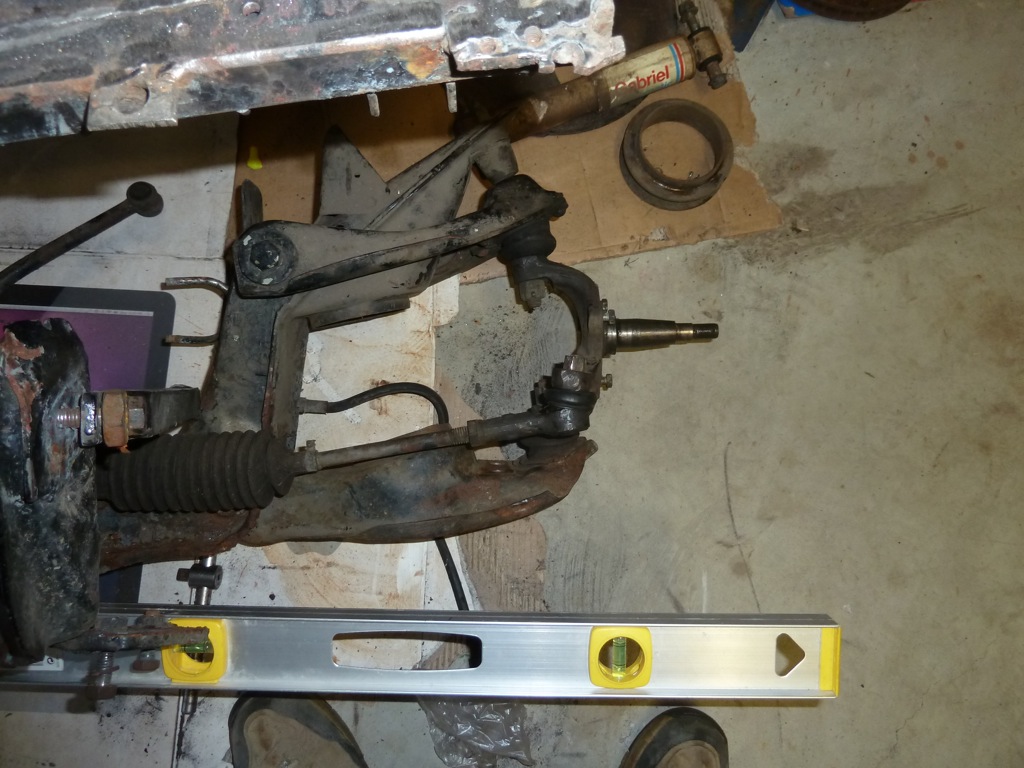

We trialled some modifications and discovered that adding a spacer below the top ball joint pretty much fixed the geometry. We were measuring slightly negative camber through the normal operating range.
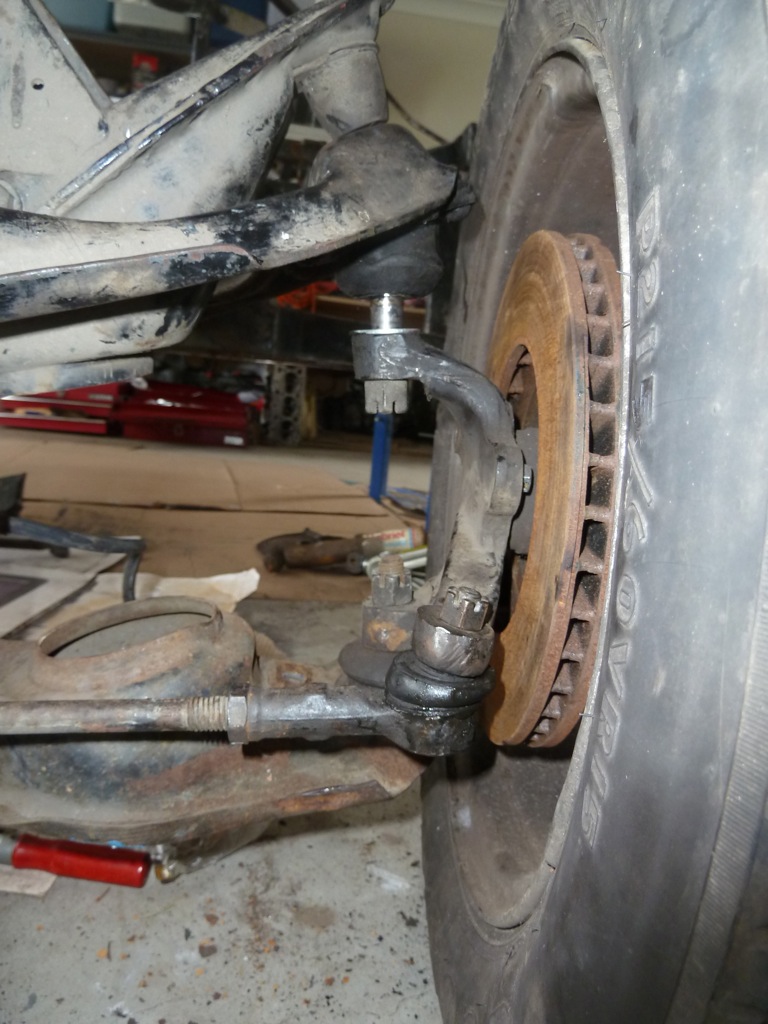
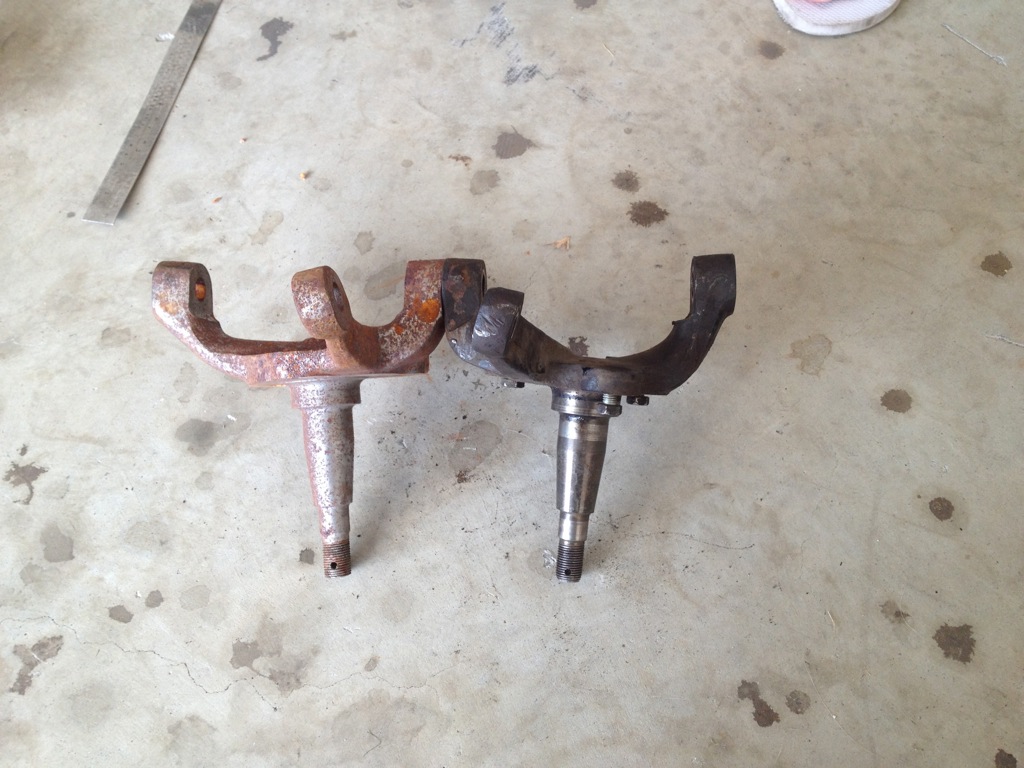
I got on to the Performance Forums and put out the call for Cortina stub axles. Thankfully, an absolute legend by the name of Nathan (Ferdie) had a set lying around and donated them to the project. They turned out to be unused and also came with a set of blank hubs and brand new ball joints. You can see the difference between the two units here (the Cortina ones have light surface rust).
During the week Jim bought a fancy digital protractor (any excuse to buy toys). Thanks Jim! Here you can see the new protractor in action measuring 0.6 degrees negative camber.
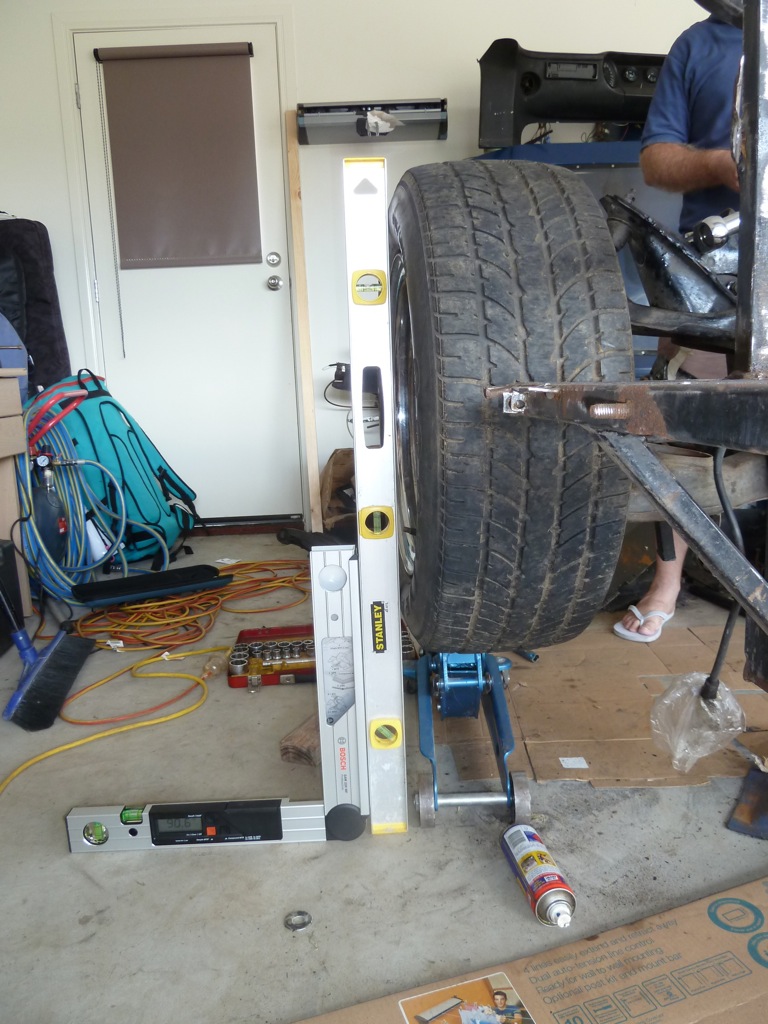
Jim also bought a laser chalk. We used this to measure bump steer and found that bump steer should be fairly negligible at normal ride height. We also measured the steering angles and I calculated that it should have a turning circle of roughly 10m. Not too bad.
The only downside to switching back to Cortina stub axles is that we will need to find new brakes. Not really a downside, I think an upgrade is necessary anyway.
What now?
OK, now that the front suspension is solved, we got cracked into it and stripped it down. Some of bushes looked a bit average. Tim is now back in Brisbane and can finally do some of the dirty work. He got stuck into removing the loose surface rust.
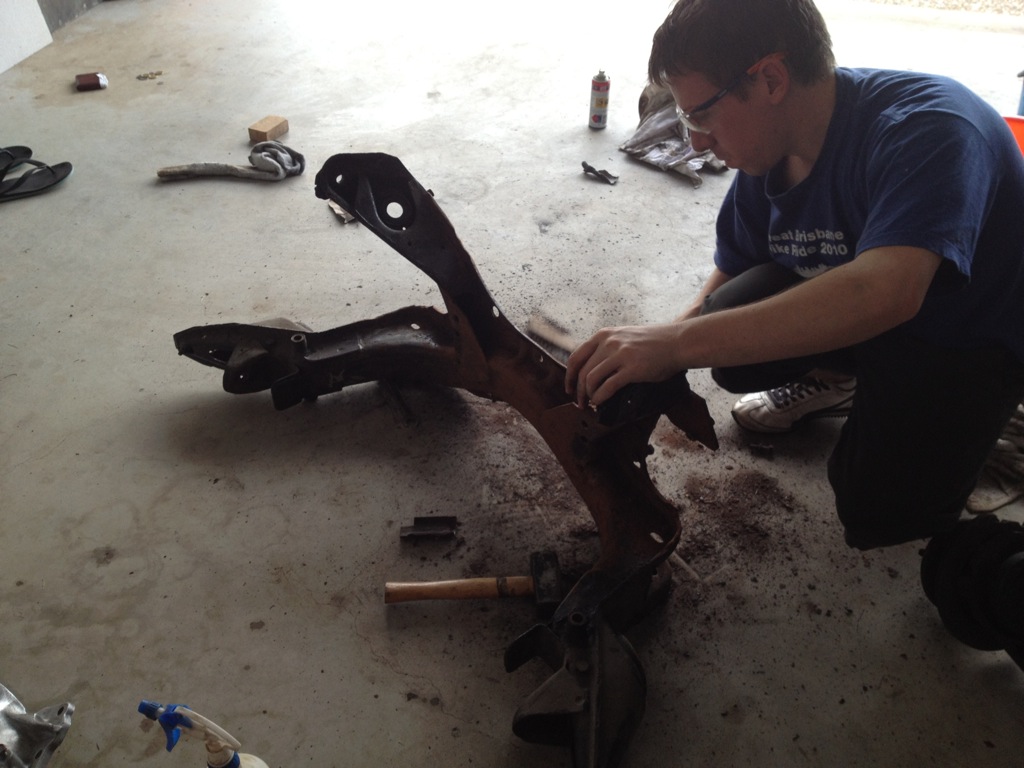
Here's how it came up after an hour or so of work. Not too much more before we can test out the new chassis paint.
Last weekend Dad repaired one of the rear brake calipers and then decided to have a crack at polishing the inlet manifold (since this thing will be seen through the back window). On Sunday, Tim's girlfriend Renee was looking for something to do, so we gave her the inlet manifold to carry on with. It's looking pretty good.
So that's where we're at now. Jobs for the next few weeks/months:
- Add some bracing to the chassis.
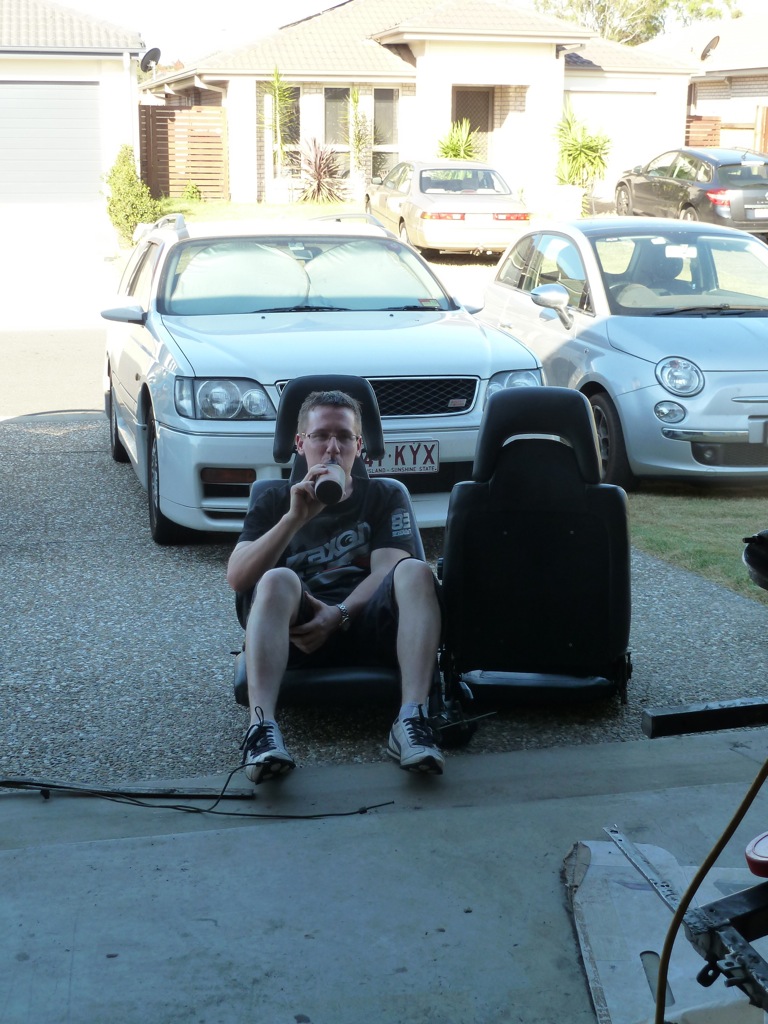
- Find some seats and build seat mounts. Anyone have any recommendations for seats? We're stuck on this one.
- Sandblast and paint the chassis.
- Sort out some front brakes.
- Rebuild the front suspension.
Hmmm that should keep us busy for a while....
Northside Blastcoat for your blasting 113 Granite St Geebung 3216 2176, they will etch prime and two pack too if you got the $$, and check out what thermal edge coating does to inlet manifolds. ..cheap too. ..not cheaper than female slave labour though
Thermal Edge Coating - The Ceramic Coating Specialists - Cermakrome, Lubricating, Thermal Barrier and Turbo Coatings
http://www.thermaledgecoating.com.au/images/gallery/full/manifold/manifold_03.jpg
Am trying to think what brand my mig welder is too??. . .can't think, see Qld Tradetools or BOC Gases, expect to pay $2K + for a decent gas tig welder + Argoshield bottle rental. .. don't go those little p1ssy gasless migs, USELESS!!!
Last edited:
Thanks Russ. I'll check out Northside Blastcoat.
Similar threads
- Replies
- 2
- Views
- 1K
- Replies
- 4
- Views
- 3K
- Replies
- 2
- Views
- 1K
- Replies
- 46
- Views
- 9K