
You are using an out of date browser. It may not display this or other websites correctly.
You should upgrade or use an alternative browser.
You should upgrade or use an alternative browser.
Kiwi scratchbuilt
- Thread starter Russ Noble
- Start date
Thanks Bill D, encouraging words, I love your RCR. I've still got quite a bit to do before I even get to the stage that someone would be at that ordered a basic kit. I will be at that stage shortly though and there will be a lot more to show from then on. Nevertheless it is going to be a minimalistic race orientated build, so not a lot of extraneous bling.
Bill H, thanks for the offer, I got a pair of Adams snorkels. One of a handful of indulgent extravagances that I have allowed myself on this shoestring build.
Kevin, I thought you'd fallen off the face of the earth! Haven't heard from you for over a year! Hope all's well with you and the shift to Hamilton has been good for you. I'm pleased that you will be making progress on your car again soon. I thought it was about to become a case of all work and no play........
Lim and I owe Kevin a great debt of gratitude in relation to our builds. Kevin was of major assistance when we were at the planning stage. It is fair to say that without his offer of assistance, neither of our builds would be as far progressed as they are. Thanks once again Kevin.
It's great how GT40 guys rally round and help each other, I have made a lot of good friends through this forum, both in NZ and overseas.
Cheers,
Russ
Hi Russ coming over to christchurch this weekend for a month would like to call round and have a look at your project.
I am putting a tornado ts40 together in the UK.
building the beast of Bolsover Bryn
I am putting a tornado ts40 together in the UK.
building the beast of Bolsover Bryn
Bryn,
PM sent. Love to see you.
Cheers
PM sent. Love to see you.
Cheers
In answer to Scotts query on this thread, http://www.gt40s.com/forum/all-gt40/21308-what-about-gt40-monocoque-chassis-2.html#post186714
Only rough sketches that I made from an unfinished kit that I was fortunate enough to have access to for a time. Although my chassis is totally different to that kit, it gave me basic critical dimensions, total width across sills etc.
I knew basically how I wanted to build it and it progressed from there. Wheelbase and track are on record of course. The chassis had to fit inside the body! And provide a structure to feed the loads into properly. I designed my own suspension and chassis broadly along traditional lines.The best part was that I was able to take body molds from the kit so I then had a body to work with. Most of that is outlined earlier in this thread.
The chassis is mild (unalloyed carbon) steel ERW tube, for the most part 1"x1"x .062" and 1"x.5"x .062, this is where .062 alloy sheet will be bonded and rivetted on one side of this frame, otherwise round tube 1" x.062 tigged or nickel-silver bronzed. Critical juctions are also gussetted. The welded in rollcage is also designed as an integral part of the structure and will add immensely to the final integrity. Rollcage tube dictated by MSNZ is 1.5"x.100.
I'm still working on the chassis, most is done now except the rear suspension subframe and pickup points. I'm waiting for my starter motor to arrive, I have a sneaky suspicion that the designed position for the lower suspension pickup points is going to be about where the middle of the armature is required to be. May have to do a slight redesign.
There's not much going to happen on the car today as I'm about to head out to Ruapuna to watch the 3 hour endurance race.
Cheers
Russ,
Did you build you're frame from a set of plans ?
Is it square or round tubing ?
If its steel, what alloy?
Best,
S
Only rough sketches that I made from an unfinished kit that I was fortunate enough to have access to for a time. Although my chassis is totally different to that kit, it gave me basic critical dimensions, total width across sills etc.
I knew basically how I wanted to build it and it progressed from there. Wheelbase and track are on record of course. The chassis had to fit inside the body! And provide a structure to feed the loads into properly. I designed my own suspension and chassis broadly along traditional lines.The best part was that I was able to take body molds from the kit so I then had a body to work with. Most of that is outlined earlier in this thread.
The chassis is mild (unalloyed carbon) steel ERW tube, for the most part 1"x1"x .062" and 1"x.5"x .062, this is where .062 alloy sheet will be bonded and rivetted on one side of this frame, otherwise round tube 1" x.062 tigged or nickel-silver bronzed. Critical juctions are also gussetted. The welded in rollcage is also designed as an integral part of the structure and will add immensely to the final integrity. Rollcage tube dictated by MSNZ is 1.5"x.100.
I'm still working on the chassis, most is done now except the rear suspension subframe and pickup points. I'm waiting for my starter motor to arrive, I have a sneaky suspicion that the designed position for the lower suspension pickup points is going to be about where the middle of the armature is required to be. May have to do a slight redesign.
There's not much going to happen on the car today as I'm about to head out to Ruapuna to watch the 3 hour endurance race.
Cheers
Thanks Russ,
That's quite the job you are doing there ! Keep up the good work.
Regards,
Scott
That's quite the job you are doing there ! Keep up the good work.
Regards,
Scott
Yes, thanks Scott, I'll try!
It's been a long haul since my first post on this thread almost 21 months ago. Before that I had spent 9 months solid spare time building the molds.
Sometimes there's not a lot to show for a heap of work, but generally every day something is done or time is spent researching and trying to finalise certain parts of the specification or chasing up stuff on ebay etc. Once I finish the chassis and the suspension arms, things will rocket ahead as parts are fitted in and bolted up, more mounting brackets welded on and then it will all have to be pulled to bits again for painting, skinning and final assembly!
Cheers
Russ,
I sent you a PM.
Regards,
Scott
I sent you a PM.
Regards,
Scott
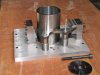
Front uprights are well underway. Lim has built the jigs.
First pic is the bearing housing, brake caliper mounts and ball joint mounts set up in the jig.
2nd photo lwr b/j mounting plate machined by Lim. There are massive loads going through this lower mount particularly under heavy braking with the big sticky rubber I will be using, so I have gone overkill here with puddle welds on all the faces. In order to do that we have built the bottom mount the way we have. Not a good place to have a failure! Also built that way so that I can extend and attach the caliper mount to that plate
3rd photo sheetmetal added and tacked in place.
Last photo finished upright viewed from the back. Partially completed spindle is alongside. Everything in the upright has been machined by Lim from 4340 billet as has the spindle.
Attachments
Last edited:
BEAUTIFUL !!!
Cheers,
S
Cheers,
S
Who is this Lim person and why isn't he machining parts for me? ")
Very nice work. An inspiration to wannabe scratch builders everywhere.
Very nice work. An inspiration to wannabe scratch builders everywhere.
Mark, Lim has recently become a forum member, he is an exceptionally talented and meticulous toolmaker who has 24 hour access to all the right gear. Perfect addition to the race car team. To understand Lim's involvement see posts # 15 and 51. If you play your cards right maybe he could do some machining for you, the exchange rate US/NZ dollar is still favourable. But don't even think about it until we've finished both our cars!
Randy, yeah in retrospect, I should have gone smaller in the bearings. Too much excess unsprung weight! I originally designed the car with endurance racing and Targa in mind. However, I'm sure the weight penalty will not be too severe.
Ryan, I'll weigh the upright later today.
Scott and everyone, thanks for the positive comments.
Cheers
Ryan,
The bare upright as shown weighs just on 2 kg.
Cheers
The bare upright as shown weighs just on 2 kg.
Cheers
Fantastic work. I can see why the specialist car builders and craftsmen in NZ have such a high reputation.
Dalton
Dalton
Progress on the car continues steadily.
I haven't been able to post recently due to glitch between my camera and computer. I will post some photos of progress shortly but will first detail one of lifes little inconveniences....
I received my sump recently from
Armstrong Race Engineering Dry Sump Systems
[SIZE=-1]www.drysump.com/
Orangevale CA
[/SIZE]
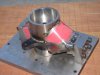
This is the most expensive, most useless, heap of crap I have ever bought. If it is typical of ARE's design, execution and engineering then maybe other forum members should think twice before purchasing any of their products.
I ordered it from a photo on their website which showed 4 scavenge ports.The pan supplied has three! That's not really a problem but this is.....
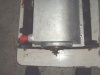
Pic #1
Note the clearance around the rear cap, zero on the LHS about 3mm on the RHS. Besides that the sump face is out of round. Not sure how it's meant to keep the oil in.........?
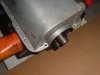
Pic #2
There is a further problem at the rear of this sump. No room for attachment bolts at the rear of the sump adjacent to the cap.
Pic #3
No room for bolts at the front corners of the sump either due to the squared off edges.
Maybe it's not necessary to use all the bolts, but I would certainly prefer to.
Now I'll do what I should have done to start with and cast my own. But since the ARE piece looked quite good, I thought I'd save myself some time because it looked to be just what I wanted. Never mind I think the old adage applies, 'If you want it done right do it yourself!'
I have also posted this in the Consumer Watch Section. Hopefully that will prevent any other guys on here getting shafted.
Cheers,
I haven't been able to post recently due to glitch between my camera and computer. I will post some photos of progress shortly but will first detail one of lifes little inconveniences....
I received my sump recently from
Armstrong Race Engineering Dry Sump Systems
[SIZE=-1]www.drysump.com/
Orangevale CA
[/SIZE]
This is the most expensive, most useless, heap of crap I have ever bought. If it is typical of ARE's design, execution and engineering then maybe other forum members should think twice before purchasing any of their products.
I ordered it from a photo on their website which showed 4 scavenge ports.The pan supplied has three! That's not really a problem but this is.....
Pic #1
Note the clearance around the rear cap, zero on the LHS about 3mm on the RHS. Besides that the sump face is out of round. Not sure how it's meant to keep the oil in.........?
Pic #2
There is a further problem at the rear of this sump. No room for attachment bolts at the rear of the sump adjacent to the cap.
Pic #3
No room for bolts at the front corners of the sump either due to the squared off edges.
Maybe it's not necessary to use all the bolts, but I would certainly prefer to.
Now I'll do what I should have done to start with and cast my own. But since the ARE piece looked quite good, I thought I'd save myself some time because it looked to be just what I wanted. Never mind I think the old adage applies, 'If you want it done right do it yourself!'
I have also posted this in the Consumer Watch Section. Hopefully that will prevent any other guys on here getting shafted.
Cheers,
Attachments

Russ - A big disappointment to be sure..
It would appear as though they had not indexed the pan properly when they drilled the holes for the bolts and then left out the rear bolts altogether...
Not saying that it's right but you may want to consider slotting the bolt-holes to move the pan to the left (referencing your top picture) which would center the rear main bearing boss.
Depending upon the thickness of the material in the sides of the pan, you may have enough room to use a rasp in a die grinder to remove enough material to allow the installation of a pair of bolts / studs for the rear bolts.
Also - I use a product by PermaTex called "The Right Stuff" on all my oil pans and intake manifold end-rails.. If your surfaces are clean (I use lacquer thinner) to begin with, The Right Stuff will not fail you.. I've yet to have a leaker on either race or street car since I've started using it. That said, the pans are significantly tougher to remove when they've been installed with this too!
Might be a much cheaper and shorter term option than casting your own pan.. My hat's off to you if you have this capability!
Russ,
While you got a bum deal with the sump its common practice to only use every second bolt on most of the dry sump pans that I have seen. That said its odd that they have drilled & spotfaced all the holes on the side rails.
The other thing that bugs me is the difference in appearance of the pans on the website versus the item you have.
Jac Mac
Thanks for the suggestions Randy.
We already looked at remedial work. There's nothing that can't be done if necessary, but it's still trying to make a silk purse out of a sows ear! Also, besides the cures you suggested, it would be necessary to build up the pan around the rear main and remachine to achieve a round face.
Also one other thing I forgot to mention, the pan was bowed on the block mating surface by about 2mm. Not a biggie, a quick surface grind would cure that. This thing really was a mess!
So it gets to the stage where the best option is to do our own.
Cheers