
- Forums
- GT40 Replica Manufacturers' Corner
- RCR Forum - RCR40/SLC/917/Superlite Aero
- The SLC Clubhouse
You are using an out of date browser. It may not display this or other websites correctly.
You should upgrade or use an alternative browser.
You should upgrade or use an alternative browser.
Kurt H (hoffkm) SL-C build thread
- Thread starter Hoffkm12
- Start date
Joel,
Thank you for the compliments.
So far on my other two cars with the POR15 caliper paint I have had no issues. On the SLC I did get a little sloppy while bleeding the brakes and the brake fluid did not attack the paint.
I purchased the Brembo decals off of Amazon. They are available in colors other than white as well. I used VHT caliper clear coat to protect the decals.
Amazon.com: R&G Brembo Decal Combo Package for 6 Piston & 4 Piston & Brembo Logos Brake Caliper Decal Sticker High Temp Set of 6 Decals + Instructions + Decal Surface Preparation Solution (White) : Automotive
Buy R&G Brembo Decal Combo Package for 6 Piston & 4 Piston & Brembo Logos Brake Caliper Decal Sticker High Temp Set of 6 Decals + Instructions + Decal Surface Preparation Solution (White): Bumper Stickers, Decals & Magnets - Amazon.com ✓ FREE DELIVERY possible on eligible purchases
www.amazon.com
Good eye Joel. I have not paid any of those items yet. Mark that up to another item the factory assembled backwards. That is why the manual states to verify everything.
Picture from the manual, nuts down:

My next task is to dis-assemble the entire suspension, polish and treat all the components, then re-assemble and torque everything correctly.
Picture from the manual, nuts down:
My next task is to dis-assemble the entire suspension, polish and treat all the components, then re-assemble and torque everything correctly.
On the camera mount- Make sure its high enough to see over the rear wing (if you use one) if not, it might be better to locate it in the rear panel as high up as you can place it. I made that mistake and the only thing I could see was the wing when looking through the cam.
Mesa,
Thank you for the input. I am not running a wing so that will not be an issue for me. I also laid out the field of view for my camera in CAD to verify that it will see over the spoiler for maximum view behind me. Rear view is about the only concern I have for driving this beast!
Kurt, outstanding work! I use cerakote on guns...never thought about automotive applications. Yes, it is N A S T Y stuff but damn it holds up well. Great progress!
Many thanks to Joel for guiding the way when it came to plumbing my AC lines. I did not copy what he did exactly but used his build as a basis for what I did with mine.


I still need to crimp the -6 hoses (crimper I purchased was missing the -6 crimp dies, a set is on back order from China), tie all the hoses down in the front, and finish the plumbing inside the footbox.
I still need to crimp the -6 hoses (crimper I purchased was missing the -6 crimp dies, a set is on back order from China), tie all the hoses down in the front, and finish the plumbing inside the footbox.
I also have one corner of the suspension dis-assembled, buffed, polished, treated, and re-assembled to spec. I also installed the driveshaft. One down, three to go. The buffing and polishing is taking a lot longer than I anticipated but it is worth it. Not quite a "chrome" shine but "good enough for who it's for" (as my dad is fond of saying).


Kurt, we are sharing basically the same drivetrain. Do you happen to have any part numbers on the driveshafts? I’ll will be contacting the driveshaft shop tomorrow and see what they have.
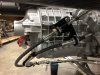
Also, I have a shifter with the car and some cables, I’m unsure if they will work with my G96 or if they were actually meant for the Graz. Does yours look similar?


Also, I have a shifter with the car and some cables, I’m unsure if they will work with my G96 or if they were actually meant for the Graz. Does yours look similar?
Joel K
Supporter
Kurt, love the progress. Nice job on the #10 hose, nice tight bend into the radiator hole.
I see you are using the HCV from the vintage air kit, just wanted to make sure you are aware on an LS engine with a mechanical water pump it is recommended to use a HCV which always circulates water through the water pump.
I see you are using the HCV from the vintage air kit, just wanted to make sure you are aware on an LS engine with a mechanical water pump it is recommended to use a HCV which always circulates water through the water pump.
Kurt, we are sharing basically the same drivetrain. Do you happen to have any part numbers on the driveshafts? I’ll will be contacting the driveshaft shop tomorrow and see what they have.
Also, I have a shifter with the car and some cables, I’m unsure if they will work with my G96 or if they were actually meant for the Graz. Does yours look similar?View attachment 111028
View attachment 111029
Kyle,
Yes, there was a tag on my driveshafts as shown below. I am guessing the 22 means they are 22" long (that is what they measure).
Yes, your shifter looks just like mine. What may be different is the cable length and possibly the connections to the shifter arms. Mine is already installed so it is hard to measure how long the shift cables are but the best I can come up with is they are about 100" long +/- 2" or so. I had to remove the riveted in ball sockets on my shift are to installed the bolted in ball sockets that came on my cables.
The black bracket shown below came with mine and I would assume to be specific to the G96. You will need one of these from either Brandwood or RCR. My transaxle had a similar bracket but I changed it out for the one with the kit.
Hope this helps you. I am always here for questions, may not always have the answers but I'll try.
Attachments
Kurt, love the progress. Nice job on the #10 hose, nice tight bend into the radiator hole.
I see you are using the HCV from the vintage air kit, just wanted to make sure you are aware on an LS engine with a mechanical water pump it is recommended to use a HCV which always circulates water through the water pump.
Joel,
You are like the big brother I never had, always looking out for me! (I am the oldest of the four).
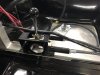
I installed a 1/4" crossover hose between the 5/8 and 3/4 lines right next to the water pump similar to what Cam T did on his build. (sorry for how dark the picture is)
If I have overheating problems or this crossover reduces the effectiveness of the cabin heater too much I can always switch the heater valve later when I pull the body back off for paint (I am currently planning to drive the car partially finished late next summer to debug most of the systems before final paint and interior finishing.
Thank you again for all your assistance. Once we finish our cars we will have to find a way to get together sometime and compare builds in person. I have been tossing the idea around in my head of organizing a SL-C rally/get together in the future. Maybe combine it with a large car show or gathering like the Hot Rod Power Tour. Just thinking out loud a little.
Joel,
For what it is worth, here is how I made the tight bend on the -10 line near the condenser. I 3D printed some bend tooling similar to what we design and build at work for CNC tube benders used in production tube fabricating.


Luckily I accidentally ordered two tube assemblies from Old Air Products. On my first try I did not hold the wiper die (shown in my hand above) tight enough to the bend die and the tube collapsed in the bend more than I cared for. On my second attempt I ran a clamp across the wiper die and my vice, inching the bend around and moving the clamp every 5 degrees or so of bend to hold the wiper tight (just as the tooling would work in a production bender). This reduced the collapse to an acceptable level.
For what it is worth, here is how I made the tight bend on the -10 line near the condenser. I 3D printed some bend tooling similar to what we design and build at work for CNC tube benders used in production tube fabricating.
Luckily I accidentally ordered two tube assemblies from Old Air Products. On my first try I did not hold the wiper die (shown in my hand above) tight enough to the bend die and the tube collapsed in the bend more than I cared for. On my second attempt I ran a clamp across the wiper die and my vice, inching the bend around and moving the clamp every 5 degrees or so of bend to hold the wiper tight (just as the tooling would work in a production bender). This reduced the collapse to an acceptable level.
Joel K
Supporter
Joel,
You are like the big brother I never had, always looking out for me! (I am the oldest of the four).
I installed a 1/4" crossover hose between the 5/8 and 3/4 lines right next to the water pump similar to what Cam T did on his build. (sorry for how dark the picture is)
View attachment 111036
If I have overheating problems or this crossover reduces the effectiveness of the cabin heater too much I can always switch the heater valve later when I pull the body back off for paint (I am currently planning to drive the car partially finished late next summer to debug most of the systems before final paint and interior finishing.
Thank you again for all your assistance. Once we finish our cars we will have to find a way to get together sometime and compare builds in person. I have been tossing the idea around in my head of organizing a SL-C rally/get together in the future. Maybe combine it with a large car show or gathering like the Hot Rod Power Tour. Just thinking out loud a little.
Glad to help where I think I can. I’ve received plenty of help and heads up from some of the other guys and always appreciate it.
You’re right, Cam T added the crossover instead of the old air products.
I am a year away from go cart so you will be on the road way before me. But meeting halfway for a cars and coffee or something like that when our cars are on the road sounds doable. Not too far for either of us.
In a normal world I travel for business and Ohio is in my territory, so perhaps in the spring or summer we can meet up post pandemic. When I was down in Atlanta I saw Dan’s build and Stephan and I live close to each other so I get to see the amazing work he is doing with the Mercury Racing SB engine.
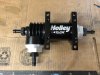
Needed to take a break from polishing aluminum so I installed an updated tune in my Holley Terminator and started playing with it a little in preparation for go kart testing later this month. The engine was surging a little at idle and some adjustments to the timing and activating idle timing appears to be helping that. While in the process of this my Corvette fuel filter regulator started leaking. I had been considering upgrading this to a Holley fuel filter/regulator anyway so this leak pushed me over the edge.

It is a shame that I will be hiding such a nice piece below aluminum cover panels.

I have also recently decided on a paint color, Porsche Guards Red. I purchased a quart to do a test spray. I plan to paint my roll bars in the engine bay the same color as the body of the car the same as Del did on his build. My cross bar came powder coated black but the upper bars were only spray painted black, with no primer underneath. I media blasted them today and shot them with the Guard Red and three coats of clear.

I am EXTREMELY happy with the color. Now I can completely wrap up the assembly of the engine bay!
It is a shame that I will be hiding such a nice piece below aluminum cover panels.
I have also recently decided on a paint color, Porsche Guards Red. I purchased a quart to do a test spray. I plan to paint my roll bars in the engine bay the same color as the body of the car the same as Del did on his build. My cross bar came powder coated black but the upper bars were only spray painted black, with no primer underneath. I media blasted them today and shot them with the Guard Red and three coats of clear.
I am EXTREMELY happy with the color. Now I can completely wrap up the assembly of the engine bay!
Attachments
Yep, I love this shade of red (Porsche Guards Red). It is really bright in the sunlight, pictures do not do it justice. A little more German Heritage in this build to go along with the German Transaxle and German decent builder.


Back to polishing aluminum tomorrow night.
Since my family canceled our Thanksgiving get together and my wife's family reduced their get together to deserts only for a short visit I have more shop time available to me over the upcoming Holiday. One good thing to come from all of this I guess.
Back to polishing aluminum tomorrow night.
Since my family canceled our Thanksgiving get together and my wife's family reduced their get together to deserts only for a short visit I have more shop time available to me over the upcoming Holiday. One good thing to come from all of this I guess.
Joel K
Supporter
Yep, I love this shade of red (Porsche Guards Red). It is really bright in the sunlight, pictures do not do it justice. A little more German Heritage in this build to go along with the German Transaxle and German decent builder.
View attachment 111417
View attachment 111418
Back to polishing aluminum tomorrow night.
Since my family canceled our Thanksgiving get together and my wife's family reduced their get together to deserts only for a short visit I have more shop time available to me over the upcoming Holiday. One good thing to come from all of this I guess.
Kurt, your car is coming together so well. The red looks great on the cross brace and rear supports. Black and red combo always looks good.
I see the polish suspension in the prior post, looks very good. Just curious, is Shark Hide more or less clear lacquer?
Last edited:
Similar threads
- Replies
- 12
- Views
- 885