
You are using an out of date browser. It may not display this or other websites correctly.
You should upgrade or use an alternative browser.
You should upgrade or use an alternative browser.
Udo
Supporter
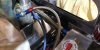
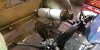
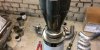
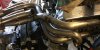
Looking at the rubber hose, connecting expansion tank and engine, and considering that this is one of the few hoses visible while rear clip is closed, I decided to replace rubber by steel jacketed hose, fig 1. Much better know :thumbsup:, and it‘s again Dash10!
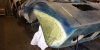
Since exhaust components not with me yet, the unsymmetric rear clip was next item to fix. Standing behind the car, the very rear portion of the clip on the right side is nicely shaped, while left side looks like peakes and valleys, and the overall size is a bit too small also (left wheel less covered by the rear clip than right one). That‘s the pain working with 30 years old body parts. Fibres, resin and hardener where still available from the good old days, and after some time the new topography is shown in fig 2. Just some grinding and filler application to do later :cheesy: ...
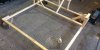
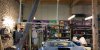
A few weeks ago I saw in one of the build logs a fixture, made for transporting and painting the spyder. At least my one is a very fragile thing, and risk of cracking even during cautious handling is given all the time. Therefore, I completely switched my working material from metal and plastics to wood - a very rare experience during last years. Surprisingly, the jig build went quite easy, fig 3. Main disadvantage of the jig is purely its size, sitting on the ground to be no option, but luckily we have some solid slant beams in the workshop, fig 4, and there the jig can wait now until I am ready to transport the body parts to the paintshop
More to follow,
Udo
Since exhaust components not with me yet, the unsymmetric rear clip was next item to fix. Standing behind the car, the very rear portion of the clip on the right side is nicely shaped, while left side looks like peakes and valleys, and the overall size is a bit too small also (left wheel less covered by the rear clip than right one). That‘s the pain working with 30 years old body parts. Fibres, resin and hardener where still available from the good old days, and after some time the new topography is shown in fig 2. Just some grinding and filler application to do later :cheesy: ...
A few weeks ago I saw in one of the build logs a fixture, made for transporting and painting the spyder. At least my one is a very fragile thing, and risk of cracking even during cautious handling is given all the time. Therefore, I completely switched my working material from metal and plastics to wood - a very rare experience during last years. Surprisingly, the jig build went quite easy, fig 3. Main disadvantage of the jig is purely its size, sitting on the ground to be no option, but luckily we have some solid slant beams in the workshop, fig 4, and there the jig can wait now until I am ready to transport the body parts to the paintshop
More to follow,
Udo
Attachments
Udo
Supporter
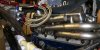
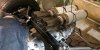
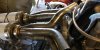
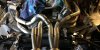
Stainless steel exhaust components got delivered, and attractiveness of exhaust build appeard my higher than filler work on the rear clip :laugh:. The custom build 8mm flanges fit perfectly - a good starting point for the day. Positioning of the silencers was next, mounted on a bracket, bolted to the gearbox (the 01E shows three free tapped holes in an ideal position), fig 1. The front right attachment is shared by the gear change rod, I like that. Also the rear view looks ok, fig 3.
In preparation for the exhaust build, I spend endless time on looking to www exhaust systems in the last days, and in theory, everything about piping was crystal clear in my head, until I was standing beside the car with elbow tubes in my hands :shocked:.
Anyway, after some time, first elbows got welded to the flanges, fig 2, and I am quite optimistic to manage the bundle of snakes ...
Mord to follow,
Udo
Attachments
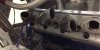
Stainless steel exhaust components got delivered, and attractiveness of exhaust build appeard my higher than filler work on the rear clip :laugh:. The custom build 8mm flanges fit perfectly - a good starting point for the day. Positioning of the silencers was next, mounted on a bracket, bolted to the gearbox (the 01E shows three free tapped holes in an ideal position), fig 1. The front right attachment is shared by the gear change rod, I like that. Also the rear view looks ok, fig 3.
In preparation for the exhaust build, I spend endless time on looking to www exhaust systems in the last days, and in theory, everything about piping was crystal clear in my head, until I was standing beside the car with elbow tubes in my hands :shocked:.
Anyway, after some time, first elbows got welded to the flanges, fig 2, and I am quite optimistic to manage the bundle of snakes ...
Mord to follow,
Udo
Great work Udo. I’m about 2 weeks behind you, will be watching your every move as I’m building my own as well.
Udo
Supporter
Nick, I couldnˋt wait for next Saturday, so spend a few hours on Sunday, just to check if my exhaust idea works. After a few iterations, I think it will ...
Just need to rework the hoses to the oil catch tank, since it might get a bit too hot over there.
More to follow,
Udo
Just need to rework the hoses to the oil catch tank, since it might get a bit too hot over there.
More to follow,
Udo
Attachments
Ian Anderson
Lifetime Supporter
Udo
Before you go much further please try the rear clip on to check those headers fit under it, the headers look quite high
Cheers
Ian
Before you go much further please try the rear clip on to check those headers fit under it, the headers look quite high
Cheers
Ian
Udo
Supporter
After thinking and sleeping about my current exhaust build, I decided to almost start from scratch again, since current piping showed some weaknesses.
Before doing so, silencer and 4-in-1 got connected with freshly delivered stainless steel clip, fig 1. Now I am flexible to mount an additional insert into the silencer, if noise level may require (you never know). Both silencers mounted to the vehicle gave the in total 16 fix points for the exhaust, fig 2, with endless options in between, and that‘s the fun part of it :surprised:
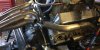
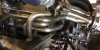
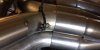
My restart began with cylinder 6, routing as low as possible to allow number 7 and 8 to just go under it with small clearance, followed by number 5. Latter required a gap to pipe 6 to allow number 7 a routing in between, fig 3 (it looks so simple, but was different when standing in front of the engine :stunned") .
.
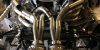
Before closing the day, pipe 8 was surprisingly easy to manage, going vertically up the the upper left silencer intake, fig 4.
Fore sure, the most interesting routing will be for number 7, but there needs to be some fun left for the following build days ...
More to follow,
Udo
Before doing so, silencer and 4-in-1 got connected with freshly delivered stainless steel clip, fig 1. Now I am flexible to mount an additional insert into the silencer, if noise level may require (you never know). Both silencers mounted to the vehicle gave the in total 16 fix points for the exhaust, fig 2, with endless options in between, and that‘s the fun part of it :surprised:
My restart began with cylinder 6, routing as low as possible to allow number 7 and 8 to just go under it with small clearance, followed by number 5. Latter required a gap to pipe 6 to allow number 7 a routing in between, fig 3 (it looks so simple, but was different when standing in front of the engine :stunned
.Before closing the day, pipe 8 was surprisingly easy to manage, going vertically up the the upper left silencer intake, fig 4.
Fore sure, the most interesting routing will be for number 7, but there needs to be some fun left for the following build days ...
More to follow,
Udo
Attachments
Udo
Supporter
After Easter break in Italy, I got well motivated back to my build. Right engine exhaust was next thing to do, fig 1. Next was to work on the most difficult tube no. 7, to make it over no. 2, fig. 2.
After closing the rear clip, I figured out that distance from exhaust to clip is only 5mm - it seems that I need to change something in the piping routing during the next sessions ...
More to follow,
Udo
After closing the rear clip, I figured out that distance from exhaust to clip is only 5mm - it seems that I need to change something in the piping routing during the next sessions ...
More to follow,
Udo
Attachments
Last edited:
Udo
Supporter
After thinking a week about exhaust routing and the potential heat damage of the rear clip (the crossover less than an inch away), I decided to re-mount the pipes. Starting point again were the silencers, deeper now and with a lower mounting angle. Not very surprisingly, existing exhaust pipes needed to get cut back by almost half of their length in order to fit to the new silencer position. At the end, I was nearly there were I have been last Saturday, but of coarse with a much better chance to not damage the rear clip .
Just minor modifications left for the next build days ...
More to follow,
Udo
Just minor modifications left for the next build days ...
More to follow,
Udo
Attachments
Udo
Supporter
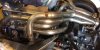
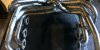
Some more exhaust work yesterday, with some progress. Pipes 1, 2, 3, 6 and 7 are done now, with some advanced welding directly in the car (I really don‘t like that, but no accidients happened). Fig. 3 shows a view through the rear clip opening - there is hope to get it done 
More to follow,
Udo
More to follow,
Udo
Attachments
Udo
Supporter
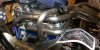
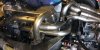
Today was a short build day, but some progress made. Right engine side is exhaustwise finished, fig 1. On the left, just outlet 8 is missing, fig 2, the job for next week. Fig 3 shows the view from the top (I couldn‘t manage a fully symmetrical left and right situation, but it‘s custom made, so what?).
More to follow,
Udo
More to follow,
Udo
Attachments

Udo
Supporter
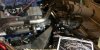
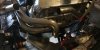
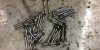
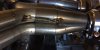
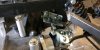
Yesterday, all exhaust tubes got finally welded, fig 1. I am half-way satisfied with the result, with some improvement ideas for next time . The system just misses the fixation between tubes and 4-in-1, and I decided to use springs for the job. Sixteen cramps, bent from 3mm dia stainless steel wires are shown in fig 2, and the fixation to the exhaust via cable strap in fig 3 (this is really one of the most useful parts in the workshop). First connected spring, assembled while exhaust was still mounted to the engine in fig 4. It‘s obvious that not all cramps could be welded in this condition, so I detached the exhaust from the car for the first time - the „bundle“ can be seen in fig 5.
More welding to follow,
Udo
More welding to follow,
Udo
Attachments
-
 C615ABAB-C975-4F56-ACC6-953530B72A09.jpeg514.5 KB · Views: 669
 -
 AF551908-386D-4660-BF1A-6652A693C1CD.jpeg539.7 KB · Views: 560
 -
 FA2C44A0-7D4A-402D-BCD9-D36CCA488E53.jpeg380.7 KB · Views: 603
 -
 90654DCD-CE2F-47BB-AF19-3E2977DD27AD.jpeg405.2 KB · Views: 640
 -
 7381D685-DB63-46FF-8325-23D0A5407AFD.jpeg451.9 KB · Views: 616
Udo,
can you access the spark plugs ok? Looks tight, but they all do
can you access the spark plugs ok? Looks tight, but they all do
Udo
Supporter
Thanks Walt, it‘s tight, but will work. The original switch wires need to replaced by custom made ones, that‘s all.
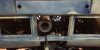
Working further on the almost endless open topics, gear cables installation was next on my agenda. I spent almost half the day in finding a proper position for the rear bracket, close to the gearbox, since space between gearbox and frame is quite tight and a proper position of the wires pin joints also needs to be secured. As result, the bracket is now attached to the gearbox and in a rotated position as shown in the attached figure. The installation to the gear changer is next, and the real fun will come when the system gets adjustment .
More to follow,
Udo
Attachments
Dan Kasten
Supporter
Looks great, a lot of work into that exhaust. I have to ask, I see you have put time and thought into it but why is it much more complicated than the exhaust on my car. Are you going for correct tuned backpressure? My exhaust just pretty much just goes straight back. I am new on here and am just curious.
Similar threads
- Replies
- 20
- Views
- 3K