
You are using an out of date browser. It may not display this or other websites correctly.
You should upgrade or use an alternative browser.
You should upgrade or use an alternative browser.
M6B Tragic
- Thread starter Udo Selter
- Start date
Clayton
Supporter
Hello Clayton.
I,m going to be in Darwin on Monday 20th and have the whole day free flying to Daly Waters on Tuesday morning. I would like to be able to catch up with Udo and you and have a look at the McLaren in the flesh if you guys were going to be available. I can rent a car for the day and come to you if that's possible. Let me know when you can I'm flying out of NZ Sunday afternoon. Cheers Leon.
Hi Leon
Have sent you a PM.
Clayton
Supporter
Hi Leon and Clayton
Hope you will be able to meet and visit Udo !!!
Then give us some news of his excellent project.......
And .....more pics up to date (If Udo is OK to share !!)
Hi Michel
I’ll take some pics on my next visit
Clayton
Supporter
Many thanks Clayton
Please pass him an hello from the other side of world !!")
Hi Michel
Saw Udo this afternoon and took a few pictures of his progress.
He has been very busy with work and it’s not moving along a quickly as he would like.
Clayton
Absolute excellent work as usual !!!!
And also some very very nice components !!! look at those AP calipers .... wohoooooouuuuuuuuu ( I know the cost but they are so good -say hard pedal brake!!......)
Lot of work done since last pics !!! desassembling and coating every thing it's lot amount of hours ......")
I do like also those Maclaren cam covers !!!! ( @ Clayton ; do you know who supply those ?)
Congratulations to Udo
And Thanks Clayton for those pics and news ( Beside they just make me more in love to start quite similar project !! ouuuuuuuch !
And also some very very nice components !!! look at those AP calipers .... wohoooooouuuuuuuuu ( I know the cost but they are so good -say hard pedal brake!!......)
Lot of work done since last pics !!! desassembling and coating every thing it's lot amount of hours ......
I do like also those Maclaren cam covers !!!! ( @ Clayton ; do you know who supply those ?)
Congratulations to Udo
And Thanks Clayton for those pics and news ( Beside they just make me more in love to start quite similar project !! ouuuuuuuch !
Hi Michel, This is a test to see if I can get into my forum.
I apologise for not responding, but apparently Clayton has been answering your questions in my absence. If this works I will start posting pictures of my progress. I will try and start where I left off.
Things are going slower than I would like, but at the moment work is taking a priority.
Good to catch with you the other week Leon. I can't wait to hear your motor start up. Actually I can't wait to hear my motor start up.
We'll see how this post goes. Stay tuned Clayton.
Andrew Robertson
Supporter
Hi Udo,
I'm concerned you are not going to have enough power!!!
Excellent!
Cheers, Andrew
I'm concerned you are not going to have enough power!!!
Excellent!
Cheers, Andrew
Hi Andrew,
I hope so, if not, I'll use it to get used to the car and then upgrade later.
Seriously, I think what you're doing is fantastic, very impressed.
I've had Darren Sherman from Albins contact me a couple of times regarding your bits, plus Leon dropped in a couple of weeks ago and we talked about your build. Every ones very impressed. Keep it up.
Regards, Udo.
Hi Udo,
Was great to catch up the other week I know I said it when I was there but will say it again for the forum, Your workmanship is second to nun, I was as impressed in the flesh as in the photos but in real life you see so much more detail and the effort you are going to is nothing short of amazing. I feel my own project is not to that standard of finish but it has spurred me to get some better finished item's onto my car as I hopefully close on the finish line in the next month or so. Thanks for letting view your work and the next Time I see you and Clayton I hope to have had mine running.
Cheers Leon
Hi Udo
Happy to read you again on the forum !!!
Many thanks to you for informations you gave thru Clayton
At the moment will hold for a little while starting similar project ; have to help urgently agood friend needing me to achieve his replica !!!
Your last pics are fabulous !!! very neat build as per usual
Congrats
look froward to watch more
Hi Chris, I don't know what you're talking about!
The photos that Clayton has been forwarding on to me look fantastic. I reckon you're doing a great job, it doesn't look like shit at all.
Both Clayton and myself love it and look forward to more progress photos. Keep them coming.
The photos that Clayton has been forwarding on to me look fantastic. I reckon you're doing a great job, it doesn't look like shit at all.
Both Clayton and myself love it and look forward to more progress photos. Keep them coming.
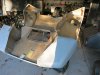
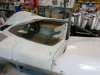
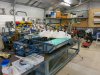
I sort of left off when I was trying to sort out the fibreglass panels and get things to fit and stay in place.
Attachments
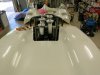

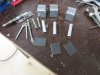
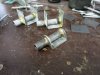
Clayton machined these locating guides out of some half inch stainless bolts and I made some pins that bolt to the body panel and they hold the body work in position firmly with nice even gaps. I also made up some door strikers that go on the front and back of the doors. You can tell Clayton made the bullets that the springs sit in. You pull on a cable in the centre and the doors flop open. Yell out if this is getting too detailed and boring and I'll skip a few pictures I've got on the camera.
Attachments
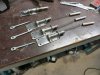

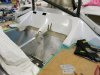
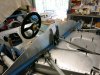
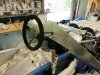
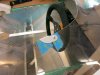
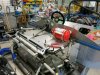
Back again. Here's some pictures of when I made the water pipes up from engine to the radiator. I used a tricky tool that my mate Clayton and his Dad made. I call it a Crox tool, because being a plumber we used one to crox the ends of copper tubes before all these new fancy crimping tools and Pex pipe came out. It makes a nice bead on the end that stops the hose from popping off. I've also added a couple of shots of the steering shaft and dash bracket.
Attachments
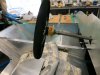
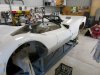
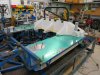
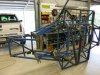
A lot of hours spent getting all the fibre glass panels lined up with correct gaps as every body knows. Also cutting the three screens and trial fitting. One picture shows the door pins in position, and I made up some little tabs that hinge over the door screens and main screen like they used to do in that era. By the way Chris, if you are reading this, Clayton sent me your latest photos of your body panels you are fitting. Looking really good.
Attachments

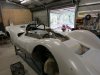
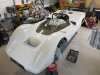
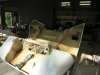
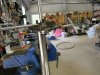
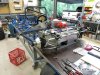
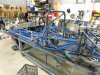
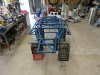
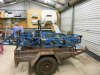
Thanks Michel, I'm glad you like them. I'll keep going. These next pictures are finding the only place I can fit the extinguisher. Then I realised I couldn't reach the dash with the harness on, so I made a small switch panel. Actually I copied it off an M8E I found photos of. There's some photos of me trial fitting the fuel tanks, and then starting to strip it down so I can add some extra bracing here and there. Got to keep that chassis nice and ridged.
Attachments
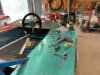
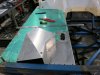
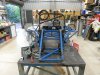
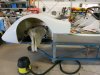
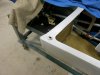
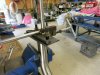
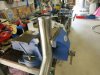
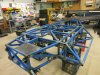
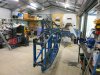
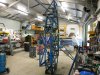
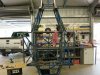
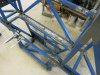
These shots are of the chassis stripped back bare so I can start welding all those places you couldn't get to before. Welding, Welding, and more Welding. Then it's off to the sand blasters and a coat of two pack paint.
Attachments
Similar threads
- Replies
- 3
- Views
- 355
- Replies
- 10
- Views
- 824
- Replies
- 14
- Views
- 1K