Mark's GT-R Build

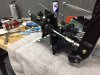
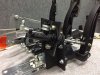
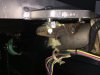
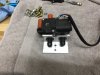
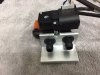
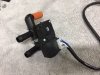
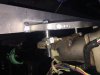
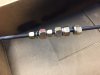
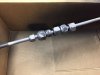
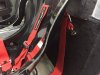
As far as the fuel delivery components, I am using all Earl's for fitting and connectors, Aeromotive for the fuel pumps, fuel filters and the fuel regulator, but used Russell's' for the fuel line. Do you think I should change out the fuel line?

yes!
Russel makes crap products. I would never trust their fuel line after reading about all the fires some of their fittings have caused. I have never heard stories of somebody using aeroquip line and coming out one day to find fuel randomly leaking out of the hose .... other products like generic summit, russel, etc..., yep, heard those stories a dozen times over.

Earls usually makes okay stuff but general rule of thumb is same hose manufacturer same fittings.

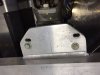
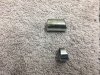
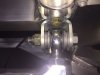
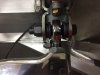
Also note above that your fitting assembly technique is not correct - you want the hex to touch the fitting or have at most 0.02'' gap.
 

Randy V

Moderator-Admin
Staff member
Admin
Lifetime Supporter
Not sure if it's still the case or not, but not lng ago it was true -
You'll not find any AN fittings other than Aeroquip in an airplane or military vehicle..
I only buy Aeroquip unless the fitting needed is specialized and only produced by one of the other mfgrs. Even then, I do so with great trepidation...
 

Terry Oxandale

Skinny Man
I've intermixed mine, and done so for many years without incident. I think a thorough understanding of the assembly and sealing concepts and other plumbing knowledge helps ensure a properly sealed assembly and durability. Yes, I've noticed some times when the nut torque was either less or more than average, and I would redo it or use another end (or section of hose) to get it right. In the old days when a split casing hose end was used, I could understand, but I believe that method has been dropped completely.
 
The pedal assembly is finally ready to go in the car. You may have seen the issues in the questions I posed to the forum. The clutch master cylinder may look a little weird, but it seems to work well.
 

Attachments

  • IMG_3226.JPG
    IMG_3226.JPG
    72.4 KB · Views: 386
  • IMG_3294.JPG
    IMG_3294.JPG
    94.9 KB · Views: 416
  • IMG_3296.JPG
    IMG_3296.JPG
    93.5 KB · Views: 442
I remounted the steering column from the pinion at the foot box wall to the steering wheel. The first photo is before modification. Adding a spacer (3.5 inches) to the foot well mounting bracket and .5 inches to the base of the steering wheel bracket really gave me ideal steering wheel positioning. I also was able to shorten the steering column about 1.5 inches by modifying the column at the universal joint attachments. You may note the change in mounting position at the plate used for mounting at the base of the steering wheel. I need to get the dashboard precisely positioned, then can decide if I need to add to the spacer at the base of the steering wheel. In the last photo, the dash is resting on the steering column, which needs to be corrected.
 

Attachments

  • IMG_3200.JPG
    IMG_3200.JPG
    68.3 KB · Views: 414
  • IMG_3298.JPG
    IMG_3298.JPG
    43.6 KB · Views: 361
  • IMG_3299.JPG
    IMG_3299.JPG
    52.5 KB · Views: 343
  • IMG_3301.JPG
    IMG_3301.JPG
    57 KB · Views: 328
  • IMG_3304.jpg
    IMG_3304.jpg
    76.8 KB · Views: 418
This is the valve for directing water from the water pump to the heat/AC. This is not the stock issue from Vintage Air. In preparation for installing the motor, I want to get this mounted to the fire wall near the water pump fixtures. The grommets hold the valve rather well in position, but I think with the hoses adding some additional stability, it should be fine. I will mount it soon. If the hoses don't add enough, I will make a mirror image bracket of the other side of the valve.
 

Attachments

  • IMG_3280.JPG
    IMG_3280.JPG
    111.2 KB · Views: 314
  • IMG_3282.JPG
    IMG_3282.JPG
    88.5 KB · Views: 251
  • IMG_3283.JPG
    IMG_3283.JPG
    100.8 KB · Views: 310
  • IMG_3287.JPG
    IMG_3287.JPG
    102 KB · Views: 312

Randy V

Moderator-Admin
Staff member
Admin
Lifetime Supporter
i can't visualize how the push rod is going to push straight back & forth

Should not be a problem... GM mounted their clutch masters in the Camaro/Firebird the same way for a lot of years but their pedals were top mounted. Still the pedal / piston geometry looks fine..
 
I appreciate your input. I took the pedal assembly over to a master mechanic's shop and had them look it over. Other than needing to be thorough in bleeding the system, which you always need to be, they did not see any problem. The proof will be when I try to use it.
 
I finally got back in my shop today and wanted to finish the steering wheel mounting. After getting the steering wheel in what I thought was the right place, it ended up being too high at the base of the steering column to allow the dash to seat properly, so I had to reposition the column with larger spacers. With 3/4 inch spacers, the dash seats properly and I have ideal view of the instruments thru the steering wheel.

I also aligned the pedals with the steering wheel and the seat position, then moved the pedals as deep in the foot box as possible. I have the adjustable pedal mount from RCR so the pedals can work for others.

I also mounted the Swirl tank as outboard as possible behind the driver position. I have been playing with different layouts for the fuel filters and pumps on the lateral heat shield, and finally have a layout that allows for easy change of the fuel filters, easy viewing of the pressure regulator gauge and (hopefully) no sharp turns in the braided lines. Ordered a few more Earl's Hose Ends and will soon get that system mounted.
 

Attachments

  • IMG_3345.JPG
    IMG_3345.JPG
    51.1 KB · Views: 332
  • IMG_3342.JPG
    IMG_3342.JPG
    108.2 KB · Views: 317
  • IMG_3346.JPG
    IMG_3346.JPG
    52.9 KB · Views: 316
  • IMG_3347.JPG
    IMG_3347.JPG
    64 KB · Views: 386
  • IMG_3348.JPG
    IMG_3348.JPG
    63.8 KB · Views: 407
I spent a day taking apart my completed suspension ball joints to lubricate them with Cerulean, by Valvolene. Scott Rowland suggested it and he is spot on.
 
Since I was taking apart the suspension, I decided to finish all of the nuts, bolts and washers with the dull grey dry lubricant. I will go back and touch up any wrench marks before final completion.
 

Attachments

  • IMG_3358.JPG
    IMG_3358.JPG
    48.3 KB · Views: 280
  • IMG_3359.JPG
    IMG_3359.JPG
    47.7 KB · Views: 392
  • IMG_3360.JPG
    IMG_3360.JPG
    45.1 KB · Views: 309
  • IMG_3361.JPG
    IMG_3361.JPG
    50.7 KB · Views: 325
I finished the day with getting the five point harness attached to the frame. I used thick two inch fender washers to back up the through bolts.
 

Attachments

  • IMG_3364.JPG
    IMG_3364.JPG
    70.6 KB · Views: 405
  • IMG_3365.JPG
    IMG_3365.JPG
    89.4 KB · Views: 361
Is that the factory seat and recommended shoulder harness attachment point? Harness manufacturers are all a little different in what they recommend but 10'-20' angle is pretty standard for shoulder harness. Could just be the perspective of the shot, but it looks more like 45'. If your shoulders sit higher then the seat opening it could be even more. There is a risk of spinal compression injuries with high angle shoulder harness.

Also I can't tell how far apart they are, but typically you want them to attach inward not outward so that if attached far enough back they would cross. There is actually a formula for this.

Formula: Y = Z - (X * 0.50)
X = Distance from Shoulder Points to attachment. Measure from the
highest shoulder point (on top of the HANS® if warn)
Z = Distance mid to mid of webbing at shoulder point
Y = Approximate distance between anchor points. (measured mid to
mid of webbing at anchor point)

View more here:
https://www.schrothracing.com/docs/Schroth_Installation_Checklist.pdf
 
Last edited:
There is a risk of spinal compression injuries with high angle shoulder harness.[/url]

Ditto.

Have mounted harnesses in a bunch of our race cars over the years and have had ours inspected by the factory reps (Such as Simpson) at numerous races. They would have a fit if they saw that.

And fender washers are not sufficient to handle the load for those mounts. I am not a mechanical engineer - but my personal suggestion is at least 1/8" steel plate and larger than those washers.

Sorry if this is a bit abrupt, but I think this is a serious issue.
 
I was also going to mention the fender washers for the shoulder harness. I think those are fine for sub straps but not the lap and shoulder mounts. As example I think FIA requires the backing plate to be 3mm (so good with 1/8) and have 40 sq cm of area with a captive nut. I realize you might not be shooting for an FIA certified car but it's a decent benchmark to go off. Again I'll preface that I don't know much about Aluminum tubs or the design of the GTR, so I think Fran will be a good resource here.
 
Back
Top