Mark's GT-R Build

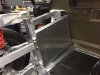
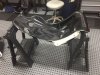
Mark in case you aren't aware on the SLC the tub is a challenge but maybe not so much for you, but

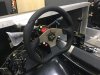
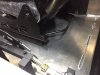
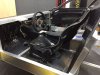
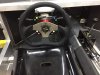
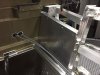
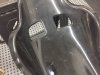
Be advised to install the tub (without cutting it side to side) requires the roll bar has to be off. The tub does assist in aligning the main body so plan your finish and sequencing of the tub install well ahead of time.

I have myself trapped in a bit of a tug of war needing to carpet/finish my tub so I can get the main body on but don't want to jeopordize a finished tub with a lot of construction yet to go.....makes it tough.

Again not sure about your car
 
I understand that the tub is a real advantage in body alignment and interior trim level, but can be a challenge to install. I have the roll bar removed now, and plan to have all of the interior components, the seats, foot pedals, parking brake, dash board, sound proofing, and shifter installed by the time the tub arrives. I should also have the brakes, cooling lines, fuel delivery system and the engine installed by then as well. After the tub is modified for the parking brake handle, the shifter cables, and anything else that interferes with the tub seating, I plan to install it, then put the roll bar back in.

That is the plan, coming from a complete novice, that has never even seen the interior tub. If there are any obvious errors in that plan, please let me know. I appreciate the warning about oncoming potential problems. The contributors to this forum have no idea how much they are helping novices like me. I love building this car, but could not enjoy it without the safety net this forum provides and Fran Hall watching over it.
 
I have been working on a number of things lately. In trying to get the interior complete, prior to the arrival of the interior tub, I have been cutting the holes in the seats for the five point harness. I have also been laying out the fuel delivery system preparing for the arrival of, what I am going to call, Lateral Heat Shields. More on that later.

There are a few areas that my knowledge needs to be supplemented. One is the clutch installation. Hearing that an experienced SLC builder destroyed the lower end of a hot LS motor because the clutch installation put too much pressure on the thrust bearing had me convinced to bring in some of the guys from Mannix Automotive, a high end auto works here in Naples. Nick and Steve had all of the specialized equipment to make sure the clutch alignment and torque specs were perfect. Now I need their help with the water pump modifications. They think it would be cool to use AN fittings welded to the water pump, so we will start that next.
 

Attachments

  • IMG_3186.JPG
    IMG_3186.JPG
    86.9 KB · Views: 608
Mark

You state you have cut holes in the seat for belts, have found or come up with an approach for grommets to protect the belts from the seat edge?
 
Mark

You state you have cut holes in the seat for belts, have found or come up with an approach for grommets to protect the belts from the seat edge?

Dan - the holes for the seat belt passthru are depressions, I was planning to slice off the back "face" of the depression and add some rubber trim on the exposed edge. These edges should be perpendicular to the rear bulkhead surface and your belts should be inline with them as they pass through the holes. I was thinking of adding some helicopter tape to protect the finish of the tub in instances when the belts rest on the holes.
 
I finished up on the holes in the seats for the five point harness. Since there are areas where the outer shell and the inner shell have a gap between them, I was thinking of glassing in the gap and rounding all of the edges. Ideally the belts are mounted perpendicular to the holes, as much as possible, but if there is pressure on the edge of fiberglass, and the edge is thin and unsupported, I can envision a problem. Where the two layers are joined already, it seems very strong. These areas will be rounded off to minimize wear on the belts.

I am planning to have an upholstered interior, and there is a primo shop here in Naples that has tons of experience, so they will help with the finishing details.

I have not yet mounted the belts. I am just mocking up getting ready to attach them. Also wanting to locate the pedals, so I am bolting in the seats.
 

Attachments

  • IMG_3187.JPG
    IMG_3187.JPG
    89.5 KB · Views: 536
  • IMG_3188.JPG
    IMG_3188.JPG
    71.1 KB · Views: 424
  • IMG_3189.JPG
    IMG_3189.JPG
    71.7 KB · Views: 431
  • IMG_3204.jpg
    IMG_3204.jpg
    94.4 KB · Views: 600
In getting everything ready for the tub arriving, I spent some time getting the steering wheel set up. Thanks to the Forum, I had all of the part numbers to make this happen. I want to use steering wheel mounted switches as much as possible, and I noticed the system Allan used in his GT-R, so I went with the same system. The Summit Technologies Raptor Pro seems ideal for our application. The Momo Steering wheel needed slight modifications to get the fit correct, but it was minor.
 

Attachments

  • IMG_3192.JPG
    IMG_3192.JPG
    58.7 KB · Views: 471
  • IMG_3193.JPG
    IMG_3193.JPG
    55.8 KB · Views: 408
  • IMG_3190.JPG
    IMG_3190.JPG
    90.3 KB · Views: 493
  • IMG_3191.JPG
    IMG_3191.JPG
    70.1 KB · Views: 393
  • IMG_3194.JPG
    IMG_3194.JPG
    67.1 KB · Views: 517
  • IMG_3195.JPG
    IMG_3195.JPG
    72.3 KB · Views: 467
I bolted the seats in place. Previously I made one inch spacers for the seat brackets to make room for the Luxury Liner Pro and the carpeting. The driver seat has Sparco Sliders, mounted handle back, to make the seat movement work.
 

Attachments

  • IMG_3198.JPG
    IMG_3198.JPG
    62.3 KB · Views: 397
  • IMG_3196.JPG
    IMG_3196.JPG
    71.8 KB · Views: 510
  • IMG_3200.JPG
    IMG_3200.JPG
    68.3 KB · Views: 507
The tunnel needs to get finished before I can put the motor in place. The first order of business is attaching the fuel line and the fuel level indicator. I have never use AN fittings before. They work great, as long as you have the AN vise blocks and the assembly lubricant. I tried putting one together without this stuff and it was a fiasco.
 

Attachments

  • IMG_3201.JPG
    IMG_3201.JPG
    72.2 KB · Views: 467
  • IMG_3202.JPG
    IMG_3202.JPG
    58.5 KB · Views: 418
With the clutch, ring gear, bearing assembled and the transaxle joined to the motor, I wanted to get the oil pan trimmed to accommodate the shaft intended for the front wheel drivetrain. It was a piece of cake! I have read where some builders are reluctant to modify this area, but it really amounts trimming some peripheral, non-structural material from the edge.
 

Attachments

  • IMG_3205.jpg
    IMG_3205.jpg
    83.8 KB · Views: 417
  • IMG_3206.jpg
    IMG_3206.jpg
    84.6 KB · Views: 413
The tunnel needs to get finished before I can put the motor in place. The first order of business is attaching the fuel line and the fuel level indicator. I have never use AN fittings before. They work great, as long as you have the AN vise blocks and the assembly lubricant. I tried putting one together without this stuff and it was a fiasco.

I personally wouldn't be comfortable with that AN fitting assembly - maximum gap spec between the fitting should be ~0.02'' (~finger nail).
http://www.bakerprecision.com/images/assinstr.jpg

also, some other things I've learned over the years

*only use aeroquip hose. Other hoses like generic Summit are usually crap and will randomly start leaking. Hoses on my cobra are almost 10yrs old and have 0 weep or signs of needing to be replaced.

*don't mix and match fittings and hose brands - aeroquip hose with aeroquip fittings. Sure it's AN spec, but sometimes you can end up with funny little surprises.
 

Ron McCall

Supporter
In getting everything ready for the tub arriving, I spent some time getting the steering wheel set up. Thanks to the Forum, I had all of the part numbers to make this happen. I want to use steering wheel mounted switches as much as possible, and I noticed the system Allan used in his GT-R, so I went with the same system. The Summit Technologies Raptor Pro seems ideal for our application. The Momo Steering wheel needed slight modifications to get the fit correct, but it was minor.

Where did you source the Summit Technologies Raptor Pro system?


Ron
 
Mark, Alex has said it like it is. Don't mix - match hose or fittings.
The Aeroquip stuff sets the standard. I've never had any issue with them.
 
I ordered it from the UK via EBay. In looking it over, I would probably order the race version instead of the street version for my application. I will not be using some of the pre-programmed street functions, and will need to re-program it. Really nice piece, though.
 
As far as the fuel delivery components, I am using all Earl's for fitting and connectors, Aeromotive for the fuel pumps, fuel filters and the fuel regulator, but used Russell's' for the fuel line. Do you think I should change out the fuel line?
 
I am really excited about adding the "Lateral Heat Shields" to the build. At this point I only have the sheet metal mounted, but on the engine side I will put Second Skin's Heat Shield material, then Lava Shield. On the outboard side of the driver side, I plan to mount all of the fuel delivery components to the shield, with the swirl tank also on that side attached to the frame rails. On the passenger side, I plan to mount all of the electronics, including the Holley Dominator engine management and some of the ISIS components. I also plan to add heat shielding from the area near the engine just above the headers, to the lateral shields, much like can be see in the LSA SLC build on post #122.

My intake system uses up a considerable amount of the firewall space, so these lateral heat shields provide mounting surface and will help to create "cool zones" in the lateral areas for fuel stuff and electronics.
 

Attachments

  • IMG_3260.JPG
    IMG_3260.JPG
    78.5 KB · Views: 443
  • IMG_3261.JPG
    IMG_3261.JPG
    80.6 KB · Views: 481
  • IMG_3262.JPG
    IMG_3262.JPG
    70.3 KB · Views: 465
Back
Top