Mclaren M8b replica (visual)

Hi there
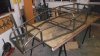
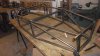
I have started out on my second build of a Mclaren M8 B car after having sold my first one last year when we experienced a rather large bump in life. We are now happy to say we are both thru that now and with a well wife and semi retirement, what else should a man do but build his favorite car. We are off on a months tour of the South Island next Wednesday and I was not going to do any welding before then...how ever seeing the steel arrive meant that I could precut the lower chassis sections and they just needed a couple of tacks to ensure that they did not move whilst away. Also drove down to Morrinnsville to collect the Rover 3.5 for this new project. On stripping down to the long block tonight, all looks good so far for just a freshen up. I plan of fitting a Holley carb onto the Rover manifold by chopping off the SU carb mounts and grafting on an adaptor block as I have done with my V8 powered `Lotus 8` This motor also came with a starter motor so that`s one thing less that I need to find because the hard part come next..where to find a trans axle. Once back from our break, i will send some pictures of progress. Russell
 
Last edited:
jeez Russ you don't stop do you, looking forward to seeing this one develop
as for the manifold I can vouch for John Harcourts manifolds, he's in Ch Ch 03-3497263, he dose a real nice dual plane for the 3.5 to take a holley.

cheers John
 
If you're going to use a 4 barrel carb. Why not just get an aftermarket one (manifold)? Edelbrock makes one & so does Offenhauser. I'm using a Buick 215 in my Lotus. They are virtually the same engine & I got an offy for mine.
 

Terry Oxandale

Skinny Man
You'll need to get some photos out straight away. I really enjoyed watching the progress on your last one, and it was an inspiration to keep me going before Leon took the torch. Good luck and I look forward to the posts.

Ox
 
Last edited:
Great to see you back in action Russell, will look forward to another well built car, you should go Chevy power for this one but I'm sure the Rover will be more than enough fun. Where did your other one end up NI or SI will we see it on the race track? I look forward to your build log and pictures, hell, you will probably finish your second one before I get mine finished better pull my finger out. Cheers Leon.
 
Thanks Terry. That's why I couldn't findit. He's gone to a different screne name. Great build thread & very interesting "the Mc Copy" LOL I'd think you might want to build a different model this time arround? Like an M6?
 
He has the moulds for the M8 body so to change to another model would mean a lot of work and money.
Cheers Leon
 
In his other thread I thought he'd said he used someone elses molds? He also was lamenting not making his own. Just a though of instead of doing the same thing over.
 
Correct me if I'm wrong Russ, but I think he actually used the moulds from the old Gemco Special but he did have to do a lot of work on them to get them right. IMO making moulds from scratch for rounded bodies such as the M6 T70 etc would be much harder than the relatively flat panels of the M8s. Cheers Leon
 
Leon
Yes your correct, I did use the Gemco as the basis for my M8 and did not make moulds as I was heartily over the mods I had done. This time I will make my own moulds and yes with basic almost flat panels, the mould should be a lot simpler...that's what I have convinced myself anyway.
I have also just had delivered to my door an Audi 012 / Boxter gearbox so my main components are set in place. When we get back from the South Island, I will sort out some pictures as I think my camera is set to big as they are not loading. I have already cut and tacked the floor and the rear section so its good to see some progress.
Main components are now as follows.
Time...plenty of.
Cash... bugger all.
Motor...Rover
Carb / carbs Holley or Del Orto.
Gearbox...Audi 012
Steering...modified Escort with quick rack
Front hubs and stubs... MX5
Rear drive and hubs Subaru Imprezza
Rear uprights...self built
Wheels...to be sorted
Tyres...tbs
Tube frame
Pedals...self built
Body...self built
Headers...self built
And anything else I can make for nothing.
This is where my scotch background comes in handy (scrooge)
All in all, its kind of fun building the same car again as hopefully I can remember all the mistakes and get right to it.
Cheers
 
Russel I also used the 012 in the 5000 I built, flatchat [chris] did the flywheel clutch adapter etc, and I used DRB GT40 alloy uprights which take C4 corvette bearings brakes etc, cost wise it worked out relatively cheap.

caution, first and third are rod out, so keep that in mind when you fab the shifter, as I used your shifter design and first was where second should be, was a lot of fun till I changed it over

cheers John
 
Hi
Back from our South Island holiday...4600ks and not one problem so now its time to get back to work.
I am being talked into using an Audi quad cam v8 rather than the Rover as it obviously just bolts straight on to the 012. I understand that its a lot heavier and also more modern but I still hanker to use the old school Rover as that's what I understand. I am not sure if I can be bothered with all the computer drama`s that would go with the Audi....Am I stuck in the past? Has anyone used the smaller Audi V8 in their set up and how did it work out?
Cheers
 
Hi Graeme
Made the decision to run with the Rover, many reasons, I had already bought one, I kinda feel like I know the basics, there old school...no computor, and it fits. I have got the adaptor plate being lazer cut now to fit the Audi 012 and have made progress on the chassis. Found some very nice wheels in Christchurch which are being drilled then freighted up to Auckland this week. I have put my feelers out for the carb set up from my other McLaren so we will see?
Goodness knows how I had time to go to work before as I barely have time for the shed!
As you will see from the photos, the design is similar to my original car, just some `design` improvements....
 

Attachments

  • DSCF2011.jpg
    DSCF2011.jpg
    256.4 KB · Views: 749
  • DSCF2010.jpg
    DSCF2010.jpg
    205 KB · Views: 524
I see you've made an inside hoop at the dash bulkhead ala Lotus 23. Will that get welded steel sheet or auminum rivered "stressed skin? What was the steering box you used on the first one? Looks rather like a Spitfire unit. Looks like you're charging right ahead on it.
 
Hi there Mike

Yes that's where I got the idea from because some comments on my previous car where that the cockpit was quite a large open space. I never noticed any flex issues how ever this time I have made the cockpit slightly shorter and added that bulkhead which will get skinned in aly.
The steering rack will be a modified Ford Escort rack. To make steering geometry easy, last time I built the suspension and then mounted the rack on the drivers side in the correct location for the pivot points and bump steer ect. Then proceeded to get a new rack shaft cut to the correct length. You can buy steering track rod ends in many various lengths so getting from the rack to the steering arm was also easy. Then it was a simple task to extend the Escort rack tube to accommodate the extra width. This was really a simple way around the problem because the new shaft only cost $150.00 and was right first time. I am on the hunt for a quick rack pinion before I get that shaft cut.
Hope that helps.
Russell
 
I'm looking at a Mustang II rack to use possably a power unit. The Lotus uses a Spit. but with the large tires (larger contact/friction area) I'm thinking a power unit might be the way to go (but I may have clearance problems with the pump). Did you have any problems with just a standared non-power unit?
 
Back
Top