- Forums
- GT40 Replica Manufacturers' Corner
- RCR Forum - RCR40/SLC/917/Superlite Aero
- The SLC Clubhouse
You are using an out of date browser. It may not display this or other websites correctly.
You should upgrade or use an alternative browser.
You should upgrade or use an alternative browser.
We are in the middle of the state by Orlando. Currently projecting 85+ mph winds. Big trees in the back yard are my main concern
Stay safe buddy! I assume you're sticking it out since in the middle?
Made it through that one. Bunch of branches down and trees down in the neighborhood but all is well at our house. Pretty weird having the howling winds and stuff hitting the roof all night, but good riddance to Irma. Have a little more clean up to do and then I can get back to work. Hopefully UPS gets out here with my order from Summit Racing so I can start plumbing this thing!
So far, Mopar Performance has been great help in getting that part square. The tech support folks have been great at providing information on the Gen 3 Hemi line of products. Before this, the only option was to scavenge a motor and harness out of a wrecked car and scab it in. Just got the wiring harness delivered and it is the complete setup including PCM, power distribution box, throttle pedal and all the connections in between with flying leads for integrating into the car. As soon as I get my wiring system (still on back-order) will start working that part of the build.
")
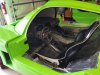
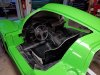
Finally finished cleaning up from the hurricane so got a little work done today. Worked to get the drivers seat/pedals/steering column all set in place. Rough cut the dash to fit around the roll bar and then mounted the pedals and column. Holding off on mounting the seats until I decide if I am going to use slide adjusters. Going to wait until I see if my daughter can fit in by just moving the pedals - she is 5'2 and I am 6'2 and want us both to be able to drive it. Tomorrow going to work on fitting the AC unit under dash and figure out how to route the lines.
Attachments
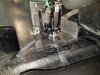
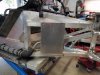
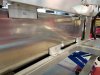
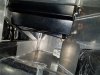
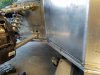
Working on the AC today with moderate success. Yes, the main unit is secured under the dash, but currently only using 2 brackets. Very tight under there, but I think I can get a couple more in now that it is secured in location. In order for the disc on the back side of the #6 line to clear the foot well, I needed to move the unit forward about 1/2" which also means the front of the unit is sitting on the 2X2 aluminum tube that supports the dash rather than the flat aluminum plate. Will require a thicker gasket but that shouldn't be a problem either. If I could think in 3 dimensions, seems I could figure out where to put a removable panel on the footwell and be able to access all of the lines, but worried about that big of a cut in the monocoque. In the pictures below, there is not a lot of clearance for the #10 line either, but going to order a 45degree fitting and I think it will clear, allowing all of the lines to run out the front of the footbox. I have a bulkhead fitting to clean up that area.
The good thing about today is I accomplished what I set out to do, and finished up in time for lunch. Hoping to get some more parts next week and get back at it soon.
The good thing about today is I accomplished what I set out to do, and finished up in time for lunch. Hoping to get some more parts next week and get back at it soon.
Attachments
Del. Glad you came out of IRMA ok. We lost a lot of Pecan trees up here, so like the orange harvest, the pecan harvest is going to suffer this year.
Just curious but you said you were taking all your lines out the front of the footbox. With the main body being nearly flush to the footbox sides up front, what is your plan to get heater and the coolant lines back to engine and compressor?
Just curious but you said you were taking all your lines out the front of the footbox. With the main body being nearly flush to the footbox sides up front, what is your plan to get heater and the coolant lines back to engine and compressor?
Hadn't gotten that far in the thought process to have an exact routing yet, but I couldn't see a good way to get it out of the side and saw some real estate just above the steering rack that looked free. One line goes to the condenser, so that would be easy and the second line would route with the radiator hose down one side back to the compressor.
This is one of those areas I have looked for pictures but there aren't a lot out there, probably because it is so tight in the box. I have seen folks route them out the side but need to get back under there to figure out how the hoses would route. Always welcome suggestions if folks have them for routing.
This is one of those areas I have looked for pictures but there aren't a lot out there, probably because it is so tight in the box. I have seen folks route them out the side but need to get back under there to figure out how the hoses would route. Always welcome suggestions if folks have them for routing.
Mike
Take a look at my build post 183 - 185. It may give you an idea.
Take a look at my build post 183 - 185. It may give you an idea.
Thanks for the info. Like the way you worked the lines out the sides with the bulkheads. I have similar ones for mine. Need to get back under there and fight it out some more. I get the heat lines going over the top. Do your AC lines run under the unit and then up the foot box? Already imagining some covers in the interior to cover electrical and hoses. I like where you mounted the heater control valve too. Keep all the heat in back unless you are running the heater. Have a question into the Mopar
tech line to see if I need to run the 4 port valve like on the LS, but may do it anyways to keep the temp down.
tech line to see if I need to run the 4 port valve like on the LS, but may do it anyways to keep the temp down.
The line that goes to the dryer and on to the condenser exit via the front passenger footwell. The lines to the compressor go under the blower and exit via the side.
I too will design some covers for the side footwells to hide all the stuff.
I too will design some covers for the side footwells to hide all the stuff.
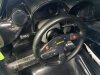
Been a few weeks since I got out to the garage, but boxes have been coming with parts for AC fittings, fuel system and other miscellaneous items. Ended up going with a NRG setup and an existing Sparco wheel that I had. Fits nicely with the column and column trim.
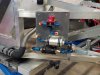
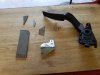
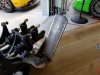
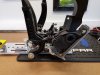
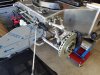
Also got working on mounting the electronic throttle pedal onto the Tilton pedal assembly. Picture shows the basic parts (I cut up the bracket that the chevy pedal fits on) and the Mopar pedal, then after tacking in position. Now just need to finish weld, paint and build the linkage to the throttle. Going to cut off the existing foot pedal and plate over the stub so I don't end up with any looseness over time.
The last thing I did was remounted the AC unit under the dash after seeing how Allan did it on the one in his shop (thanks for letting me take a look at your shop Allan). Still need to do a little work there on the finished brackets (pictures to come) but I now have room for all of the hoses to come out of the back of the unit, even with the relocated heater lines. Will get pictures of the complete modification of the brackets and AC unit when it is finished. Can only last so long in the garage with the humidity.
Attachments
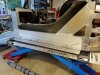
Been a while since I posted, but been a while since I had a real day to do any work, so it has been moving at a snails pace. But last weekend it finally felt like I was getting somewhere. After taking what seemed like forever to figure out how I wanted the AC unit and lines to be run, building a cart to hold the body with and spending a small fortune on stainless steel hardware I have some updated pictures and a short status.
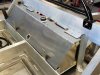
- made markings to indicate where the body aligns on the chassis for drilling and coating with Lizard Skin
- Rough installed bulkhead fittings to break the AC lines into manageable sections that can be replaced without removing major sections of the body
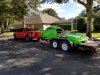
- Removed the body and moved off site to make room to work on things
- secured the brake lines down the side of the chassis. A few more sections to work but this is effectively behind me. Found some nice stainless steel clips at a swap meet that hold two lines about an inch apart with a single screw.
- Mounted pump for lift kit, battery and drilled holes for master cylinder reservoirs
- Mounted drivers side cooling tubes.
- Fabricated panel for heater control valve to be installed in front of the right rear tire
- Fabricated panels for fuel pumps/filters/lift tank to be installed in front of left rear tire
I am working one side of the car at a time, and have started with the drivers side just to try to keep some semblance of order. It sure is nice working with aluminum. I haven't broken a single tap (famous last words). This weekend will try to finish up the drivers side, mount the reservoirs for the master cylinder, mount the pedals and then set my sites on the fuel tank and fuel system.
I have had to reassess my timeline for the project, but think I have a real chance to have enough of the chassis work done to blow it apart and do the Lizard Skin by the end of the year. Not exactly a blistering pace, but the weather is cooling off in Florida and it is actually becoming comfortable to work outside.
More pictures to follow over the next couple of weeks.
- made markings to indicate where the body aligns on the chassis for drilling and coating with Lizard Skin
- Rough installed bulkhead fittings to break the AC lines into manageable sections that can be replaced without removing major sections of the body
- Removed the body and moved off site to make room to work on things
- secured the brake lines down the side of the chassis. A few more sections to work but this is effectively behind me. Found some nice stainless steel clips at a swap meet that hold two lines about an inch apart with a single screw.
- Mounted pump for lift kit, battery and drilled holes for master cylinder reservoirs
- Mounted drivers side cooling tubes.
- Fabricated panel for heater control valve to be installed in front of the right rear tire
- Fabricated panels for fuel pumps/filters/lift tank to be installed in front of left rear tire
I am working one side of the car at a time, and have started with the drivers side just to try to keep some semblance of order. It sure is nice working with aluminum. I haven't broken a single tap (famous last words). This weekend will try to finish up the drivers side, mount the reservoirs for the master cylinder, mount the pedals and then set my sites on the fuel tank and fuel system.
I have had to reassess my timeline for the project, but think I have a real chance to have enough of the chassis work done to blow it apart and do the Lizard Skin by the end of the year. Not exactly a blistering pace, but the weather is cooling off in Florida and it is actually becoming comfortable to work outside.
More pictures to follow over the next couple of weeks.
Attachments
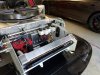
A little more time today in the garage and got lots done. Mounted all of the master cylinder reservoirs, pedals, battery ground and cables. With the exception of wiring (my wiring package hasn't shipped yet from the supplier) the only thing left up front is the radiator hoses (look to arriving tomorrow). Tomorrow going to finish up brake lines, fuel tank and work on the panels to mount the fuel system. Hopefully can have another productive day.
Attachments
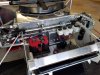
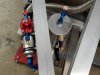
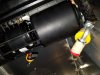
Another day, a few more things knocked off. Added a couple of panels for mounting fuel pumps and surge can and mounted the pumps, regulator and one of the filters. Seemed to have lost the cushion clamps for the second filter so had to order them (the filter has been sitting in the garage for a couple years from a past project, so you never know where all the parts could be). Also made all of the brackets to hold in the fuel tank and got that set in place. All that is left there is getting the fittings for the fuel vent and cleaning up all of hold down brackets.
Last thing I did today was moved the car around so I can start working on the passenger side where all of the heat and AC lines are being run. Also going to mount the condenser for the AC. Hopefully will get some more time in the garage next weekend to make some more progress.
Last thing I did today was moved the car around so I can start working on the passenger side where all of the heat and AC lines are being run. Also going to mount the condenser for the AC. Hopefully will get some more time in the garage next weekend to make some more progress.