
You are using an out of date browser. It may not display this or other websites correctly.
You should upgrade or use an alternative browser.
You should upgrade or use an alternative browser.
new build a Porsche LMP
- Thread starter kaspa
- Start date
This is the body that Fran has offered to me, admittadly a bit 70's retro , but remove the horrible oversize Gurney Flap and fit a decent wing, WALA!!
now if i could figure out how to loose the front air intake, [as i would be using side mounted radiators ducted from the top of the side pods] it would give a better impresion of what it would look like.
anybody have the expertise?
thanks to kind people, a pic as well with duct missing and one with some panelling around the cockpit etc, getting closer to what i was thinking of doing, change the colour and add some decals, Mmmmm maybe, the orig on right.
BTW Fran I have a package for you,as discussed ready for post, just waiting for an address, and some pics please mate.
cheers John
Attachments


Last edited:
I like it.
To my eyes, changing the nose will spoil the look. Why not just put the rad in the front?
Cheers
Fred W B
To my eyes, changing the nose will spoil the look. Why not just put the rad in the front?
Cheers
Fred W B
Hi Fred, to fit a front rad would require substantial changes to front of chassis which i want to avoid if at all possible,
my freindly photo shop guy is doing another mod for me, this time with an enclosed cockpit as per orig WSC so will see what that looks like, as that can be added quite easily with alloy.
cheers John
my freindly photo shop guy is doing another mod for me, this time with an enclosed cockpit as per orig WSC so will see what that looks like, as that can be added quite easily with alloy.
cheers John
Coming this morning mate....
")
Hi Dom , roof Nah Í like em topless:evilgrin:
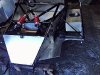
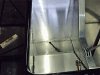
made a bit of progress today, inso much as the floor is now 95% done, just the front wheel cut outs to get right and that monkeys off my back, thank god, almost 400 rivuts, all by hand, and only broke one drill, whose a clever boy then:kid:
will post a couple of pics tomorrow
Cheers John
made a bit of progress today, inso much as the floor is now 95% done, just the front wheel cut outs to get right and that monkeys off my back, thank god, almost 400 rivuts, all by hand, and only broke one drill, whose a clever boy then:kid:
will post a couple of pics tomorrow
Cheers John
thank god that weekend is over, i dont think ive ever squeezed so many rivuts in one sesion before in my life, highly reccomend an air rivuter, but thank god its done, have posted a couple of pics, feed back appreciated as usual.
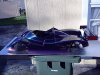
also the painter at work has been busy experimenting with colour on the model, Porsche Dark blue with some pearl for effect, thoughts
Cheers John
also the painter at work has been busy experimenting with colour on the model, Porsche Dark blue with some pearl for effect, thoughts
Cheers John
Attachments

A question for the masses, i am building my seats into the cockpit, i have fabricated and temp fitted the center consul ala tunnel, which will house sway bar adjuster levers,and add side support, and was wondering if i should take the extra effort, and have the seats glued and rivuted to center and side wall etc to make them part of the car instead of just sitting them in the space, would they add any aditional stiffness etc to the cockpit area?
cheers John
cheers John
A well designed tunnel that joins the front and rear bulkheads together will add masses of torsional strength to the car....its the single biggest improvement in most chassis designs....IMHO....so do all you can to make it stiffer...
By the way its an 1985
By the way its an 1985
thanks Fran i was thinking right then [for a change] it will mean a little extra folding ,but will certainly look alot neater and one can never have to much stiffness:thumbsup:
85 is the right number so i would say youve sold it, will no about freight early this coming week, all going well
cheers John
85 is the right number so i would say youve sold it, will no about freight early this coming week, all going well
cheers John
have had a busy weekend, its been raining heavy all day, so a good day to be in the shed uninterupted.
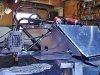
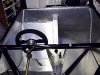
I have finalised the center consul and built the drivers seat and fitted it in as a stressed member, fully glued and rivuted to sides, floor, center and rear bulk head. once i get the passengers seat in it should be as stiff as a school boy on his first date.
i will have to move the steering wheel mount over to the right a touch to centralise it, but other than that it fits like a glove, very comfortable.
my next big headache is sorting out gearshift mechanisim and how and where to mount it, will be RH shift, somewhere close to steering wheel.
as always, opinions welcome
cheers John
Attachments

low and behold the rain has finaly stopped, but that cold southerly is still out there, and sh@t is it cold.
but being the tough nut i am i braved the conditions and ventured out to the shed , and managed to finaly complete the seats.
passenger seat is now all done thank god , so far almost a 1000 rivuts and two tubes of Sikaflex but we got there, paneling now all done

inside seat belt anchours are in place just the outside ones to fit, then slot the top of the bulkhead for shoulder straps, and thats taken care of.
just the gearshift left to worry about
cheers John
but being the tough nut i am i braved the conditions and ventured out to the shed , and managed to finaly complete the seats.
passenger seat is now all done thank god , so far almost a 1000 rivuts and two tubes of Sikaflex but we got there, paneling now all done
inside seat belt anchours are in place just the outside ones to fit, then slot the top of the bulkhead for shoulder straps, and thats taken care of.
just the gearshift left to worry about
cheers John
Thanks to Russel K a gear shifter is in the post, thanks heaps mate i owe you one, so that headache is now solved, looking foward to receiving same and sorting out how and where to position it, but that should be pretty straight foward
also spoke to an old freind tonight about engine improvments, i wish i hadnt gone there, he's talking some serious HP out of these EG33 engines without alot of effort or money, both sound good to me, just a little plumbing and a couple of small hair dryers, Mmmmmmm
oh well plenty of time for that, lets get it rolling first.
cheersJohn
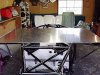
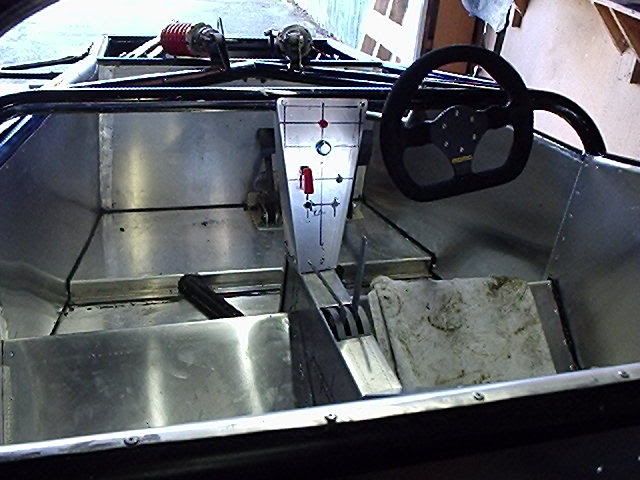
Weather is still cold wet and miserable, but thanks to Russel K a parcel arived the other day with a very nicely enginered shifter inside, after a bit of fiddling and mind changing i finaly decided on the best position to mount it and so in it went pretty straight foward just a rose joint and a bolt, i will need one more support bearing behind the bulkhead to support the main shaft through the cockpit then a uni joint to transfer the angle to the rear of the trans, nice and simple just how i like it.also got the out side seat belt mounts made and fitted, just have to make the cut outs in the top panel for the shoulder straps, you can also see how the shift rod exits the cockpit throught the rear of the seat, bulkhead etc.
as always opinions welcome
cheers John
as always opinions welcome
cheers John
Attachments
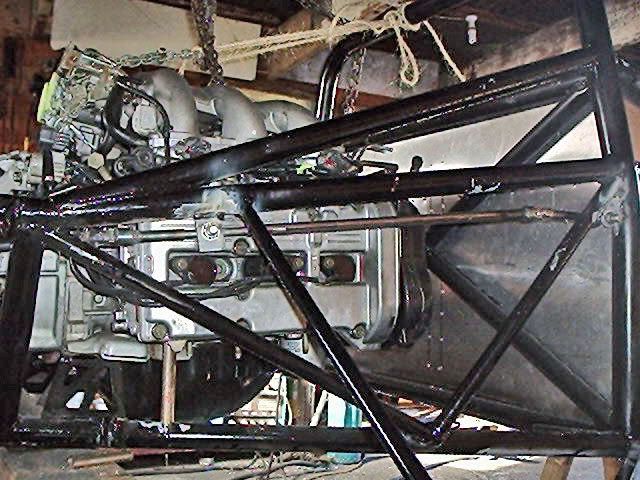
Another fairly productive weekend, Sat saw me get the shifter mounted and sorted, apart from the linkage to Trans, and yesterday i spent all day trying to reposition the engine so i could access No 5 plug with out either 1/ having to pull engine or 2/ making the diagonal removeable.
solution was to move the whole unit foward 50mm which has solved the access problem, and has probaly shifted a little more weight foward, which cant be a bad thing. its tight but it dose come out ok without to much bother.

so now i have to re fabricate some new engine mounts, and as i have changed from a 4wd box to a 2wd box which has a smaller rear housing [no extra diff] i had to remove the orig rear mounts and make a single one to pick up the rear of the box, and yes i will add a gusset to the alloy bracket just to be on the safe side.
it meant adding another x brace across the back of the chassis, but i dont think the extra couple of ounces will upset the balance of things to much.

the only concern was drive shat angle, half shafts now have approx 4 deg of angle on them, but a few learned freinds tell me that its nothing to get to worried about.

what do the masses think
as always opinions welcome
cheers John
solution was to move the whole unit foward 50mm which has solved the access problem, and has probaly shifted a little more weight foward, which cant be a bad thing. its tight but it dose come out ok without to much bother.
so now i have to re fabricate some new engine mounts, and as i have changed from a 4wd box to a 2wd box which has a smaller rear housing [no extra diff] i had to remove the orig rear mounts and make a single one to pick up the rear of the box, and yes i will add a gusset to the alloy bracket just to be on the safe side.
it meant adding another x brace across the back of the chassis, but i dont think the extra couple of ounces will upset the balance of things to much.
the only concern was drive shat angle, half shafts now have approx 4 deg of angle on them, but a few learned freinds tell me that its nothing to get to worried about.
what do the masses think
as always opinions welcome
cheers John
John
If that plug is behind the brace, why not cut out a section and weld in a heavy gauge ring / or tube so that you enter the plug thru that new `hole`. It would mean that you can get the motor back in your prefered position. Glad to see that you got some use out of my surplus gear shift too.
Cheers
If that plug is behind the brace, why not cut out a section and weld in a heavy gauge ring / or tube so that you enter the plug thru that new `hole`. It would mean that you can get the motor back in your prefered position. Glad to see that you got some use out of my surplus gear shift too.
Cheers
Thanks again Russ it fits like a glove.
I did think of that , the ring thing, but decided moving everything foward would be the better plan, pluss the extra weight distibution etc wouldnt be a bad thing,
i only now have to get the linkage sorted to the trans, shouldnt be to hard, just a matter of giving it some thought.
good luck with your start up, youll have to give me a ring when its going and let me hear it
cheers John
Re: new build a Porsche LMP, latest update
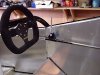
after much trial and error i can now change gears from the cockpit :thumbsup:, its not 100% but it dose work, i used a couple of old uni joints out of a 1/2 inch drive socket set, and they work fine but unfortunately have a little to much side movement in them, so will have to try and source some small steering uni;s from somewhere.
but at least the concept works


i may also up the size of the control tube from the 1/2 in it is now to maybe 5/8 or 3/4 just to give it a bit more stregth and a more positive feel
opinions as always appreciated
cheers John
after much trial and error i can now change gears from the cockpit :thumbsup:, its not 100% but it dose work, i used a couple of old uni joints out of a 1/2 inch drive socket set, and they work fine but unfortunately have a little to much side movement in them, so will have to try and source some small steering uni;s from somewhere.
but at least the concept works
i may also up the size of the control tube from the 1/2 in it is now to maybe 5/8 or 3/4 just to give it a bit more stregth and a more positive feel
opinions as always appreciated
cheers John
")
Similar threads
- Replies
- 2
- Views
- 492