Old Tornado- Bringing Back to Life

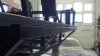
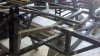
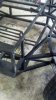
It's a good idea, David. It would certainly add a bit of rigidity to the top of the horseshoe. Ideally, you could run some legs down from the top of the bulkhead, like the newer GT.


2005_ford_gt_engine_bay.jpg


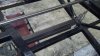
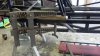
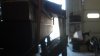
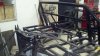
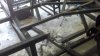
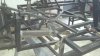
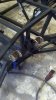
Doing this and doing a rollcage would add a LOT of stiffness to the chassis. Not the greatest tube-frame design, what with all the weight hanging out on the rear. The engine bay supports from the bulkhead to the picnic table side areas that Tornado and others sell help a bit, but to do anything real substantial would mean throwing bars under windows and across normally-open viewing areas. :shrug:
 
Catching up to where the frame is at now- I've been busy making bracing in preparation to cut out the upper engine bay rails. Slight detour to get my buddy's TIG welder running again after 3 years of being a mousetrap.

One thing I am fixing is the upper outermost framerails, where the top of the rockers sit. I've attached a picture with a flat piece of stock laid across the top to show the bow in them. It is pretty clear that these outer rails, when welded, aren't jigged farther back than the cross-support that attaches to them right at the bulkhead. This is where they start to sharply curve upwards, and end up significantly higher than the engine bay rails in the rear. Normally all this would get taken care of when the rear shell and rockers were trimmed, but since I'm cutting up the rear anyway, these will be corrected downwards and everything rewelded to get them flat. This is where I really wish I had a frame jig. I hate to utter the words "next time" before a single panel is riveted on, but I've got some things stuck in my head for a few (read: a lot of) years down the road.
 

Attachments

  • Framerail.jpg
    Framerail.jpg
    118.7 KB · Views: 400
  • New Crossmember.jpg
    New Crossmember.jpg
    181.5 KB · Views: 434
An update on the recent framework-

The new crossmember is welded in, and the old one will come out after all other engine bay work is done. No reason to remove stiffness while welding/cutting.

The dovetail of the outer sill rail past the bulkhead has been corrected. A temporary support was welded in, the 45 degree rear brace was sliced completely at the bottom, and the top cross-tube was slit up to the top face. The sill tube was kinked starting at the bulkhead cross tube, but was still straight, so I didn't want to bow the tube when I corrected it. Plates were clamped along the top of the rail, past the bulkhead, to keep it in shape. The bottom of the sill tube was heated with a torch, and tapped down with a hammer on the back corner while a ratchet strap kept downward tension on it. In the close up picture of the sliced 45 support, you can see how much the framerail had to move down by...those angles used to be flush. Now when you lay a straightedge across the engine bay or down the sill rail, the worst height discrepancy is around 0.040" due to the weld joints, rather than the 0.375" curve that existed beforehand.
 

Attachments

  • IMG_20130424_154639_793.jpg
    IMG_20130424_154639_793.jpg
    197.5 KB · Views: 486
  • IMG_20130424_164340_646.jpg
    IMG_20130424_164340_646.jpg
    158.1 KB · Views: 458
  • IMG_20130424_164505_559.jpg
    IMG_20130424_164505_559.jpg
    99.4 KB · Views: 441
  • IMG_20130424_171341_570.jpg
    IMG_20130424_171341_570.jpg
    60.2 KB · Views: 406
  • IMG_20130425_160932_518.jpg
    IMG_20130425_160932_518.jpg
    184 KB · Views: 440
Boris, incredible work. I cannot imagine how meticulous you have to be to derive these curves from 2D layouts. You should've picked an easier car shape....like a DeLorean!


The Coyote engine bay modifications are almost done. I welded in temporary bracing to ensure the horseshoe and outer rails did not shift. My round tubing for cross-bracing is on backorder and doesn't come in until next week, so I will have to leave the temporary bracing in until then. I will not be making the bulkhead coyote modifications until I finalize rollcage plans, so...on to other things! Front suspension is up next.
 

Attachments

  • IMG_20130426_203029_792.jpg
    IMG_20130426_203029_792.jpg
    218 KB · Views: 397
  • IMG_20130427_143115_847.jpg
    IMG_20130427_143115_847.jpg
    149.6 KB · Views: 380
  • IMG_20130427_143309_812.jpg
    IMG_20130427_143309_812.jpg
    146.5 KB · Views: 392
  • IMG_20130429_165545_371.jpg
    IMG_20130429_165545_371.jpg
    167.5 KB · Views: 400
  • IMG_20130430_152414_733.jpg
    IMG_20130430_152414_733.jpg
    181.6 KB · Views: 371
Due to cost, availability, and durability, I have opted to swap the Granada front pieces for Wilwood Pro 2" drop spindles, based off of Mustang II geometry. This creates a few problems with geometry. The Wilwood spindles are 1.550" taller than their Granada counterparts, in addition to having different balljoint taper angles and a different centerline. Steering geometry is almost identical.

Wilwood_Spindle_830-9807.jpg


I'm looking at probably moving the upper A-Arm mounts and getting new arms. Lower geometry shouldn't need to change. Below is a shot of the Wilwood spindle in place with stock geometry.

attachment.php
 

Attachments

  • 5-8-13 Suspension.jpg
    5-8-13 Suspension.jpg
    176.4 KB · Views: 1,800
I've been fabricating a jig and doing a lot of research in preparation to make new A-arms. In my internet travels, I ran across these:

images


Spohn Del Spheres....Greasable rod ends using delrin bushings. I've used delrin before and am always amazed it is not used more in automotive bushing applications. These are rebuildable, and can be tensioned to eliminate play if they wear. They also have more than 20 degrees of movement freedom because of the spherical joint. They look amazing, don't cost significantly more than other options, and people say they ride like poly and handle like solid rod ends. Sounds like a win-win, right? Well, the diameter of these units is massive (2.25"), so a major redesign of mount points would be needed to use them. But now that I've seen them, I can't unsee them.........
 
Not much work lately, but a lot of parts are coming in the next few days. I'm going with the del-spheres and will be notching and redoing the frame mounts for them.

Here's a picture of the adjustable A-Arm fabrication fixture, made out of my old floorpans! Good thing they're thick enough to use as freakin' weld fixtures!

976867_10151473243120835_2081523225_o.jpg
 
So, here I am 6 months down the road from "I'll just strip and repaint the A-arms". With the help of a local circle-track guy, as well as forum members such as Phil, and extensive research, I've designed new A-arms and mounts to change up the geometry and allow for more suspension travel, a modern-offset wheel, adjustable chassis pivots, adjustable anti-dive, better turning radius, wider track width, etc etc. The Tornado chassis allows plenty of interior room as designed, but really limits what you can have for rack travel and bump when running granada hubs with short arms, large scrub radius and vintage wheels. This means I'm committed to a new-style wheel and now have the challenge of finding something decent-looking, but I'll worry about that down the road.

Here are some pictures from the past few months:


The wilwood spindle with my brakes, back when I was going to keep my stock arms:
964090_10151503835220835_1677665621_o.jpg


Some CAD pictures of the geometry. Note that A-Arm things such as coilover position and leg position aren't finalized. Observant Tornado owners will also note that I am pushing back the front corners of the frame by the spider/rear of the front wheelwell.

attachment.php

attachment.php


And after two months of research and design, the first new chassis mounts, off the laser:
1039979_10151536966745835_1325763432_o.jpg
 

Attachments

  • Final Suspension Setup.jpg
    Final Suspension Setup.jpg
    509.6 KB · Views: 1,860
  • Final Suspension- Head On.jpg
    Final Suspension- Head On.jpg
    407.4 KB · Views: 1,511
Last edited:
Hi Dylan, I have been reading your log, I think you are doing the right thing, by stripping her right back, you will never regret this, although you make the build journey longer, the satisfaction of a job done well will never leave you. Keep up the good work.

I took on a partially built Tornado, in some respects I wish less had been done by the prev owner, so I could have done more, as I would have done it differently, but hey, maybe with the next one I will start from scratch. What CAD s/w do you use? keith.
 
Hi Keith. It is a blessing and a curse that it was still at a point where I could start fresh. If not for the modifications I've been doing, the car literally could have been built sans body by now. Panelling and bolting things on will go by in a flash when I finally get to them. I have to say, I envy the posts you make about tidying things up a bit and being able to check them off the list for good.

I use Solid Edge software (very similar to SolidWorks, uses the parasolid kernel) for all my design work.
 
Dylan, we're all on a conveyer, I think the secret is, not to get hurried or impatient by looking at the progress of others. Now that I remember, on the tornado chassis, you eill have to put a couple of MS straps across the cabin floor, before you panel, this is to fix the seat and/or runners to. Otherwise you will be like me, having to do it post panelling, ;-(

I think you probably make more visible progress in an afternoon than I do, when you get towards 'the end' the trivial tasks eat time, e.g. making barckets to mount the headlamps and make them adjustable Simply because the space starts to get cramped and confined. The tasks become ones that other will see and the potential for a 'balls-up' increases exponentialy. When it comes to body work, you find yourself measuring, marking, remeasuring, moving, checking, then saying a prayer before taking the drill to it. Don't know if i was OCD before, but like twitter I'm trending. K
 
The girlfriend let me off the leash long enough to spend some time in the garage this weekend. :laugh:

Cut up the top of the frame where it will be pushed back to make more room in the wheelwell, and cut off the original suspension mounts and prepped for the new ones. My hole saw had a broken arbor, so I couldn't drill the holes in the frame to put in and weld the cap tubes that the new mounts will bolt through. The A-arm details have been made, and just need to be (TACK) welded together. I'm hoping over the holiday weekend, I can bolt together the new suspension and check the geometry in real life, then weld the arms solid and move on.
 

Attachments

  • IMG_20130629_170953_487.jpg
    IMG_20130629_170953_487.jpg
    85.9 KB · Views: 352
  • IMG_20130630_102429_064.jpg
    IMG_20130630_102429_064.jpg
    262.4 KB · Views: 412
  • IMG_20130629_145502_125.jpg
    IMG_20130629_145502_125.jpg
    90.2 KB · Views: 398
Dylan, you look to have a slight angle on that member wrt the the other members across the chassis, I think (from mem) that mine are perpendicular, I'll check when I get home at 17.30 GMT, in about and hour and a half? I also see it in your CAD, perhaps this is deliberate and I have missed the explanation? (or perhaps mine is not perp and we can forget the whole thing). K
 
You are correct- It is angled, and purposely. I cut these back to give more room in the inner wheelwell for the wheel to turn and travel. I mentioned this earlier briefly, but sandwiched between pictures, so I'll elaborate a bit since you asked.

At varying levels of bump, the panelling off of this chassis element interferes with the wheel long before the inner framerail restricts movement of the rear of the wheel. Moving the frame back here guarantees that even with longer steering rack travel (such as Mustang II 5.25" travel instead of Tornado ??? rack 4" travel) and a 10.5" wide front tire, the tire will never collide with the panel even during extreme bump.
 
Yes, but you have to remember, I am tossing out the Granada hubs and Tornado A-Arm geometry. Just off the top of my head, this will mean no clearance problems at 3" bump, 75% racked, on a 10-11" wide modern rim with around a +38mm offset, 25.6" diameter wheel. This is an extreme bump number- I expect to be less than this when all is said and done, which means there would never be a chance to collide with the paneling even at full bump, 100% racked over. The upper frame corners have been pushed back less than 2", but it provides greatly improved clearance for larger tires.
 
Back
Top