Old Tornado- Bringing Back to Life

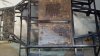
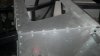
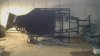
It has been a while, but I got back down in the garage for a good chunk of time and started removing the original panels. I don't like to speak ill of dead men, (original owner passed away,) but he sure did a number on the riveting. Panels were half-sealed with a thick and uneven layer of some type of clear caulking, uneven number of rivets side-to-side, hand-bent corners that were more like gentle radii....oh well- it will all be redone. I might do the highly visible bits like the sill runners and the bulkhead in thin brushed stainless.

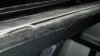
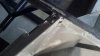
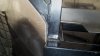
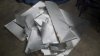
I tried to vacuum the trapped rivet debris out by drilling a large hole in the end of a frame element, plugging all the other holes up with tape, and feeding in surgical tubing hooked up to a vacuum. This failed. I couldn't get large enough diameter tubing into the frame to be able to pick up meaningful bits of rivet with the suction. I am really stuck with what to do here. Cutting up the frame to get these bits out scares the heck out of me. I am looking into the foam method, and might test that on a few scraps of square tubing.
 

Attachments

  • 2012-12-04_17-12-24_727.jpg
    2012-12-04_17-12-24_727.jpg
    131.4 KB · Views: 555
  • 2012-12-04_17-12-33_251.jpg
    2012-12-04_17-12-33_251.jpg
    104.4 KB · Views: 631
  • 2012-12-04_18-27-27_831.jpg
    2012-12-04_18-27-27_831.jpg
    139.8 KB · Views: 598
  • 2012-12-04_18-28-04_895.jpg
    2012-12-04_18-28-04_895.jpg
    136.8 KB · Views: 543
  • 2012-12-04_18-28-41_939.jpg
    2012-12-04_18-28-41_939.jpg
    96.8 KB · Views: 643
Dylan,
I was in the same position as you when I started my rebuild. To remove the old rivet heads I drilled a 10mm hole in the chassis tubes and then up-ended & rolled the chassis around to get them out.

I know I haven’t managed to get all the old heads & debris out, but a liberal dose of waxoyl will stop them rattling. However it doubtful you’d hear them rattling over the sound of a V8!
Regards,
Andy
 
What about drilling another hole on the other end of that tube and insert a small hose with pressurized air and try to blow them out on the other end ?

TOM
 
Tom, that is actually my next step now! I'm going to throw a can with a screen over a tube end and see what I actually collect for pieces. The fact that Andy had some success with rolling it around is also heartening.

I was in the garage until a bit past midnight, and managed to get the chassis completely taken apart and all the rivets drilled and panels removed with the exception of the skidpan. Broke a fair number of drills, too- none stayed in the frame, luckily. Man, my hands hurt.
 
Some pictures of the progress...err....regressive progress...um...WORK!
 

Attachments

  • 2012-12-06_21-19-31_764.jpg
    2012-12-06_21-19-31_764.jpg
    169.6 KB · Views: 609
  • 2012-12-06_22-21-42_304.jpg
    2012-12-06_22-21-42_304.jpg
    158.3 KB · Views: 612
  • 2012-12-06_22-32-51_379.jpg
    2012-12-06_22-32-51_379.jpg
    127.5 KB · Views: 577
  • 2012-12-06_22-33-00_819.jpg
    2012-12-06_22-33-00_819.jpg
    143.9 KB · Views: 570
Got the belly pan off, and got about halfway through emptying the rivets out of the framerails using a combination of magnets, compressed air, gorilla tape, and a vacuum. As Andy has done, I'm drilling holes in the frame. A 0.400" hole has been sufficient on all but two frame elements so far, to remove debris. I am checking everything with a careful eye and flashlight, and will be borrowing a craftsman remote camera setup (on the flexy tube) from a friend to check some of the other frame elements. So far, so good, and MUCH less time than I thought I was going to devote to it. Hooray! Rewelding of some of the rivet holes can begin. Tomorrow marks.....the beginning of reassembly of the car.

I have six beams in my garage. The empties are going to fill them up fast, so I guess I better hurry up and finish the project.
558941_10151177729290835_1087437184_n.jpg

9643_10151177749730835_730445127_n.jpg
 
"Rewelding of some of the rivet holes can begin. Tomorrow marks.....the beginning of reassembly of the car."


You don't have to close up any holes unless they went too far oversive when you drilled them out.

This is an old trick I've used. You can make one or buy one for different size rivets.

rivet hole finder you can make/new life for broken hack saw blades - Zenith Aircraft Builders and Flyers

D&D Aircraft Supply


Also save any of the panels that were decent so they can be used for patterns.
 
That is a clever little tool, and I happen to have two blades to sacrifice for that. Thanks for the links!

I am extremely frustrated with the rivet spacing and location on the rails. Except for a few panels, I am probably going to reweld and dress all of the holes, and laser new panels with even spacing. Time wise, it'll probably be easier than reusing and cleaning up the old panels, and it certainly will make me happier in the end.
 
Chally:
Listen to Scott..he knows these chassis inside and out.
Also, a trick I use on trailer repairs with aluminum skins is to lay the old skin over the new one and be as accurate as you can lining them up. Use spray paint to mark through the holes onto the new sheet, get one corner started and if you were reasonably accurate the holes will line up.
That hacksaw blade trick is definitely neat.
Cheers
Phil
 
In my opinion, looking back at the previous builders rivet alignment, they were not nice enough, trying to re use the holes will only end up with a tatty job.
Study that 2nd picture on 5.12.12 and see how many rivets are out of alignment, some may think acceptable but if you start with a " that will do attitude " it will run with the whole build.
Weld the holes over, grind them flat, use the opportunity to tidy any welds, shot blast and powder coat it.
In my opinion that will look a proper job. I bet once your set up you could do the whole job in a couple of hours..... then send it to the coaters....... Start a fresh
 
Last edited:
All of the rivets are out except for the two main framerails. I have to wait for a buddy to come over and help me with that next week- my back is about shot from tipping the chassis around myself to get everything so far.

I dragged the transaxle out of storage and cleaned it up enough to identify it. It is a later Porsche 914 transaxle. :( Oh well. I'll have to sell it and get in the hunt for a real unit.

I started cleaning up an old 302 iron block on an engine stand. This will be my mockup engine until I can get something built.

Keith, that is actually one of the straighter rivet lines. I'll post some other pictures later, maybe. It will soon only be a memory, regardless.

Ian, remember that I was the guy that originally joined this board looking at a Fiberfab Avenger years back! I don't know if you were serious, but buying a new chassis certainly isn't in the budget. Labor is cheap when you're the guy doing the work, so might as well take that route. Removing the rivets is much easier than I expected, actually. ~50-60 hours of work, and I will have a holeless, unmolested frame to start the build with. Not having to build it twice- can't put a price on that. (Well, not one I could afford. :laugh:)
 

Ian Anderson

Lifetime Supporter
Hi Dylan
Yes I remember the Fiberfab bit.
I agree that the own labour is cheap, but was just suggesting an alternative route that may have saved a couple of hundred hours of work.

Good luck searching for a gearbox. Lots of different ones available and loads of information on this site about most of them.

Back ache? Build yourself a couple of tressles to get the chassis to a more comfortable work height.

Ian
 
Hi Ian- The back ache was from tipping the chassis against the wall and shaking it back and forth to get the rivets moving around. I got a few hands to help for the rest of the removal. Rigging it to the beam in the ceiling and attacking it with rubber mallets and compressed air through the holes was enough to quickly move all the rivet bits to the 0.400" holes drilled strategically at capped tube ends. I am very happy that this is over with! The chassis will be welded on Saturday.

Some interesting things found during chassis cleanup-

-The crossmember that runs behind the seat plates, at the base of the bulkhead section, is blown out along about a foot of length on the driver's side. As in, the square tubing sides are bowed out- likely from a large amount of welding superheating the trapped air inside the tube and pushing the sides around when they got soft. I am going to have to put some heat back in it and use some C-Clamps and plates to bring the sides under control. There will be an air relief hole drilled for this.

-The powdercoat wasn't that great and was pretty thin in a lot of areas. Some of this is to be expected with all that tubing getting in the way, but the fact that I speedlok sanded all the holes down in less than two hours says something about the coating thickness all over. It worked in my favor here, but I'd be inclined to strip it down and do a properly thick paint job on it if I got it as a fresh chassis anyway.

Things are looking good for plugging away at some basic reassembly over Christmas break!


60818_10151284450537290_406277317_n.jpg


543933_10151184187385835_1809496615_n.jpg


Attached is a picture of the underside after bellypan removal. I would never forgive myself if I didn't fix this mess.
 

Attachments

  • 2012-12-08_19-23-02_686.jpg
    2012-12-08_19-23-02_686.jpg
    224.7 KB · Views: 478
Last edited:
I seriously doubt the side of steel tubing are pushed out from air pressure, A better explanation would probably be freezing. If there are that many unsealed holes water will migrate through rivet holes very easily. We see this in our race cars up here all the time. Drill drain holes.
 
Sorry Dylan, But I think what I would have done is drill out the rivets, those that fall in the chassis can stay there forever, if they rattle a bit squirt some of that builders foam we have here and probably in the US it will do no harm and as you never need to get into the inside of the chassis rails do you.
Grind holes flat , weld up ...job done ...no back aches... no mess.... if the whole job would have taken a day I would be suprised.
What is all that shit sticking under the floor pan ? I looks like it was glued and rivetted.
Crap work.. sand it off and when it's shot blasted you wont see it.
What I dont understand is how anyone cant drill holes in a straight line. If your going to do a job do it right, if you can't do a simple thing like that you shouldn't even think of building a car. The guy who built that should not have.
I tell you I have seen some real crap work over the years, death traps too. But you can easily make this into a real nice car. Keep at it..
 
Last edited:
Well Keith, it took a few days, but the frame no longer sounds like a jar of pennies when you move it around. So, mission accomplished.

Egoman, that was my first guess as well, but the framerail inners are rust-free. I've been able to tell which rails had moisture or water in them. This wasn't one of them. :/ A mystery.
 
The frame is 100% welded. Took it over to a friend's shop and spent all day Saturday on it. The holes are all TIG-welded. 17 feet of 0.063" wire and an entire bottle of gas later, it rolled back out. For the larger 0.400" holes drilled into the frame caps, I used a whitney punch size slightly smaller than the hole to get some disks to fill the holes. We tacked the punched disks to a wide material edge, which held the plugs flush with the frame when put over the holes. Two tacks on the disk, break the tack on the holder, then plug weld it and repeat ad nauseum. Most of the welds are so flush that they will require very little grinding work. The picture below of the bulkhead bar is after welding.
 

Attachments

  • 2012-12-15_10-23-20_996.jpg
    2012-12-15_10-23-20_996.jpg
    88.2 KB · Views: 456
  • 2012-12-15_15-06-06_754.jpg
    2012-12-15_15-06-06_754.jpg
    78.4 KB · Views: 503
  • 2012-12-15_16-22-30_903.jpg
    2012-12-15_16-22-30_903.jpg
    62 KB · Views: 529
It's been a while without updates, but I haven't been idle. I got myself a new laptop with a decent processor and graphics card for work, and was finally able to actually use my CAD program at home. A few days of work, and the frame has been fully modeled. I am working on the suspension bits next, though the next roadblock is the studs for the lugnuts spinning in their holes on the rear hub. I'll have to cut them off one night this week. I've been told by a friend with a Merkur that the brakes are Sierra Cosworth/Scorpio pieces and are reasonably desirable. I haven't decided if I am going to sell them and fit something else yet, but I am leaning towards it.

I found a Mk1 body modeled in Solidworks, and brought it into Solid Edge (my CAD program) and cleaned it up. I haven't obsessively measured my own shell pieces against it, but it should be close enough to give me a good idea of what different pieces will look like on the car. The rocker panels are within 0.125" of where they should be according to the frame CAD model. Now I can work on the car when I'm not home! My girlfriend hates this "time-sucking THING" already. I can't imagine this will make her any happier.

attachment.php

attachment.php

attachment.php

attachment.php

attachment.php
 

Attachments

  • Frame 1.jpg
    Frame 1.jpg
    16.8 KB · Views: 1,442
  • Frame 2.jpg
    Frame 2.jpg
    17.7 KB · Views: 1,590
  • Assembly 1.jpg
    Assembly 1.jpg
    12.7 KB · Views: 1,386
  • Assembly 2.jpg
    Assembly 2.jpg
    12.1 KB · Views: 1,343
  • Assembly 3.jpg
    Assembly 3.jpg
    19.8 KB · Views: 1,337
Last edited:
Back
Top