Roaring Forties 66

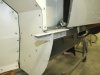
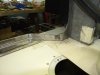
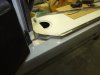
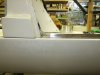
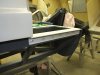
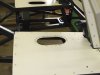
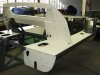
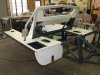
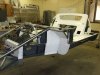
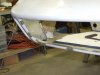
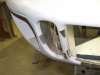
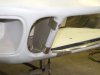
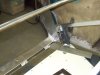
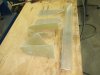
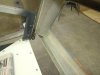
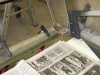
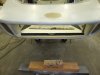
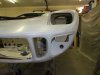
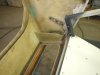
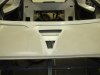
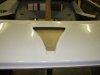
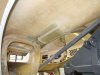
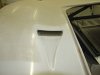
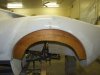
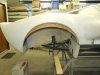
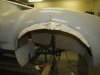
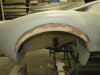
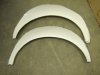
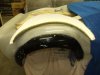
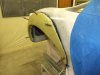
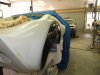
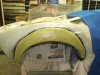
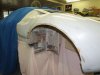
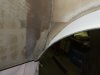
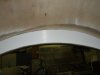
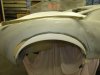
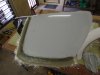
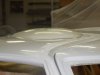
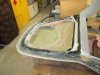
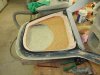
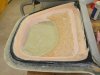
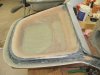
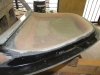
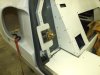
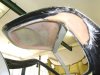
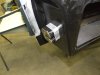
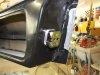
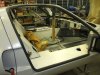
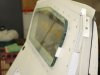
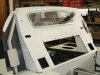
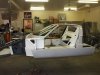
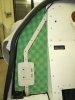
And the panelling continues.....

Clayton
 

Attachments

  • Panels 30.07.10 053_renamed_25167.jpg
    Panels 30.07.10 053_renamed_25167.jpg
    90.4 KB · Views: 315
  • Panels 30.07.10 059_renamed_22735.jpg
    Panels 30.07.10 059_renamed_22735.jpg
    144.3 KB · Views: 349
  • Panels 30.07.10 060_renamed_516.jpg
    Panels 30.07.10 060_renamed_516.jpg
    153.8 KB · Views: 334
  • Panels 02.08.2010 005.jpg
    Panels 02.08.2010 005.jpg
    143.2 KB · Views: 322
  • Panels 02.08.2010 009.jpg
    Panels 02.08.2010 009.jpg
    128.5 KB · Views: 355
Bulkhead window will be glued in and a trim to cover the edges.
Spider glued and riveted in place. Sat the windscreen in for a test fit.
Rear bulkhead panels edge sealed to the spider, then insulated.

Clayton
 

Attachments

  • Panels 06.08.2010 005.jpg
    Panels 06.08.2010 005.jpg
    128.3 KB · Views: 349
  • Panels 06.08.2010 015.jpg
    Panels 06.08.2010 015.jpg
    74.2 KB · Views: 333
  • Panels 06.08.2010 020.jpg
    Panels 06.08.2010 020.jpg
    124.6 KB · Views: 322
  • Panels 06.08.2010 054.jpg
    Panels 06.08.2010 054.jpg
    135 KB · Views: 322
  • Panels 06.08.2010 059.jpg
    Panels 06.08.2010 059.jpg
    149.8 KB · Views: 366
  • update 22.01.11 002.jpg
    update 22.01.11 002.jpg
    123.9 KB · Views: 344
  • update 22.01.11 005.jpg
    update 22.01.11 005.jpg
    122.1 KB · Views: 399
Clayton,

I have to tell you how much I appreciate this thread. First, I admire you for the absolutely meticulous job you are doing and how special this car must be. Incredible workmanship and attention to detail and finish. Second, I really like to see this build develop in such a short time. I think you might have done it right to publish the build after it is built. I might have not remembered where you were if it was spread out over multiple years.

Well done! Keep it up. You are giving me a lot of ideas to think about on my build.

-Bob Woods
 
Thanks for the kind words Bob
Luckily I dated the photos, otherwise it would have been a nightmare going back through and sorting 12 years’ worth…..

Clayton
 
Time for the body
First place to start was the radiator / brake duct opening. I wanted to extend the walls of the ducts to give it some depth. Also double skin the lower opening to clean up that area.
Made the moulds from alloy, and then laid fibre glassed on them.
The lower edge has a dogleg in it so that a bolt-in panel (off the chassis ) will fill the area, stopping air from bypassing the radiator.

Clayton
 

Attachments

  • body oct 2010 001.jpg
    body oct 2010 001.jpg
    109.4 KB · Views: 358
  • body oct 2010 002.jpg
    body oct 2010 002.jpg
    118.9 KB · Views: 316
  • body oct 2010 004.jpg
    body oct 2010 004.jpg
    86.4 KB · Views: 344
  • body oct 2010 005.jpg
    body oct 2010 005.jpg
    88.7 KB · Views: 337
  • body 25.11.10 001.jpg
    body 25.11.10 001.jpg
    139.2 KB · Views: 355
  • body 25.11.10 003.jpg
    body 25.11.10 003.jpg
    124.9 KB · Views: 319
Starting to glass the additions in.

Clayton
 

Attachments

  • body 25.11.10 008.jpg
    body 25.11.10 008.jpg
    111.6 KB · Views: 380
  • body 25.11.10 013.jpg
    body 25.11.10 013.jpg
    153.8 KB · Views: 365
  • body 25.11.10 020.jpg
    body 25.11.10 020.jpg
    108.9 KB · Views: 336
  • body 25.11.10 047.jpg
    body 25.11.10 047.jpg
    106.6 KB · Views: 305
  • body 25.11.10 050.jpg
    body 25.11.10 050.jpg
    112.2 KB · Views: 323
Opened up all three NACA ducts.
The centre one was hitting the chassis, so I had to cut it out and make a shallower floor. At the same time extended the duct rearward to make it look right.
For the outboard ones, I made an open ended duct to give them a purposeful look.

Clayton
 

Attachments

  • body 25.11.10 052.jpg
    body 25.11.10 052.jpg
    90 KB · Views: 364
  • update 05.05.11 032.jpg
    update 05.05.11 032.jpg
    67.1 KB · Views: 350
  • body 25.11.10 025.jpg
    body 25.11.10 025.jpg
    122.3 KB · Views: 347
  • body 25.11.10 051.jpg
    body 25.11.10 051.jpg
    77.6 KB · Views: 348
Next inline was the rear wheel arches.
I have never liked seeing daylight above a tyre, even though it may come from the factory like that.
Working with the loaded tyre radius and chassis ground clearance, I needed to lower the arch by 50mm on the left and 45mm on the right to have 15mm of tyre cover.
Used some ply as my template, added foam to build it up and then bogged to the final shape.

Clayton
 

Attachments

  • body 25.11.10 027.jpg
    body 25.11.10 027.jpg
    104 KB · Views: 365
  • body 25.11.10 030.jpg
    body 25.11.10 030.jpg
    124.5 KB · Views: 362
  • body 25.11.10 031.jpg
    body 25.11.10 031.jpg
    96.7 KB · Views: 372
  • body 25.11.10 032.jpg
    body 25.11.10 032.jpg
    109.1 KB · Views: 358
  • body 25.11.10 069.jpg
    body 25.11.10 069.jpg
    91.2 KB · Views: 335
  • body 25.11.10 070.jpg
    body 25.11.10 070.jpg
    130.9 KB · Views: 374
Took a mould off the new guard extension and before I removed it, I drilled holes for skin pins.
Had some good advice from an old fibre glass man. He told me to make the buck / extension, lay up the mould then skin pin it. Remove the mould and cut away all of the added stuff (bog / foam etc) and taper out the glass to a feather edge.
Refit the mould with skin pins (perfectly located) add the gel coat and finish with several layers of glass. Great thing is, you made the part and fitted it in one go.

Clayton
 

Attachments

  • body 26.11.10 008.jpg
    body 26.11.10 008.jpg
    129.8 KB · Views: 330
  • body 02.10.10 001.jpg
    body 02.10.10 001.jpg
    146.7 KB · Views: 331
  • body 02.10.10 004.jpg
    body 02.10.10 004.jpg
    124.1 KB · Views: 334
  • 06.12.10 004.jpg
    06.12.10 004.jpg
    108.7 KB · Views: 300
  • 06.12.10 007.jpg
    06.12.10 007.jpg
    106.5 KB · Views: 362
New arches in place.

Clayton
 

Attachments

  • 08.12.10 001.jpg
    08.12.10 001.jpg
    120.1 KB · Views: 326
  • 08.12.10 008.jpg
    08.12.10 008.jpg
    101.8 KB · Views: 311
  • 08.12.10 011.jpg
    08.12.10 011.jpg
    92.6 KB · Views: 307
  • 08.12.10 017.jpg
    08.12.10 017.jpg
    67.4 KB · Views: 319
  • 20.12.10 005.jpg
    20.12.10 005.jpg
    101.8 KB · Views: 302
  • 20.12.10 008.jpg
    20.12.10 008.jpg
    128.9 KB · Views: 250
Hi Clayton
Like David I am also enjoying this thread...
Well done.. Great to watch and very informative

Cheers Craig Young

Hi Craig, absolutely incredible job on building your GT 40!!!! I own a CAV with the 016 Audi trans and was wondering where you found the 3:22 ring and pinion, I have a 4:11 in mine and would like to change to something more reasonable, any help much appreciated, thanks, Neville.:shy:
 
Hi Neville
Sorry but this great build thread is Clayton's.
I also have a 016 with a 3.89 final drive but at this stage not planning to change the ring and pinion.
When I have started the chassis and have something to show I will start my own build thread but for now I will be watching and learning.

Cheers Craig Young
 
Thanks Guys
I appreciated your feedback.

Neville
I do have a 3.22:1 in the 016, I got it through a group buy organised by Mick (40 inches) he's on page 1 of this thread.

Clayton
 
Onto the driver’s door and Gurney bubble install.
The gap lines were a bit big on the roof section. Feathered out the edge to a point and laid glass both sides.
Centred the bubble over the seat centre line and as far back as possible (could have gone back a bit further if the door allowed).
Recessed the bubble into the roof by the thickness of its flange, so the roof could remain flat up until the start of the bubble.

Clayton
 

Attachments

  • 20.12.10 002.jpg
    20.12.10 002.jpg
    108.8 KB · Views: 290
  • 30.12.10 005.jpg
    30.12.10 005.jpg
    87.9 KB · Views: 296
  • 30.12.10 011.jpg
    30.12.10 011.jpg
    71.9 KB · Views: 316
  • 30.12.10 013.jpg
    30.12.10 013.jpg
    81.5 KB · Views: 315
With the door off, I was going to keep the inner roof panel and flare it into the bubble, but the inner skin had a bulge and hung low (3/4” in the middle).
Cut the whole inner door roof skin out, filled the edges with expandable foam.
Added 6mm cork tiles to act as a core for the next layer of glass.
Bogged up all the gaps and smoothed it out.
Laid several layers of glass to finish off the inner skin.

Clayton
 

Attachments

  • 08.01.11 023.jpg
    08.01.11 023.jpg
    177.2 KB · Views: 311
  • 08.01.11 002.jpg
    08.01.11 002.jpg
    154 KB · Views: 322
  • 08.01.11 009.jpg
    08.01.11 009.jpg
    169.6 KB · Views: 291
  • 08.01.11 015.jpg
    08.01.11 015.jpg
    148.8 KB · Views: 268
  • 08.01.11 017.jpg
    08.01.11 017.jpg
    158.8 KB · Views: 313
  • 08.01.11 020.jpg
    08.01.11 020.jpg
    143.8 KB · Views: 312
Had a small break from fibreglassing and the dreaded itching and started on the door seals, clips locks.
The over centre latches for the clips had nothing substantial to bolt to the chassis. Added angles to the chassis to support the sill panel at the latch mount.
The front door seal plates get sandwiched between the chassis and dash and follow the door inner skin. The sill seal holder completes the full door seal.

Clayton
 

Attachments

  • update 19.01.11 001.jpg
    update 19.01.11 001.jpg
    119.8 KB · Views: 346
  • update 19.01.11 004.jpg
    update 19.01.11 004.jpg
    86.8 KB · Views: 335
  • update 19.01.11 012.jpg
    update 19.01.11 012.jpg
    101 KB · Views: 328
  • update 19.01.11 008.jpg
    update 19.01.11 008.jpg
    96.2 KB · Views: 321
  • update 19.01.11 016.jpg
    update 19.01.11 016.jpg
    108.9 KB · Views: 336
  • update 19.01.11 025.jpg
    update 19.01.11 025.jpg
    141 KB · Views: 325
  • update 19.01.11 027.jpg
    update 19.01.11 027.jpg
    124.7 KB · Views: 358
In order to keep the door striker plates as short as possible (less chance of catching them while getting in and out. I added a 10mm spacer to the drivers catch and 20mm to the passengers catch so they just cleared the door seal.
Door rear edge rubbed on the door seal, cut it right back and re-glassed.

Clayton
 

Attachments

  • update 20.01.11 011.jpg
    update 20.01.11 011.jpg
    159.1 KB · Views: 330
  • update 20.01.11 013.jpg
    update 20.01.11 013.jpg
    109.1 KB · Views: 354
  • update 20.01.11 006.jpg
    update 20.01.11 006.jpg
    146.6 KB · Views: 352
  • update 20.01.11 021.jpg
    update 20.01.11 021.jpg
    111 KB · Views: 327
  • update 20.01.11 007.jpg
    update 20.01.11 007.jpg
    137.4 KB · Views: 361
The rear clip needed quite a bit of extra glass added to the sill shut line area to bring it up in alignment with the spider.
Made some locating pins and receptacles that would hold the panel gap constant.
Pinched the idea from Chris (flatchat).

Clayton
 

Attachments

  • update 04.02.11 001.jpg
    update 04.02.11 001.jpg
    78.5 KB · Views: 344
  • update 04.02.11 009.jpg
    update 04.02.11 009.jpg
    89.6 KB · Views: 356
  • update 04.02.11 012.jpg
    update 04.02.11 012.jpg
    90.8 KB · Views: 374
  • update 04.02.11 014.jpg
    update 04.02.11 014.jpg
    80 KB · Views: 324
  • update 04.02.11 016.jpg
    update 04.02.11 016.jpg
    68.8 KB · Views: 348
Back
Top