Rookie mistake and the concequences

Randy,
You might really be on to something. My start button is from a Honda 2000. In that wiring diagram there is a safety switch that will not allow the engine to start until the clutch is depressed. I have mine wired for it just haven't hooked it up yet. It is wired to the frame for now. Uses the micro switch used in the brake line to work the lights. In this case it is the ground. Could easily work for the rear clip. If doesn't close the switch, can't start. Just add a spring on the hood pin that would keep the clip from grounding out the switch.
In the security system I have, there is a wire that works originally for the trunk on the fob. I have it laying loose in the rear area near the hood pins. Was always thinking of a way to use it. I can easily adapt that to a light weight door opener. The latch would always be locked when the clip is closed. Have to hit the button to allow the clip to open. Just like a door!!
Oh yeah, I love gadgets.

Bill
 
I have a 69 mustang with the 2 hood clips and I was having a bad testing day in the car and drove away without securing them. Up went the hood bent it the hings and one fender. Nothing would help my stupid I saw they were not on but a second too late. So I feel your pain.
 

Bill Kearley

Supporter
I saw that Canadian flag ,,,,, Two things came to mind boy i'm glad I have medical, walk in off the street and get fixed no mater what and not a thot about money. Money to spend on my 66 GT 350R hood after I forgot to install the hood pins, glad it was F/G. This had nothing to do with age.
 
Good post Bill.
Sorry it happened though. Good job on the repairs.

I, like 350R, had the hood on my '66 GT350 fly off. The hood wasn't the original Shelby piece but an aftermarket model with a '67 GT350 style scoop and four pins, no hinges or latches.
I was working the Saturday morning shift at an EXXON station and had just finished a valve adjusment on the 289. I put the hood on, installed the pins, and went to wash up. All cleaned up I jumped in and said good buys to the afternoon crew. I pulled out and acclerated hard up the street. Suddenly all I saw was two white vertical stripes and top of the scoop. Just as fast it disappeared.
My mind said "WWWWHHHAAAATTTT?????"
I looked in the rear mirror and here was a guy in VW beetle. The hood passed over his car landing in the road right side up. I pulled over, so did the VW, I ran back, grabbed the hood, and put it on. Checked on the other guy who was scared witless. No harm done to his car. With no pins to lock the hood down I slowly drove back the station trying to figure out how it happened.
As I pulled in the crew scattered. One of them sheepishly told me they pulled the pins and placed them on the dash thinking I'd spot them before leaving.
The hood was surface cracked but not broken and the corners were a little beat up too. I had an ex-boss who owned a body shop and he fixed it for cost of materials.
I never drove off again without first checking all the hood pins.
 
Since I was in the repair mode, I took some comments to heart(way back when) and since the main cabin needed painting, decided to remove the "wart".

P1010177_zps67c66e6c.jpg


As it stands now:

P6130409_zps57a2b988.jpg


I plan to put a rear view camera in the same spot but with a smaller unit that will hide in an XIM reciever from a Cadillac.

I have started the repaint process.Everything is primered and blocked. I obtained a chip sheet(one of two in existance that I know of) of the 1960-61 English Ford Anglia. This is the color for the Linden Green that is shown here. These are of the pictures of Martin's car and an original.

Martin3_zps23309a50.jpg


Martin4_zps89fb3cba.jpg


5520899470_40e13d85a7_z_zpsd9b435dc.jpg


As you can see, the color doesn't translate well in photography.
To mke matters worse, the chip looks nothing like the real color, as seen on this chip. I polished one half of it just to see if it changed the color. It didn't

P6070397_zpsc43dcd2f.jpg


It however, via computer analysis, comes out very close to these pictures of Martin's 40 and the original. Martin has graciously sent me a swatch of his color, and I have another source that is supposed to come from an original owner. When those arrive I will have them computer analysed and decide if the color I got from the chip is the one to stay on the rear clip(already painted, based on the chip).

Bill
 

Mike

Lifetime Supporter
Awesome Bill such a great color! Can't wait to see it finished.

If anyone likes this color I have an unopened gallon of some high quality linden green paint. PM me for details.
 
Bill, I noticed your camera and think of a similar solution. I just ordered the one below which should fit nicely to my white car. The camera's angle is 74 degrees. However, I haven't tried yet whether I will be see both my fenders and the surrounding so would be keen to know your camera's specifications (i.e. angle).

So this is the one I ordered directly from the German manufacturer

[ame]http://www.amazon.com/Perimeter-View-CS110-Blind-Camera/dp/B004DAJWH0[/ame]

Plus I have ordered another one with a 185 degrees angle for parking and a high quality 7" split screen. All from the same company.

Thanks

Thomas
 
Thomas,
You are a little high end for me. I stick to the low end of the budget as I ordered my setup some time ago, and CCD was very hard to find and was rather expensive. As time moves on, the price drops. So maybe when I tire of squinting, or my vision deteriorates I will upgrade. I have a three camera setup. I can have all three on, the two side cameras on, or just one camera on and switch around.
P1010131.jpg


One is for rear view, and two in either side mirror(RX-7). I have the Gulf Flares on my car and you can't see very well over them with a regular mirror. My mirrors are mounted on the corner of the plexiglass which is high, and you still can't see much. The 120s help a lot with that. See above.

P1010101.jpg

I am looking for a rear view camera that will be compatible with my system, that is small. I found an XIM reciever in the junk yard for $10, and will alter it to be a hidden camera like my side mirrors. It will be mounted high so I can see what is coming up on me. It will be a 90 degree FOV. This will give me the most life like look at what is behind me. If you have the 120, everything behind you will look tiny until it is right up on you. The camera I am taking off is a 120. Thought I would need the IR lights, but I don't drive it at night so that is a moot point. I also was going to build a reverse scoop to hide it but that didn't pan out either.
I also have my cameras set up so that as an overtaking car moves out of range for the rear camera it goes into the side cameras FOV(they are 120s). As it leaves that cameras view, it is at the windows edge. If I had the money I would install a small tablet and a USB camera. One of the other Bill's installed one and made it his "infotainment" system. I am too busy with other projects to go into that. Besides I can't see getting a data plan just for the car. I also thought of adding a console to the dash for a tablet.......
If you have a setup like mine with the rear camera mounted high you won't need the parking camera. Most of the back up cameras on trucks and cars are 120-150s. A 170 will give you a real fish eye look at what is behind you.

Bill
 
Thanks Bill for your comprehensive feedback - btw, I really like the linden green colour.

In terms of budget pls note that the link I had posted shows as pair of cams not a single one but you are right, the set I ordered will cost me about USD 1k. However, I think this is still a wise investment considering what I had paid for the car.

Once I am done I will share the result with you - either here or via PM

KR Thomas
 
Thomas,
Keep me informed. Never know where the ventures wind up. May have trouble sourcing compatible hardware.
Interesting note on the paint. In talking with the paint supplyer they told me that the chip is an unsprayed sample. They are always darker than the sprayed result. I have just finished doing all but the main cabin in the color. I am really impressed with this color. Have a few runs to work out and respray, but it is really striking. I would put some pics up but my camera doesn't translate the true image.
May have a paint shop do the clear coat and cut and buff. The nostrils and the rear clip vents to the intakes are very difficult areas to do. The nostrils more than any other part. It will have to be hand buffed as no machine can fit into these areas(twin nostrils). Doing both 1500 and 2000 grit by hand doesn't thrill me either.

Bill
 
Time for a little teaser. Would have finished the painting of the car by now, but made another rookie mistake in that the compressor was inside the paint booth. It got clogged up with the mist of the paint and the end result was a clogged cylinder and a broken exhaust valve on the compressor. Have a new valve assembly on order. Took a while to realize I could get it faster on Ebay rather than the repair shop. So it should be here in a day or two. I had the tank sills and the front nostril completely done as far as painting. Then burned through on the buffing of one sil and the nostril. So they go back for more paint. The one sill is finished "completely". So here it is. In order to get the camera to recognize the true color I had to add some background so it would filter it correctly. It is amazing how the camera will give several different colors with this Linden Green. So the blue and red gave me the best results. First the blue.

P1010122_zpsfe271d57.jpg


Now the blue and red.

P1010124_zpsd7f48773.jpg


I have to say I am really excited about this color. It is turning out better than I would ever have imagined.

Bill
 

Terry Oxandale

Skinny Man
Awesome Bill from Dawsonville...err sorry, wrong Bill.

Love the paint! What economy multi-view display are you using. I'm configuring a side-rear-side, and front camera views for my project, but not yet sold on the monitor, which must be as small a practical.

Terry
 
Terry,
I think you can probably find some of the newer ccd setups for your cameras and monitor. If you can, find the 4 channel type monitors. That is what I have in mine. I just use the three channels. Couldn't justify a 4th(I can already see in front of me, but my wife thinks otherwise). The better ones will allow you to show one, two, or all 4 at a time, with sequencing them as well, one at a time. The CMOS units like mine give a slightly greenish hue. Just have to make sure you get the kind of cameras that are reversing. Do a search for rear view cameras and you will find the lower end units at places like Tadi Bros. etc. There are some better high end units out there, but expect to pay for them. I went for the 7 1/2" screen. If you go smaller the images will be rather hard to make out. Also mount your main rear view camera as high as you can. If you mount it at the tag level(very low)you won't be able to see very much. Also use 90 degree FOV if you can find them. Nothing over 120 for sure. Too much fish eye and you won't make out cars coming up behind you til they are right on you. Some of the SLC guys are using a Tablet with USB cameras that look pretty neat. They use several apps for their "info-tainment" centers as one of them calls it. Might want to check them out. Just expect to pay for the time like your cell phone when you use GPS and things like that.

Bill
 
After working on the repair all summer I am getting close to the finish line. Had my trials and tribulations along the way. The biggest delay came when my compressor of 25 years broke the reed valve.

P8240500_zps60d68d28.jpg


They are a universal valve for oilless compressors, but they are hard to find. I tried the Dewalt tool repair shop locally, who told me they don't make them anymore but happened to fine one in Charlotte North Carolina. They said it would take about 10 days to arrive(first story). Eventually(weeks later) they told me they couldn't tell me when it would arrive.. I went to a friend and tried to get the broken valve welded, but stoped short when I found one on line.This ate up several weeks. I came to the point I was willing to buy another compressor new or used to just finish up the job. BTW my wife told me that I should hurry up and finish as the sound of the compressor was driving her crazy.
The on line order arrived as stated and it promptly went into the compressor. I should say some more about the paint job here. I had painted, color sanded and buffed out and finished one tank sill, and painted four other parts when the valve gave way. So the four got sanded again as they would be outside the window of time to paint over without scuffing or sanding, and I didn't want to take a chance on the sanding changing the color. Sounds trivial , but I wasn't willing to take a chance. This wasted about a third of the gallon of paint(and supplys). To be safe I ordered another half gallon of paint and a few of the now dwindling supplys.
Tested the new assembly and it held pressure well. Started painting on the twin nostril section as it is a difficult piece to paint(at least for a learning painter). 20 minutes into the paint the valve failed again. After examining the valve and comparing it to the old one I saw I had a cheap Taiwan knockoff valve.

P7250460_zps45af0ab2.jpg


There wasn't a stop plate over the exhaust valve. This limits the travel of the valve. Without it the valve can open as far as it wants. Since it is smaller than the intake(6 leaves vs. 3) it flexes the valve pretty bad, probably setting up some wild harmonics and breaking the valve. Got a refund from Ebay.
The good news was that the one from Dewalt finally came in. Put it on and it has worked flawlessly since. So here we are now with all the pieces having paint on them. I am buffing out the doors, the front clip and the other tank sill. The main cabin and the rear clip got paint on Friday. Tried to fit the rear clip and the repair job on the fiberglass has changed the alignment of the clip. So that will have to be addressed. An easy fix as the rear bolt hole that holds the clip on and in alignment, just has to be welded up and redrilled with the clip aligned. Here are a few pics to let you see how it is coming along.The final assembly will show it all. I plan to add decals to the car, as I think it now looks kind of naked without them. I have had some of the decals since I first bought the car. I have had them so long the "lucky horseshoes" have faded. One set is orange and yellow and the other is red and red. Anyone know the true colors???? The others have held their color. I will add some strips and roundels, but will have to wait for several weeks(at least one) before adding them. Need to let the clear coat cure. I plan to experiment with the stripes and will probably use Plastidip before committing to the final color. Will see how it looks. Something to look forward to.
The interior will be completed in a week or two.

P8230493_zps6e1ab879.jpg

P8210489_zps83e846a2.jpg

P8230494_zpsd8cf19da.jpg


Bill
 
Yes I did. I was in a real delima over the color of the car. I wanted something different and the Linden Green colors that I saw, confirmed that this would be the color. I didn't know that there was such a hassle in trying to get the color. I researched the color for several months and came up with several sources. One GM(67 GTO), one Lincoln(54), One Ford Anglia(60-61) and one Willys(49). Now I had to find the actual paint that was the correct color as there were several paint codes(which wound up being undecipherable). All pictures I found of these cars were not even close to the colors I had seen. So the GM, Lincoln, and Willys were eliminated. I was told by several people on the forum that the color was an English color since the first cars were built in England. Now I had to find someone that had the color or knew how to get it. I must have called or contacted 10 or so people. Only a couple were able/willing to help. Gelesco(sp?) flat out said they wouldn't help me, even though they have 2 cars on their web site with the documented rebuilds(Gelscoe Motorsport’s pre 65 GT40 Chassis 3 | Gelscoe Motorsport and GEL W005 – Pre ’65 GT40 | Gelscoe Motorsport). The Ford Anglia club contact that supplys all of their paint needs, told me he had to have a sample, and even if I had a sample wouldn't send it overseas. Martin, who through Michael Pass, was kind enough to send me a sample of his color which looked very nice in pictures on the forum.
Martin0_zpse6afb77e.jpg


One other source was Jesús Pozo who has a Linden Green convertable, but in all his moving back and forth to Europe(Spain I believe) did not save a sample. I contacted my friend who owns an original Road Car, and he touched base with his friends in the original community and they responded with a search of Ebay which led me to an original chip sheet of the 60-61 Anglia cars with the Linden Green color on it. I purchase one of two sheets that I know of existed. The linden color turned out much darker than I envisioned. Nothing like the colors I had seen on the forum. I polished the sample and it shinned it up but the color remained dark.
P6070401_zpseb75c500.jpg


I took this sheet to my paint supply house and they mixed it up. According to their master mixer, he assured me that once I sprayed it the color would lighten up. Did it ever. This guy has over 30 years of experience in mixing paint.
The best help I got was from Andrew(Charlie Farley) at GT40PARTS.COM He actually reached out to me and offered to help. I mean more than help. He contacted the owner of an original and pulled in a favor and obtained a "sprayed" sample of Linden Green from the owner. He offered to do this without knowing who I am, other than my postings on the forum. I have since spent several hours talking to him over the phone over several mutual problems, and came away with the opinion that this is a guy I want to know. I am in his debt for the help he has given me. I am pretty sure he is in debt to this owner as well. So any favor he would ask of me would be gladly done.

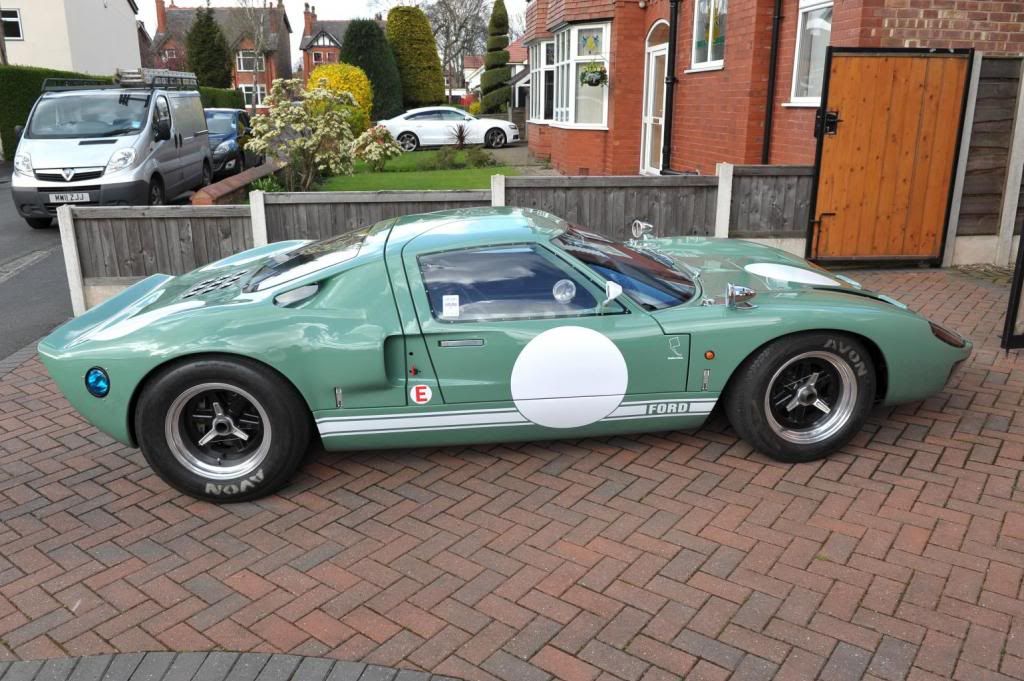
The results of all this searching for several months resulted in the following. The photography of the color is the most difficult I have ever run into. I have to have a red and blue color beside the color to get the camera to come close to its real color(maybe because it takes red an blue to make green??). Most pics of the color come out grey looking if taken by itself. It really is one of the prettiest color I have ever seen. Marin's color(he has since sold the car, so I feel I can say this here and now) is much darker than the color from the chip sheet(and forum pics). I had the mixer do a very small batch and sprayed it on top of the color on the rear clip(was just sitting there since the compressor had broken and was going to be resprayed anyway).It was really different from What I was starting with, and was waiting for Andrew's sample to know if I was on the right path. I was worried that I might have to repaint everything based on his sample. When his arrived I compared them and they were virtually identical. I can't tell them apart. I have to say that if I had to repair the paint I have on there now with the original owner's color, it would be hard to say they aren't the same.
I finally repaired the compressor about a week and a half ago and tried to do as much as I could before taking my grand daughter to Myrtle Beach for a couple of days. Finished the paint portion this last Friday and wanted to make a car show on Saturday(I was requested to show the car at a "Make A Wish" fund raiser), but couldn't get it back together in time. The repair job on the rear clip has made the fitment of the clip different and I have to do a lot of realigning. I am off work all this next week, so I should have it on the road by the weekend. I will try and get some good pics and post them. It will take a week or so for the clear coat to cure good enough to color sand and buff out. It will be a little more difficult but I would rather do it that way than to try while the clear is still soft.
This endeavor will not be a perfect paint job, but it is great for me in that I have never painted a car before, and I can't believe how well it has turned out. Thank you Utube and thank you Andrew.

Bill

PSS. I noticed a lot of pics in earlier post are missing. I have come within 10% of using up my Photobucket free space and have deleted a lot of pics that have not been posted or needed in retelling the saga of this build. I guess that caused the reference of the photos to disappear. Sorry about that!! If anyone wants to access my photobucket site to see the "many" photos I have taken they are welcome to go there and roam around. Here is a slideshow of my "bucket" page. If you want the details of other albumns let me know if you can't access them.
http://s282.photobucket.com/user/Billmusarra/slideshow/
 
Last edited:

Terry Oxandale

Skinny Man
Glad you're getting the color issues straightened out. It is a beautiful shade of green.

also:
Terry,
I think you can probably find some of the newer ccd setups for your cameras and monitor. If you can, find the 4 channel type monitors. That is what I have in mine. I just use the three channels.
Bill

I did some experimenting recently and found that having a rear-view camera displayed in an open cockpit is nearly useless due to direct and indirect bright light of day (even with a shield around the display). So I'm moving the display to a darker place under the doors where the visibility is much improved. Not ideal, but it is usable now.
 
Hey Bill
any chance of a write up on how you painted the car? the finish looks good and im looking forward to seeing the finished pictures.
 
Back
Top