Ryans Group Ten GT40 build - Body 5.

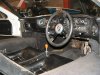
@Dans GTD, where did you end up putting the reset push button?

was planing on updating the diary with some more screen shots of the CAD work but it all collapsed when i tried to move the steering column axis to 1.08" inside the 10" datum line. I had previously had it at 1.25" so its moved across about 5mm.

Ryan
 

Dan Kasten

Supporter
Ryan,
The reset button sticks through the bottom lip of the dash below the speedo. I will take a pic later when I get back to my shop.
 
Postie has been again. Got lucky with a pump cover ending in 64. Is that the year of manufacture?
took a while to work out you half click the trigger on the Dymo to get a space. Will the 3/8” 9mm tape be about right for the dash labels?
454528F2-9236-4D32-8FA8-956046F4EB41.jpeg
9752299F-7C5E-42B7-A3BD-BFE6F5A6FBA1.jpeg
2BC148AA-A633-4950-8C3F-778FAB34612A.jpeg
 
Managed to get a 4 bolt demister vent to go with the 6 bolt one I already had. I am not sure which one I will end up using yet. Whatever fits best at the end of the day. Also managed to get a single speed 6WA wiper motor and a multiple speed 6W. Hopefully they clean up ok.
62770B85-FCEF-40D3-93D7-5C44821D92B4.jpeg
4BBE9B7D-AC83-420B-995F-46EB3C0B2CD1.jpeg
DAF1998A-F03A-4C41-8A4A-DABDBA821B52.jpeg
1253137C-11C0-4A6D-919D-6F11A5A74A5C.jpeg
 
3C664BD7-AE82-4EC0-9FF9-54400C38AE31.jpeg
BF998D32-5C94-4C22-B2B9-B002ADF75F99.jpeg

Has anyone had any luck restoring the Anglia handbrake levers.
Need a new grip on one of them.
the other one has a few paint scrapes.
not sure on the mountings or how the cables is supposed to mount at this stage.
Ryan
 
Just been told that the MK I and MK II Escort lever is very similar. Different grip though. (Burton Power web site)
there is also a replacement Anglia grip available from J B Anglia parts.
 
Hi Ryan ,
i think i have similar on the kva and i have one axe going through with 2 quarter inches holes in it...
and no grip actually
Paul
 

Attachments

  • IMG_0652.jpeg
    IMG_0652.jpeg
    319.9 KB · Views: 536
  • IMG_0651.jpeg
    IMG_0651.jpeg
    325.8 KB · Views: 641
  • D6242373-00F4-4500-AC6E-5C350BD9032C.jpeg
    D6242373-00F4-4500-AC6E-5C350BD9032C.jpeg
    294.9 KB · Views: 599
Paul, I think that may be a Triumph one?
the ford ones had a small ford logo stamped in the back of the main arm and are a one piece main lever.
I am debating if I drill the rivets out and try and sand blast the bad one before repainting it. The hand grip is very hard and starting to crack open in a few places.
I have ordered a couple of replacement hand grips. I will wait until they arrive.
 

Agostino

Supporter
Hi Ryan, my handbrake was originally in a similar condition to the good one in your picture. I didn't removed the rivets, I just removed the old grip (that was already splitting) and I used a common paint stripping product. Then I did a DIY electrolytic rust removal and finally zinc primed.
 

Brian Stewart
Supporter
Just used a wire wheel on mine and a Dremel to get into the more difficult places. Wash with de-greaser. Hand grip had a couple of very minor cracks, so filled with epoxy, then painted. Has lasted well so far.

Bolted straight in. Have used the original routing for the cable (i.e. handbrake merely pulls foot brake pedal down), but had to make a couple of small adjustments due to my pedal box being located so far forward.

Handbrake.jpg
 
Well, a bit up and down here at the moment.

Started stripping the old paint of the demister grill with some citrus paint stripper.
F1FF0C64-97E9-43BE-A7CF-4E02B29EE21A.jpeg.a4596bd425971735d3abf62ec9321196.jpeg

Seems like someone had had a go in the past at painting it. The black came of very easily.

2CC770FC-D92E-4261-947C-EA671045DBAA.jpeg.f6ad63eb54e9f7fb47ea60da34a02e67.jpeg9C124746-62CF-4AA5-8A07-B29A4CF861AB.jpeg.c1e5fa9247f5579e30da359241d8c637.jpegA9533A3B-4513-4260-A26D-3F93317065B2.jpeg.864bfc558d6e640963c5c1bfbaf7697f.jpeg

The white underneath was a lot more stubborn.

9EB7319F-5FD8-40C7-9450-2FDA48819DFF.jpeg.8aab704e1fd5c7cafcb4c208a2e64a12.jpeg313295B3-CC78-48EC-A653-A2A8722AFA3B.jpeg.a7dec6f520563c06e7af03bd56f1ca81.jpeg
In the end, after soaking for most of the day, a bit of scrubbing and washing i am left with this. Not sure what the red/brown coating is. There is still some more white paint that i want to have another go at. So will try again with the paint stripper.

FE467EB6-5FD9-445F-8291-5495AA02C0F4.jpeg.7f759446b5b171f9f27202b04aa7d26d.jpeg

Have also sandblasted and de burred the wiper motor housing on the really grubby one from above. process was Sandblast to remove paint, file dags off and then sandblast again to get an even patina for paint. More on this part next post.

Ryan
 
I wasn’t sure about sandblasting initially as I wasn’t sure on how thick the metal was. After most of the paint was removed it measured around 0.75mm. I Started sandblasting on the back side lightly. Couldn’t see it doing much damage so I went for it.
it has all cleaned up just fine.
I had to open up some of the clips on the back, they were all squashed differently and there was some deformation on the front face anyway so I wasn’t sure how it was supposed to be.
either way, now sandblasted and I can now set about flattening and straightening it all up.
Very relieved. Think it will come up nicely.

D52F5768-30DE-4910-BCC1-EB78BE17D2FC.jpeg31FD265E-903F-4689-BD37-6E18D77C8911.jpeg1A2A7D52-C558-4D14-A73F-30E96405D9C9.jpeg6964E444-70D6-43AC-B3DF-A972E1F84052.jpeg
 
Does this explain it. Same size. 6 bolt is not a flat vent though, and has an upturn at the edge agains the windscreen.

91E89D43-933F-4136-B42B-9BD3C8E77A63.jpeg3C98874F-7E8B-40AB-B813-0BC97A528D14.jpeg505ADF40-D404-4A7B-974D-880BEFA0FFB1.jpegE57F3B9E-C00E-48C1-BB09-B61814E07A92.jpeg896DDD59-F28D-4569-B436-CA6282042D84.jpeg
 
Sorry about the photos. I have my arm in a sling at the moment after breaking my Clavicle, and with the inflammation i currently have in the shoulders and neck i am struggling to do most things at the moment including holding and operating a camera steadily with one hand.

Ryan
 
Made a little tool for re shaping the edges of the vent and picking up the low spots. The little notch is for where the screw holes are. I just clamp it in the bench vice and tap lightly with a hammer. I had some low spots where these had been over tightened in the past and had bent all the mounting tabs down as well. Seems to have worked well. Now to get it cleaned up and painted

D639C99F-5D49-4CDF-AC70-F5DAE00DFFF5.jpegA308A6E4-BD6F-42E1-9B7A-1C3C9BE3A04B.jpeg06EC06A7-AA05-4F32-8F09-9D451EB1B857.jpeg02FED245-52F7-4DCE-9CA4-03E316BDB062.jpeg
 
Got the single speed wiper motor back together with the exception of this one part. Can’t see it in any of the photos I took when I disassembled it.

it’s some sort of cardboard insulator.

also a before and after photo. This was the grungy one on the right. Figured I would tackle the single speed one first.
AEC4247F-44A7-4F16-9F44-F218BE5C1403.jpegBC3C6199-2639-44D8-9BE6-90066BAFB876.jpeg6FBB394D-D729-4BB4-AFE8-22C32ED23A17.jpeg
 
Bit of searching, and I think this is where it’s supposed to go. It normally comes in the spare brushes pack.
The insulation sort of sits over the top of the brush holder, to keep it in position untill the brushes wear in.
the wires below keep it up and the outer edges are just tucked below the tabs on the side. Stopping it riding up any further.
not sure if I have this correct or if I should have it on the other side.
BA691D5D-A3E6-47C4-A83B-B86F618427C0.jpeg3FF15D08-F688-4D29-BA14-390DD7744E32.jpeg
 
Back
Top