SLC 24 Howard Jones

Howard Jones

Supporter
Fran, if you have the car around and have the time could you post a picture of the car for me showing your cooler arraingement and diffuser?

Thanks, Howard
 

Howard Jones

Supporter
Finished rear beer can holder mod. Added a cover to the area behind the front wheels so that road crap would stay out of the side pods as much as possible. Also it will reduce airflow disturbance under the car, a tiny little bit anyway, and generally seal the bottom of the car a bit more. I also added a stiffener to the panel so that it wouldn't crack.

I have begun thinking about foot-box access. I am getting too old to craw down under the dashboard anymore. More on this as I progress.

These are really pretty much the end of any more bodywork mods. I have a bit more mold lines to finish but after I complete the door fitting the body is done except final sanding prep for paint. All in all the body could have been completed as far as sanding and mold lines in a day or two with good body skills and power equipment
on a as delivered build. Almost no filler that I can think of is needed and no fiberglass work except to mount door hardware. Really a pleasure compared to my old GTD.
 

Attachments

  • HPIM1406.jpg
    HPIM1406.jpg
    109.2 KB · Views: 452
  • HPIM1407.jpg
    HPIM1407.jpg
    108.6 KB · Views: 434
  • HPIM1410.jpg
    HPIM1410.jpg
    136.1 KB · Views: 425
  • HPIM1411.jpg
    HPIM1411.jpg
    148 KB · Views: 418
  • HPIM1408.jpg
    HPIM1408.jpg
    197 KB · Views: 465
  • HPIM1409.jpg
    HPIM1409.jpg
    177.9 KB · Views: 432
  • HPIM1412.jpg
    HPIM1412.jpg
    103.7 KB · Views: 438
Last edited:

Howard Jones

Supporter
Finished off the bottoms of the wheel well corners and then cut out my foot-box access door. I used the cutout piece as a mold and made a thinner piece that was of uniform thickness. Then put it back in the hole after coating t with mold release. Taped it in place with duct tap and re glassed it from the bottom. after it got hard , cut it out to the correct size, installed Duse fittings and the door is done.

The next thing is going to be cool. Watch this space.
 

Attachments

  • HPIM1413.jpg
    HPIM1413.jpg
    153 KB · Views: 395
  • HPIM1416.jpg
    HPIM1416.jpg
    160 KB · Views: 386
  • HPIM1415.jpg
    HPIM1415.jpg
    201.1 KB · Views: 389
  • HPIM1417.jpg
    HPIM1417.jpg
    134.7 KB · Views: 402
  • HPIM1420.jpg
    HPIM1420.jpg
    101.2 KB · Views: 409
  • HPIM1421.jpg
    HPIM1421.jpg
    102.6 KB · Views: 392
  • HPIM1419.jpg
    HPIM1419.jpg
    200.5 KB · Views: 384
  • HPIM1418.jpg
    HPIM1418.jpg
    97.5 KB · Views: 385

Howard Jones

Supporter
Mesa says that I need this, so I did it. It will stiffen the center of the roof and give me a place to mount the roof to the firewall. I can glue some foam to it and seal the firewall also. Pretty easy really when you only need to do it once. I just made a dam out of cardboard painted it with mold release and it worked out nice enough for me.

This isn't the cool thing.
 

Attachments

  • HPIM1428.jpg
    HPIM1428.jpg
    172.2 KB · Views: 461
  • HPIM1430.jpg
    HPIM1430.jpg
    166.3 KB · Views: 467
  • HPIM1427.jpg
    HPIM1427.jpg
    174.5 KB · Views: 454
  • HPIM1431.jpg
    HPIM1431.jpg
    184.5 KB · Views: 466
  • HPIM1434.jpg
    HPIM1434.jpg
    181.1 KB · Views: 476
  • HPIM1436.jpg
    HPIM1436.jpg
    157.6 KB · Views: 420
  • HPIM1435.jpg
    HPIM1435.jpg
    163.2 KB · Views: 427
Pretty Sweet, Slick.

I take it you marked the location that the flange needed to be in before you lifted it off the chassis, No? I didn't quite get what your were saying before about the cardboard forms, but a picture is worth....

Now it won't have engine fume smells lingering about in the cabin. Maybe you can do the same for Betty (His GT40)?
 

Howard Jones

Supporter
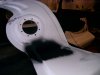
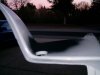
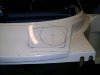
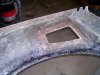
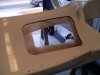
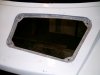
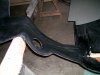
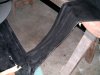
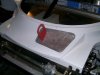
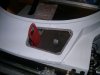
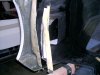
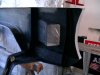
Cool thing done. Well I suppose that it's not that cool, but it will work and it can be removed later if I change car over to a streetcar without damaging the paint. If I had simply cut a slot in the bodywork then I would have to deal with a ugly slot in the body if I removed the tow ring later. AND how would I do that without a door? I have made a second door without a slot and I will paint them both and save the non tow ring one for later.

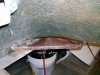
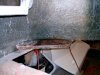
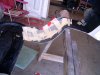
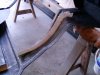
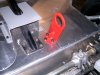
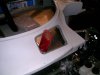
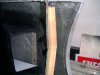
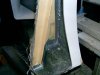
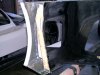
The tow ring is 6061 T6 1/4" Aluminium with a 2.25 inch diameter FIA reg size hole mounted with three 3/8 grade 8 cap screws and big washers on the inside behind nylocks. Very easy to remove. You could probably lift the car from it. Ive been towed on track and it VERY important to have a tow ring that will not fold up and damage the car or cause the tow line to rub the bodywork, damaging it.

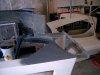
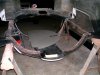
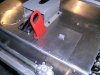
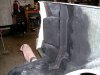
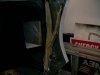
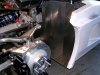
You can see the foot-box access door and enlarged hole also. The little cover can be removed with one screw slid up and out of the way.

All of this is in keeping with my prime directive, Build it so you can fix it later. It also illustrates how one simple idea can turn into quite a bit of work when you stray from the "standard build"

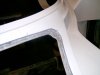
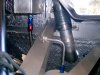
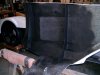
And Rob, the firewall flange fit dead on.
 

Attachments

  • HPIM1423.jpg
    HPIM1423.jpg
    165.8 KB · Views: 519
  • HPIM1424.jpg
    HPIM1424.jpg
    166.2 KB · Views: 513
  • HPIM1425.jpg
    HPIM1425.jpg
    162.9 KB · Views: 494
  • HPIM1438.jpg
    HPIM1438.jpg
    135.5 KB · Views: 521
  • HPIM1440.jpg
    HPIM1440.jpg
    112.6 KB · Views: 489
  • HPIM1441.jpg
    HPIM1441.jpg
    127.6 KB · Views: 478
Last edited:
I don't know how I missed this post? Nicely engineered Howard, no one will ask where your tow hook is either!

"Build it so you can (service) it"

Amen brother.
 

Howard Jones

Supporter
Here I fixed something that I had done earlier. I just didn't like the long one piece hose. It looked hokie, so I made a new one from some 2 1/4" alum tubing.
 

Attachments

  • HPIM0933.jpg
    HPIM0933.jpg
    153.9 KB · Views: 441
  • HPIM1442.jpg
    HPIM1442.jpg
    207.6 KB · Views: 445
  • HPIM1444.jpg
    HPIM1444.jpg
    152.5 KB · Views: 420
  • HPIM1443.jpg
    HPIM1443.jpg
    150.3 KB · Views: 409
  • HPIM1445.jpg
    HPIM1445.jpg
    153.7 KB · Views: 411

Howard Jones

Supporter
More fiberglass stuff. I think that the rear wheel wells need to have a vertical panel to seal the engine bay from the swarf that gets thrown off the tires. Most of the other guys have mounted a alum panel behind the tire. Here you can see that I have added a vertical mounting tab to the bodywork to support the alum panels (to be made). It is the rear most body tab.

I made them the same way I did the rear bulkhead tab above the roll hoop. Simple, cheap, cardboard and tape. The tap was coated with PVA and it came right off easily.

The forward one is to mount a similar panel that will seal the rear opening of the side pod. Again alum panels.

These both sort of pull the rear bodywork together with the chassis and the lower floor of the engine room to complete the body mounts and bulkheads at the rear.

When the center section of the body work in reinstalled with the alum panels it will all be clearer. More pictures then.
 

Attachments

  • HPIM1457.jpg
    HPIM1457.jpg
    161.2 KB · Views: 379
  • HPIM1458.jpg
    HPIM1458.jpg
    185.3 KB · Views: 386
  • HPIM1459.jpg
    HPIM1459.jpg
    151.1 KB · Views: 399
  • HPIM1460.jpg
    HPIM1460.jpg
    152.9 KB · Views: 359
  • HPIM1461.jpg
    HPIM1461.jpg
    163.3 KB · Views: 352
  • HPIM1463.jpg
    HPIM1463.jpg
    117.7 KB · Views: 390
  • HPIM1464.jpg
    HPIM1464.jpg
    150 KB · Views: 349
  • HPIM1467.jpg
    HPIM1467.jpg
    167.5 KB · Views: 363
One "trick I've found. They have aluminum tape at Harbor Freight. The kind you peal the backing off. Fiberglass doesn't stick to it very well at all. If I'm doing a quick cardboard type dam or piece. I just lay several stips of it out, over lapping just a little. Wax it up & good to go. I generall will use PVA too just tho be on the safe side but generally not really needed. Or like here where he wanted a flange for the foot well access. Run a strip down each edge of the door piece & glass around. Piece will pop right off & a nice flange. I use a lot of it & hot glue when doing "down & dirty" parts.
Mike S
 

Howard Jones

Supporter
Here's the cut out aluminum pannels for the side pod end covers and the wheel well splash shields. I haven't mounted them yet because I want to have a final centersection mount location first. All of this stuff must be in correct alinement when it all goes together the last time. A lot of cardboard went into these.

These are the last pieces to be made for the body. Now on to the doors.
 

Attachments

  • HPIM1468.jpg
    HPIM1468.jpg
    171.1 KB · Views: 401
  • HPIM1470.jpg
    HPIM1470.jpg
    171.7 KB · Views: 392
  • HPIM1471.jpg
    HPIM1471.jpg
    183.8 KB · Views: 439
  • HPIM1473.jpg
    HPIM1473.jpg
    171.2 KB · Views: 417
  • HPIM1472.jpg
    HPIM1472.jpg
    157.2 KB · Views: 409
Nice work Howard. I have made similar flanges to block off the side pod. One difference is that I extended the flange out a bit more and down to the aluminum floor extension. The aluminum panel doesn't protrude over the bottom of spider. I thought one less area to maneuver around when setting body on. But it does flex enough to get it under the aluminum panel I guess.
I want to ask about your inner fender location. I am planning mine and was wondering the purpose of having it so far forward leaving the flat shelf at bottom on the tire side? Is something going there or is there special sand in your part of CA that you're trying to collect.
 
The lower shelf extends to the edge of the lower/forward wheel well and since his splash panel is straight and not curved like the wheel well opening, the panel needs to be placed a bit forward, creating the shelf you see.
 
Back
Top