
- Forums
- GT40 Replica Manufacturers' Corner
- RCR Forum - RCR40/SLC/917/Superlite Aero
- The SLC Clubhouse
You are using an out of date browser. It may not display this or other websites correctly.
You should upgrade or use an alternative browser.
You should upgrade or use an alternative browser.
SLC 24 Howard Jones
- Thread starter Howard Jones
- Start date
Howard Jones
Supporter
VJ,Tom, Justin, Oh .................he already has.......... twice, the 917 and the LMP1.
Everything I have done so far is to adapt the car from a streetcar to a track car that can be converted later back to a street car without a complete redo. Also I view this car as a learning experience, especially the aero aspect. I have pretty much completed all the changes to the bodywork that I think I want to do before paint. All this fiberglass stuff must be done before that or I will be spending money on repaint later.
I have one final minor change to the rear lights and then it's gonna be a few weeks of body prep (read sanding) before I decide on a final plan for color. I have to say that I have gotten really interested in vinyl wrap jobs and am really considering doing a complete wrap or at least a partial one over a base color.
Dave... we are going but haven't decided what day yet.
Howard Jones
Supporter
I'm sanding the bodywork for paint prep. I hate doing this and it takes a long time when I only work on it a few hours at a time. In reality if you didn't make any changes to the body and just prepped it for paint I would guess about 3 or 4 full days and you would be done.
Advice, buy a package of 200 grit and another of 400. Be very careful not to damage gel coat as you work on the car, don't use anything coarser than 200 and finish up with 400 and be done with it. Very few tools necessary beyond a sanding block and a straight board. I don't think you need power tools for this body, they are very good. You might need a pint of bondo for the few minor things found in all fiberglass body's but all in all a very easy body to prep.
Looking to paint car after the first of the year, more than likely Feb or March. Maybe a picture or two as I get more done. I figure I'm about 3/4 through the rough job and then final time with 400.
Howard Jones
Supporter
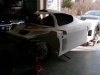
Just a boring update. I have completed all the first time thorough body panel sanding to 220 grit, all of the mods to the bodywork, and all the panel fitting. I will need to cover all the body panels again with 400 and then plan the paint time table.
It's not that it takes a long time. I just hate sanding so much it's had to force myself to so it. My best guess would be that a completely standard body could be surface prepped for a street paintjob (I don't know anything about show cars) in a full weekend. 16-18ish hours. The panels gaps lined right up and the doors went on without any real issues that wasn't figured out pretty quickly.
A couple of weeks and one of these body's could be on the car and ready for paint if a guy really wanted to work full days on it.
That's frigging good for a kit car believe me!
Attachments
Just a boring update. I have completed all the first time thorough body panel sanding to 220 grit, all of the mods to the bodywork, and all the panel fitting. I will need to cover all the body panels again with 400 and then plan the paint time table.
It's not that it takes a long time. I just hate sanding so much it's had to force myself to so it. My best guess would be that a completely standard body could be surface prepped for a street paintjob (I don't know anything about show cars) in a full weekend. 16-18ish hours. The panels gaps lined right up and the doors went on without any real issues that wasn't figured out pretty quickly.
A couple of weeks and one of these body's could be on the car and ready for paint if a guy really wanted to work full days on it.
That's frigging good for a kit car believe me!
Hey Howard. Did you end up choosing the C5 forgestars? Looks nice. Can't wait to see the finished product. :thumbsup:
Howard Jones
Supporter
Those are standard C6 Corvette wheels. I bought them with the car and had it delivered on them. I will use them and the R6 Hoosiers that are on them until the tires are used up then rethink tire/wheel setup. They were cheep and easy at the start since you need wheels to deliver the car I had Hoosiers put on them as a default setup. The stock C6 Corvette, including the wider ZO6 wheels will work OK but I don't really like the 18/19 diameter deal. I would much prefer all 18s.
If I do change wheels I will have these available with used up tires on them for sale cheep. Some future SLC buyer might be able to use them to deliver his car.
Also the Chevy wheels are very thick through the rim profile and use up a lot of internal wheel radial area. If you look at a set you can see what I mean. They are all like that, even the reproductions. I suppose that it's not a problem if you only run the current brake setup and street tires. I'm going to do something different with the brake disk/hat's than what I have now, later. This will mean moving the rear calipers so for now it's just finish the body!!
Ya me too! Oh, the dice stay until it hits the track. To be replaced with a hula girl.
Attachments

Last edited:
The SLC deluxe plus kit has a choice of three wheel styles from Forgestar and just about any colour you want .....they are great wheels and certainly nicer than available OEM wheels IMHO...sorry Howard
Howard Jones
Supporter
Fran what would the cost be of a set. F 9 or 10 X18 and R 12x18 ?
More importantly which ones will clear the REAR lower wishbone in 18 inch diameter?
More importantly which ones will clear the REAR lower wishbone in 18 inch diameter?
Last edited:
none will clear ..only CCW , Formula 43 and Jongbloed race wheels clear in 18's
Last edited:
none will clear ..only CCW , Formula 43 and Jongbloed race wheels clear in 18's
CCW's....
Does that include the C2K? Corsair wheels only? Or ????? :thumbsup:
John at CCW will only recommend his strongest wheels for the SLC due to the cornering capability of the car....C10 and C12
Howard Jones
Supporter
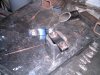
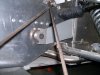
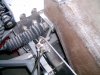
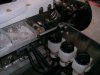
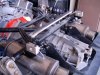
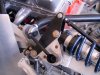
I needed a break from the sanding so I followed through on a lot of research I have been doing on antiroll bars. The front bar that came with the car is a 1 inch diameter hollow one. When I ran some calculators on the geometry I came up with something like 1000 ft pounds. I guessing, but I think that is way too stiff. I also didn't like the as supplied arms and how they were bent. At the original angle it looked like the arm would BE the roll bar until it broke (lots of stress cracks from the bending that was done to make it fit).
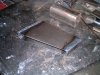
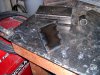
So I did the math on my GT40 and the front bar came out at about 150 lbs or about 1/2 the spring rate of the coil overs. So I made the pieces you see in the pictures. The biggest change was to lengthen the arm from a bit more than 4 inches to 8 for the new ones and relocate the pillow blocks to move the bar forward using the same mounting points on the chassis.
I made a jig so that the mounts would come out square and the same side to side. The jig and the mounts are in the first few pictures. Then I made the arms. The spline thingies came from Speedway Motors and the rest of the materials are all 4130 and came from Aircraft Spruce. I spent about 60 bucks and days worth of work. Not bad. I reused all the other hardware that is expensive like the bar, pillow blocks and link hardware. By the way they are just a bit lighter than the aluminum arms as are the mounts a littler lighter than the solid aluminum ones that came with the original setup.
The net result is the calculator comes out at about 300 pounds using a hollow bar. If I use a solid bar in its place I can go up to about 400. Pretty close I think.
The idea is to set the front bar and then tune the car with the rear. I am going to make a bar for the rear also and drive it from the bell cranks. But back to the bodywork........first.
Fran, thanks for the info on the wheels.
Attachments
-
 HPIM1858.JPG220.2 KB · Views: 445
 -
 HPIM1859.JPG217.9 KB · Views: 443
 -
 HPIM1860.JPG216.5 KB · Views: 415
 -
 HPIM1861.JPG206.2 KB · Views: 442
 -
 HPIM1862.JPG214.7 KB · Views: 434
 -
 HPIM1863.JPG237.4 KB · Views: 409
 -
 HPIM1867.JPG149.2 KB · Views: 445
 -
 HPIM1868.JPG168.6 KB · Views: 448
 -
 HPIM1866.JPG158.6 KB · Views: 454
 -
 HPIM1864.JPG154.1 KB · Views: 407
 -
 HPIM1870.JPG175.4 KB · Views: 444
 -
 HPIM1872.JPG149.6 KB · Views: 433
Last edited:
Howard Jones
Supporter
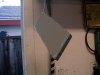
Here I made up two little stays to make the side nose side plates more rigid out of some left over tubing.
Attachments

Howard Jones
Supporter
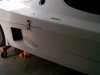
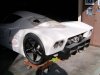
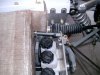
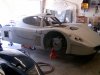
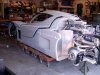
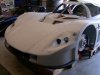
Back to the bodywork. Completed full sanding to 400, primed with high buildup primer and got bored again with body prep. Here's where I am with the body. I need to sand the whole car again with 400 to smooth the primer, then its paint. The first few are the nearly done body.
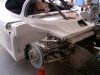
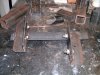
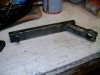
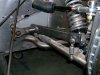
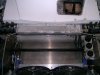
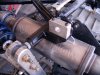
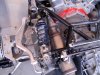
When I get enough of the stuff I hate, I do something I like. The rear antiroll bar..........well, I did it over. The bar will mount up on top where it can be serviced/tuned I will drive it off the rear suspension bell cranks. Should have been done it this way from the start, but that's how you learn.
Here you can see the pillow block mounts I welded onto the big brace assembly and the pillow blocks I made. When the material gets here I make the bar, the push rods and mount them.
Attachments
Howard Jones
Supporter
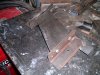
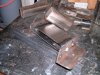
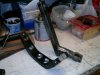
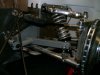
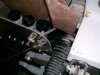
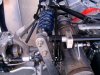
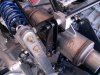
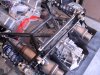
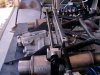
So here's the complete prototype rear antiroll bar. The calculator I used says this will adjust from about 200 lbs to about 350 or so. That should be in the ball park with the front bar. The springs on the car are 600F and 750R. The only thing to do now is finish the car and drive it to see where I'll at on balance........So I guess we'll see.
Thanks to QRP for letting me look at their car. The rocker extensions are their idea as well as many other racecars I have been studying. The double shear rocker pin brace was their also. I made them from so leftover material I had in the cut off bucket. It's all 4140 CM.
All the material is 4041 CM, 0.10" flat plate for the arms and rocker extensions, except the pillows and their weld on mounts,. The pillow blocks are 6061 Alum .75" square bar cut to length, cross drilled for the two through mounting bolts and then drill out to .75 for the bar. The chassis mounts are 1.5 X 1/8 wall mild steel square tubing.
I got the 3/8 high misalignment rod ends from QA-1 and their pushrods are 5/8 OD 1/8" wall drilled and taped to 3/8-24 L and R hand thread.
All in all about a 100 bucks, two sawsall blades, a disk sander disk and 24 hours or so.
Attachments
Similar threads
- Replies
- 14
- Views
- 2K
- Replies
- 5
- Views
- 2K