
- Forums
- GT40 Replica Manufacturers' Corner
- RCR Forum - RCR40/SLC/917/Superlite Aero
- The SLC Clubhouse
You are using an out of date browser. It may not display this or other websites correctly.
You should upgrade or use an alternative browser.
You should upgrade or use an alternative browser.
SLC 24 Howard Jones
- Thread starter Howard Jones
- Start date
")
Howard Jones
Supporter
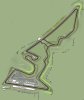
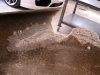
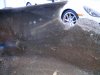
Ya I'm not sure exactly what happened. I went off at the end of the brake zone Turn 19. This is not a place that lends itself to hit anything. I hit the outside fence, drivers right, at about 5-10 MPH. Just enough that you think sliding up to it that I might make it. NAAA. Shit!
What was weird was all was good until I released the brakes and started to turn the car in. Then it snapped sideways with the nose pointed at the fence. All that can be done then is to get back onto the brakes and ride it out. I was hopping for a straight side down the track but it got some low speed grip and put me into the fence.
Could have been a caliper didn't release at the rear. More than likely at the right rear. Maybe both rears. I'm gonna change both of the residual valves.
I was pushing a bit and had gotten into the 2:30s. That's not really all that quick but quite a bit faster that the 40s shake down learning speeds I had been running up to this point. Oh well, more on what I find and the bodywork repair as that progresses.
Attachments
Howard Jones
Supporter
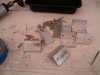
Ya the on track crew was really helpful. They took their time and didn't damage anything else. I asked for the pieces and the crew boss said they didn't usually do that but everything was right there in one spot so he gathered things up quickly and put them in the car.
I just got through taking all the busted stuff off and didn't find any additional damage. Then I ran the rotor runout and all four are under .004 with three under or at .003. I think that is OK for a in service rotor. Much more to look at tomorrow.
I ordered a bunch of fiberglass material and resin and it should be here soon.
Howard Jones
Supporter
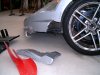
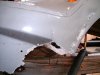
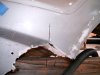
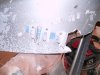
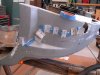
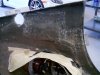
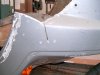
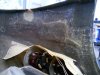
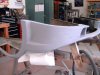
I started to fix it. First thing to do is repair some of the cracks in the larger nose piece so that it is all in the correct place/plane to graft the big broken part back on later. As you can see in the pictures the cracks are ground out so that only intact parent material is left. This is important. Get rid of all the frayed and broken material so that the new fiberglass patch has solid fiberglass to bond to.
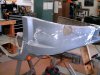
I use a slurry of resin, chopped fiber, and micro balloons, the consistence of peanut butter to fill the crack and low spots, and then fiberglass matt to cover the slurry three or four courses thick on the back side.
The crack is positioned with a few angles across the crack. They are screwed onto the piece with sheet metal screws and then the points are ground off the back side to make it smooth with a cutoff wheel. I cover the crack first with a piece of painter tape to keep the slurry in the crack.
More pics as this progresses.
Attachments
I put the whole front end and most of the right side of a Corvette racecar back together again by basically doing exactly what you’re doing.... It may have been a pound or two heavier, but it was pretty darned strong.
Your recipe for filler material sounds a lot like 3m’s HSRF ..... I’ve also used this trick, not only to save money and time but to have consistent resins...
Hang in there!
Your recipe for filler material sounds a lot like 3m’s HSRF ..... I’ve also used this trick, not only to save money and time but to have consistent resins...
Hang in there!
Howard Jones
Supporter
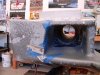
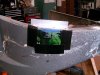
Ya, this is pretty easy really. Not difficult just a bit time consuming. Here's yesterdays progress. I decided that I'll name it the "humpty dumpty process"
Attachments
-
 HPIM2467.JPG886.3 KB · Views: 543
 -
 HPIM2466.JPG959.6 KB · Views: 503
 -
 HPIM2463.JPG735 KB · Views: 506
 -
 HPIM2468.JPG814.5 KB · Views: 475
 -
 HPIM2469.JPG944.6 KB · Views: 479
 -
 HPIM2470.JPG962 KB · Views: 544
 -
 HPIM2462.JPG1.1 MB · Views: 467
 -
 HPIM2465.JPG831.6 KB · Views: 504
 -
 HPIM2460.JPG886.6 KB · Views: 492
 -
 HPIM2464.JPG861.8 KB · Views: 512
")
Howard Jones
Supporter
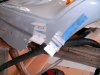
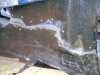
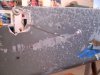
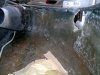
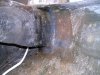
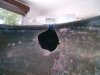
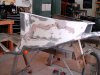
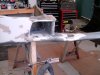
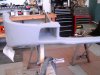
Saturdays progress. Filled big hole created by canard mount bolt being pulled though body. I decided to not replace original piece and instead just glassed it over from the inside. First I covered hole with a piece of hard carboard covered with duct tape on the inside. Resin does not stick to duct tape.
All the pieces now back in place and inside work done. Now I will need to bevel outside damage and smooth edges. Then I can add matt and grind down to smooth for bondo.
All the pieces now back in place and inside work done. Now I will need to bevel outside damage and smooth edges. Then I can add matt and grind down to smooth for bondo.
Attachments
Howard Jones
Supporter
Howard Jones
Supporter
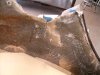
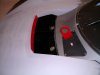
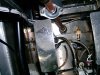
So all better now. The first picture is of the new Wilwood residual valves. I have installed an fittings on the ends so I can directly attach to system without the little pieces of brake line tubing. This makes it much easier to remove them and is virtually impossible to leak at the connections.
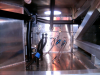
The last is the redone radiator exhaust opening.
The last is the redone radiator exhaust opening.
Attachments


Howard Jones
Supporter
Here's where the new Wilwood residual valves ended up. The first pic is the original valves with the pieces of tubing needed to hook it all up. I never liked that anyway so I got rid of the tubing and used AN fittings on the Wilwood valves. Second picture. Better.
Attachments

Howard Jones
Supporter
Here's sort of a update. I towed out to Willow Springs in California to run the car for two days with The Cobra owners Club of Orange County. They do a track weekend there twice a Year and I ran the GT40 with them a number of times when I lived in California. I really like that track but more so I really like that group of guys.
In any case the cleaning of the rotors seamed to work and the new residual valves were much better, It appears that the original ones were in fact causing a constant drag from the pads. I think the effect was that this prevented a good bedding process that really became more apparent as I changed to a higher friction pad material. I have more to learn on pad materials, but my advice is to remove them if you have them and install Wilwood valves. The for mentioned vibration has gone away by about 90% but I think a recleaning of the rotors will not be necessary, just more laps and see If they continue to get better as the rotors are worn in with the pads on the car now.
About that (more laps). This time it was the throttle cable that failed. It was to close to the engine block in one spot an although it was shielded it still melted and froze. No drama, as I found the problem as I was starting the car for the forth session on Saturday. Nothing to do at that point but pack up and leave Sunday morning.
This was too bad really as I was just about to change up to a faster run group and push a bit harder.
I really hope that all you guys that are thinking about track cars for the first time are reading this thread. This is the kind of stuff that happens with new race cars. It will one thing after the other until you begin to achieve reliability and things do not fail or you gain the desired performance. I had hoped that I was there or at least close enough to run the whole weekend but then the unexpected happened. That's just the way it is I guess. That's why they are called prototypes...

Howard Jones
Supporter
Ya that was the group that I needed to get out of after a couple of sessions. It was really getting dangerous as my closing speeds went up. Never got a real flying lap in as it turns out. However I did miss the three, Ya THREE! GT350 brand-new mustangs with Coyotes in them, that blew themselves up before lunch on the first morning, in the next faster group ahead of me. Something wrong with that motor, I don't care what Ford says. Stay with the Winsor's fellas.
Similar threads
- Replies
- 14
- Views
- 2K
- Replies
- 5
- Views
- 2K