- Forums
- GT40 Replica Manufacturers' Corner
- RCR Forum - RCR40/SLC/917/Superlite Aero
- The SLC Clubhouse
You are using an out of date browser. It may not display this or other websites correctly.
You should upgrade or use an alternative browser.
You should upgrade or use an alternative browser.
SLC 36 Cam's Build
- Thread starter Cam MacIsaac
- Start date

Thrilled to see you found a workable solution. How much does it encroach on the passenger footwell?
Fran, do you have any pictures of the current system installed in a car? Trying to figure out how it looks upon completion.
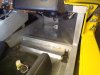
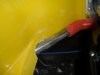
ArtGirl, here is one of the A/C in the footbox. you see even less as you are getting in. the an-6 90deg condenser line sticks down a little in between the passengers shins but not bad...
Attachments
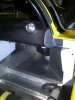
But Cam, what if ArtGirl wants a ride and she is wearing a long dress????ArtGirl, here is one of the A/C in the footbox. you see even less as you are getting in. the an-6 90deg condenser line sticks down a little in between the passengers shins but not bad...

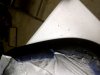
Finally got my windsheild mounted. Got the hole cut for A/C so i can permanently fix it. Actally I decided to screw it down in 14 places with nylon 10/32's. I went with the plastic windsheild after a little mishap where i snapped my glass one. I went with 1/2 trim from a windsheild shop. I had to cutr back the lexan. it cuts like butter but its hard to get the edge back to a factory perfect once cut. I ended up trimming most of the edges on the whole windsheild.
It's not DOT so i could take it out put in my old glass to get re-inspected. I bet it shave 20lbs plus the visibility is clearer. I put a 2" band of border paint on it to hide the F/G edge.
Window Border Spray Paint
It's not DOT so i could take it out put in my old glass to get re-inspected. I bet it shave 20lbs plus the visibility is clearer. I put a 2" band of border paint on it to hide the F/G edge.
Window Border Spray Paint
Attachments
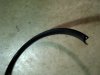
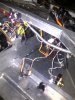
I put silicon on all my coolant joints. after 4k miles, they are looking like new.
<?xml:namespace prefix = o ns = "urn:schemas-microsoft-com<img src=" /><o ></o>
></o>
Funny thing, I put regular old school black Goodyear hose in a few joints. They never leak. The fancy shmancy silicon hose with regular hose clamps tends to form tiny leaks. Then tighten them up and 500 miles later tiny leaks again. I put stronger t-clamps on them and that helps a bit. The old school Goodyear guys might know a thing or two about carbon black magic. Or you want to move to T-clamps instead of hose clamps if you are running silicon hose for joints. FWIW.
<?xml:namespace prefix = o ns = "urn:schemas-microsoft-com<img src=" /><o
></o>Funny thing, I put regular old school black Goodyear hose in a few joints. They never leak. The fancy shmancy silicon hose with regular hose clamps tends to form tiny leaks. Then tighten them up and 500 miles later tiny leaks again. I put stronger t-clamps on them and that helps a bit. The old school Goodyear guys might know a thing or two about carbon black magic. Or you want to move to T-clamps instead of hose clamps if you are running silicon hose for joints. FWIW.
Attachments
Windshield looks good.. doubt they would actually check it to see if it is poly, esp with the screws hidden.
Try constant torque clamps (basically t-clamps with a spring to take up size changes from temperature gradients)
Try constant torque clamps (basically t-clamps with a spring to take up size changes from temperature gradients)
I did paint the border on the inside of the back and side lexans and screwed it in. i alos painted the F/g in the gap that the lexan sits. i didnt take the time to trim the lexan and finish with any trim. Tapping into the F/G holds great. no need to add 10/32 or 8/32 nuts. Much faster in/out.Nice...the windshield install looks great. I like the trim.
Did you do the rear glass the same way?
Attachments
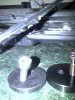
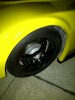
I got an '06 GTO spare. I dont want the run flats and needed a solution in case of a flat. The vette blogs mention it can fit over some Z06 calipers. Close but no cigar. i had to add 1 spacer in the fornt and 3 (ugh) in the rear. It not a long term, safe soluton but i did limp around town 20 miles and it held. This way i can throw in in the footbox when i take it to a track day.
Attachments
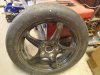


Yup, new powder coated black...
Badass dude, I like it much better than the previous chrome!
I like the black wheels. Mean.
I've got just a few more steps and ...A/C!
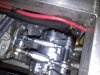
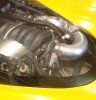
I added double heims to the compressor mount so i can "steer" it a bit.
With the GenII mini mounted half way into the upper footbox it leaves alot of room. You dont really see it as you are getting in. It would have certainly been easier putting all the a/c, heat bulkheads on with the body off but I was still able to fit it.