
You are using an out of date browser. It may not display this or other websites correctly.
You should upgrade or use an alternative browser.
You should upgrade or use an alternative browser.
Tornado Build - www.gt40builder.com
- Thread starter trevorsummers
- Start date
Adding detail always helps the overall look of the finished project.
Martin.
Beautiful work Martin, totally agree. The other thing I am doing is changing the shape of my rear bulkhead window from the standard rounded shape supplied by Tornado to the upside down triangular style as per the original cars. Again it would be easier to go for the standard window but it's another one of the little details that I like
Trev
Nearly ready to start rivetting panels again and to start on the suspension but trying to decide on my brake setup before I do anything.
Also this just arrived in the post.

I am sure most people on here know what this is but if you don't it's a aircraft lamp from a Spitfire plane. I don't know the exact history of the lamps but I believe they were used on GT40s at Le Mans, most likely to help spot the cars during the night. The Linden green Gelscoe car has one which is why I decided to get one. Only cost me £13 including postage so can't complain.

Also this just arrived in the post.
I am sure most people on here know what this is but if you don't it's a aircraft lamp from a Spitfire plane. I don't know the exact history of the lamps but I believe they were used on GT40s at Le Mans, most likely to help spot the cars during the night. The Linden green Gelscoe car has one which is why I decided to get one. Only cost me £13 including postage so can't complain.
Not too much to report this week. Just about finished my sills and the beading. The ribs and the round fuel sender cover will be powder coated but I'll wait until the body is fitted to attach the beading.

Also my black sealed rivets arrived this week so I can finally start rivetting again.

I need to think about which panels I can rivet at the moment and which I need to leave until later in the build. At the moment I am thinking of rivetting/sealing in the wheel arch panels 6-1, 6-2, 6-3 & 6-4 but not sure about panel #8. Really I want to leave this unrivetted until the spider goes on the car so I can clamp it to the spider with aluminium angle but will there be enough room in that area to rivet in panel 8 once the suspension goes on?
This image shows the panels in question:

Thanks
Trev
Also my black sealed rivets arrived this week so I can finally start rivetting again.
I need to think about which panels I can rivet at the moment and which I need to leave until later in the build. At the moment I am thinking of rivetting/sealing in the wheel arch panels 6-1, 6-2, 6-3 & 6-4 but not sure about panel #8. Really I want to leave this unrivetted until the spider goes on the car so I can clamp it to the spider with aluminium angle but will there be enough room in that area to rivet in panel 8 once the suspension goes on?
This image shows the panels in question:
Thanks
Trev
Trevor,
Leave out which ever one/two that will allow you to instal the fuel fillers. It is tough to get to the lines with the panels in place. All I had to work with were the inside panels and it wasn't easy. Also run your vent lines early so you can see which frame members need to have holes placed for the lines if you run them to the front. I ran my back lines to the front and joined them with the front lines and up to the filler area to vent. Vents fore and aft will allow the pressure to equal out if parked on a slant. While you are at it put in a roll over valve on any line that goes to a vent. If you do it like mine you need two. You may want to go the opposite direction if you don't want them to show. Also leave room for a charcoal canister to keep the fuel smell to a minimum.
Bill
Trevor
My advice would be to follow the build manual.
Thanks
Andy
My advice would be to follow the build manual.
Thanks
Andy
Trev,
The only panels I left un-rivetted were the two cill panels above the fuel tank. I only recently rivetted these after I had run all the hoses, gear rods, a/c etc etc. At this part of the build your in and out the car all the time and if you want to keep your cills in good condition, you can take them off. But, as Andy says, follow the manual and it'll keep you straight.
Ian
Andy, had a good look through the build manual last night and it doesn't say at any point what panels to rivet in. The manual is very clear where not to rivet such as panels 9-12 until the steering rack goes in but it isn't totally clear which panels are safe to rivet in now and that won't effect the build going forward.
Therefore should I rivet in wheel arches as it doesn't mention not to in the manual?
Thanks
Trev
Therefore should I rivet in wheel arches as it doesn't mention not to in the manual?
Thanks
Trev
Trevor
My advice would be to follow the build manual.
Thanks
Andy
Trevor
Just rivet them on in the sequence that they are written about in the manual.
The manual tells you where not to rivet on each panel and does not mention panels that should not be fitted.
Just follow the text.
Thanks
Andy
Just rivet them on in the sequence that they are written about in the manual.
The manual tells you where not to rivet on each panel and does not mention panels that should not be fitted.
Just follow the text.
Thanks
Andy
Trevor
Just rivet them on in the sequence that they are written about in the manual.
The manual tells you where not to rivet on each panel and does not mention panels that should not be fitted.
Just follow the text.
Thanks
Andy
Thanks Andy
I just wanted to double check that when the manual says 'now panel' whatever panel it means make, seal and rivet that panel. In which case the wheel arch panels will be going on this Sunday and then I can get cracking on the suspension.
Not much to report unfortunately. The only job I managed to get done this weekend was to set all my riv nuts in the sill tops and footwell top and order some bolts and washers in black to match the colour of my fuel sender covers once they have been powder coated.
The big issue this weekend was to do with rivets. I was due to rivet in the front wheel arch panels yesterday but after testing a couple of my new black sealed rivets I've found that a small flake of aluminium seems to get trapped in the top of the rivet and rattles around. I could live with 1 or 2 slight rattles from the odd rivet but it seems to be happening to all of my new rivets but not my old ones. The new ones are 4x12.5mm (don't know the brand) and my old ones are 4x10mm(bralo) so I don't know if it has something to do with the size or brand? Any suggestions on what I shoudl do are welcome here:
http://www.gt40s.com/forum/gt40-tech-exterior-interior-ac-trim/34680-rattling-rivets.html#post338140
Trevor,
I am not sure of what you mean by the fleck of aluminum. If this is what I think it is, what you are seeing is the break of the pull rod that causes the rivet to expand and hold the panel in place. I can't explain why it would rattle around, but I would put one or two in place and then try to move the panel. If it stays in place there probably is a little space in the body of the rivet that allows the head to drop into once it snaps off. If it moves then the shaft is breaking before it is wedged in place and is a defective rivet. My only suggestion is to:
1. Try to get the original style rivets, or
2. If you find it is not defective, then go to your local pharmacy and get some plastic hypodermic syringes(3cc should do) and some 18 or 16 guage needles(try to get blunt ones, sometimes called saftey needles. If you can't find them there try a frfriend in the O R to get you one or two. We use them in the O R to keep from getting stuck). These sizes should fit the face of the rivet. If you go smaller to say a 20 guage it will be pretty difficult to get the caulk through it. If you use a regular needle you will have to break off the point as any caulk you push through will not go into the rivet Put some black caulk into the syringe and inject it into the face of the rivet. Enough should go in that it will hold that loose piece and the black will get rid of that aluminum fleck.
Bill
Dont forget that 12.5mm rivets are designed for work thats 4-7mm thick. that could be your problem.
Dont forget that 12.5mm rivets are designed for work thats 4-7mm thick. that could be your problem.
Yeah I thought this, I'll do a few more tests. Should the 12.5mm rivets be ok for rivetting the panels to the chassis frame as the panels are approx 2mm thick and the frame is at least that again?
Hi all
Not a great deal to report, busy planning my wheels, brake, suspension setup at the moment which is taking some time to learn about each part and it's effect on the car.
Only new thing is I've had my fuel sender caps powder coated and bought some matching black hex bolts and washers to finish the look

Trev
Not a great deal to report, busy planning my wheels, brake, suspension setup at the moment which is taking some time to learn about each part and it's effect on the car.
Only new thing is I've had my fuel sender caps powder coated and bought some matching black hex bolts and washers to finish the look
Trev
Your sills are looking good Trevor.
I enjoy each instalment of your build log, its has good info that I'm sure I will reflect on when I get round to getting my 40.
Cheers
Paul
Thanks Paul, glad your enjoying my build. There's not too much happening at the moment but I am hoping to get things moving along properly in the next few weeks
Trev
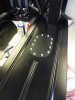
Rivets finally going in
Finally managed to get some rivets in the car this weekend. I've sealed and rivetted the front 4 wheel arch panels on each side of the car ready for fitting the steering and suspension.
I used my new black sealed rivets for the first time and am really happy with the results, they definitely look much smarter than the silver rivets and everything matches really well.
Tomorrow's job is to go around and fill any panel gaps and joins with additional sealant and tidy everything up ready for my steering parts which should arrive in the next few weeks.
Also after hand rivetting over 100 rivets I think its time to look into some air gun. My hands can't take it")

Trev
Finally managed to get some rivets in the car this weekend. I've sealed and rivetted the front 4 wheel arch panels on each side of the car ready for fitting the steering and suspension.
I used my new black sealed rivets for the first time and am really happy with the results, they definitely look much smarter than the silver rivets and everything matches really well.
Tomorrow's job is to go around and fill any panel gaps and joins with additional sealant and tidy everything up ready for my steering parts which should arrive in the next few weeks.
Also after hand rivetting over 100 rivets I think its time to look into some air gun. My hands can't take it
Trev