Tornado TS40 Build Belfast Northern Ireland

I thought I'd post a pic of the footwell panelling,... I know there's been tutting on street corners about this, but what the hell they're my feet. Anyway it's going to be carpeted, so you can stop yer tutting and roll yer eyes. :shocked:
 

Attachments

  • HappyFeet.jpg
    HappyFeet.jpg
    106.6 KB · Views: 619
All of Sunday afternoon was absorbed one of those 'that'll-just-take-an-hour-tasks'. I bought a part finished car, problem is that some of the regs have changed and there are a few areas where she's non-compliant.

"Every seat must be securely attached to the vehicle structure, or other obvious suitable load bearing parts of the vehicle."

Seats secured to the floor panels won't pass. So I need some load bearing braces in place. As my car has the floor and inside sills panelled, my initial thought was to put in (for each seat) a couple of U shaped brackets which would then be bolted to the side and tunnel chassis members...... however the passenger seat is such a snug fit that there was no room at the sides for the vertical portion of the U brackets, never mind any bolt heads :shifty:. I was really reluctant to start removing panels. Decided to cut away a recess in the inside of the side sill panels to allow me to weld flat bars to the chassis. This is an unseen area and I will make up some cover places for the side panels. No one will ever know.

These 6mm bars will be tapped before being welded in place and the seats secured from the top with M6 screws.
 

Attachments

  • IMG_20140323_184859.jpg
    IMG_20140323_184859.jpg
    51.7 KB · Views: 501
  • IMG_20140323_193642.jpg
    IMG_20140323_193642.jpg
    58 KB · Views: 502
Those paying close attention to my build (probably both of you) will notice the shift in activity from the front bay to the cabin. Basically, bar the electrics, the front bay is finished. My effort now is to finish off the cabin, again bar wiring, as I'm leaving that to the last.

The engine water pump was removed and an electric one installed in the front bay, so I could get rid of the hump. The coolant pipework around the engine is also finished. so time to cash-in on the humpless rear panel.
 

Attachments

  • IMG_20140322_191830.jpg
    IMG_20140322_191830.jpg
    61.9 KB · Views: 537
Keith,
Have you trial fitted the seats yet?. Looking at your interior shot, you may have a tight fit for the drivers seat. Your shift bar that goes back to the trans may have to be put closer to the side panel to fit without a rub or bind? or is it just an illusion?? Mine was a tight fit with just a skinney rod that operated a cable. Also be careful of the seat mounting. Everytime the seat is raised just a bit it makes a difference. I had a 1/4" plywood panel on the floor of my drivers side and it made the difference in my foot hitting the steering column. Took it out and all is good. Thought I was going to have to move the column with the windscreen now attached!!

Bill
 
Bill, thanks for the HU, I actually plan to have a centre cable shifter, so all the linkage between the sill and seat is coming out. Presently the floor straps are just sitting in place, I have to mate them up to the holes in the bottom of the seats, then drill and tap to M6 or poss M8. I'm not putting the seats on rails, so the seats will be sitting solely on these 6mm bars.

Before welding the bars in place (in the car) I plan this.... once the bars are threaded fix them to the bottom of the seats with bolts from the top, I then with the bars and seats as one piece, place them in the car with some sealant or similar on the bottom of the bars, let it adhere to the floor pan, remove the bolts and remove the seats, leaving the bars in place on the floor, I can then weld them to the chassis, knowing that they align with the seats... famous last words! K
 
When you put them into the car just sit in them and make sure you can close the door without seeing stars***** before you secure them. My first seat selection had that problem. Come to think of it I didn't try that with a helmet on with the newer seats.:shocked:
Since I am repainting and repairing fiberglass, I guess it isn't too late for a bubble!!

Bill
 
6 pointer. I am hoping that I don't have to do the helmet thing. Bit I have until Sept. to get one in if I do. Might take a run at Road Atlanta to try everything out.

Bill
 
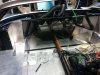
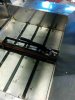
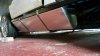
Finally got the straps for the seats welded in, went for three per seat, I now have to make up some small ally plates to cover the holes I had to make in the sill panels, it can only get better.

These were a nightmare to do; as I did not want to drill the floor panels, I wanted the bolts securing the seats to the straps to be accessible from the top (not the underside of the car)

I had to position the straps on the bottom of the seats while they were in the car, drill location holes in the seat bases and straps, send the bars to get tapped to M8, got them back, bolt the straps to the base of each seat, (oh, take the roof section off the car so the seats with straps attached could be moved in and out of the car), position the seats on the floor with straps secured, then glue (yes glue) the straps to the floor, load the seats with bricks as seats would not sit flat, leave it for a day (glue to cure), remove the bricks, unbolt the seats and then weld the lot, hoping nothing moves and I did not blow a hole in the ally.

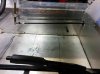
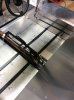
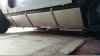
Forgot to say that to remove the paint from the offside sill,(with a drill and wire brush thingie on the end) I had to remove all the gear linkage, grrrrrr. Luckily I plan centre shift cable system, so is was due to come out. can you sense my frustration?

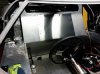
Well anyway it worked, I am able to sit in the car with my hand on the wheel and make brum noises, but with no gear linkage it is a bit monotonic. K
 

Attachments

  • Seat-800.jpg
    Seat-800.jpg
    82.5 KB · Views: 509
Hi Keith
I'm enjoying the build log. Just wondering if you revisited your mini mirrors has yet, how are you planning to do the inner door retainer part.
Cheers Andrew
 
Hi Andrew, got the cooper mirrors, but not got round to fitting them yet. I guess i'll have to extend them (extend the mounting arms) so they will pass the IVA rear visibility requirements. I'll plan to use an inner plate probably a bit of curved aluminium to mount to on the door. Presently I'm fitting the fuel tanks, so I can locate the roof section and then the filler caps, after that is the doors, the closing mechanism and poss mirrors, hopefully by the late summer i'll be progressing it. Are you planning to use mini mirrors too?

K
 
Hi Keith it sounds we at a similar point, brought some assistance in today to help with the wiring putting additional relays in Central locking etc. Purchased the mini mirrors with some other kit, it's a little disappointing they need additional work!
I'll let you know when I get to mirrors.. Cheers Andrew
 
OK, baby's got tanks straps, still need to put a rubber sleeve over them to stop them fretting the tanks, probably use an inner tube of a bike. Also got a Mocal oil radiator, take off plate and a remote filter housing, not fitted this yet, indeed I may leave it until we're on the road.

Oh nearly forgot, was planning to have a 'quick release' and/or a tightening system for the tank straps, but I want to drive the car this century, so bugger it, normal straps will do.
 

Attachments

  • IMG_20140531_172117.jpg
    IMG_20140531_172117.jpg
    98.9 KB · Views: 469
  • IMG_20140531_172019.jpg
    IMG_20140531_172019.jpg
    128.7 KB · Views: 441
Andrew, we can do the toggle system as you suggest for the EPAS controller, car start at t=0, controller waits 10 secs to initialise EPAS ECU, then goes immediately to high speed (low assist) mode and stays that way until a button press toggles it to low speed (high assist) and stays that way until you press the button again,....

Standard £39 price:-

Corsa B, C - EPAS Kit - Electric power steering controller ** NO KNOBS ** | eBay


If you buy one of these we can deliver in a week or two. K
 
Nearside tank straps, for those of you ticking stuff off my list.

Next I'll positions the sills, insert the riv-nuts.
Need to do the same for the front apron of the roof section.

After that it's the central gear change mechanisms and wiring. I'm sure there was something else....
 

Attachments

  • NSTank1.jpg
    NSTank1.jpg
    70.7 KB · Views: 443

Andrew

Supporter
Keith, did you ever finish the build? I've just read through your thread and gutted there was no happy ending!!
 
Back
Top