Tornado TS40 Build Belfast Northern Ireland

Cheers Andy, i'll have to expand my stock to flanged one, another invoice to hide! I do have a schoolboy question, erhumm, on the electric water pump, which side (flow to the engine, flow from the engine) are you measuring the coolant temperature, for the control of the rad fans? K
 
Thanks Brett, I did skim and scan the manual,..... the reason I asked the question was, I don't have a top hose conn on the rad, both are on bottom, one left, one right. I believe normal flow is from engine to top of rad, flow then out bott of rad back to engine? I just want to make sure that measuring temp on the flow out of the engine is correct. My car had been plumbed the flow had been measured on the return to the engine, so this made me doubt.

I have to say that measuring the temp on the return to the engine does make some sense, as it gives a direct indication of the effectiveness of the rad or the rad and fans to cool the engine, problem is, you may have to adjust the 'set point' for kicking in the fans. clear as mud. K
 
Hi Keith,

The fan control on mine is done by the ECU, but the sensor is still in the top of the inlet manifold, prior to where the ‘normal’ thermostat would have been. This is also where the sensor for the coolant gauge is. I see no reason why this should be any different with a remote thermostat & pump and the fact it ran fine on the chassis dyno at 4500rpm full load, supports this theory.

Regards,
Andy
 
Phew, finally got it finished, it's not too dark?

photo.JPG

Have to say I like the matt black or is it eggshell.
 
Last edited:
Keith, found this pic on the forum a while ago of a mk1 in matt.
I really like the colour, just not sure if I'm brave enough to do mine in it.

Black GT.jpg

Jason
 
Jason,
There is a way to get the look and not cost a fortune. It is called Plastidip. It is a rubber based paint that has the ability to be peeled off if you make a mistake or just don't like it.
https://www.dipyourcar.com/home.php?gclid=COO6lY3MlLwCFdHm7Aod3R4AJw
Your problem in the UK is getting it. It is listed as a hazardous chemical. You might have to get it in France or Germany. The whole paint job including buying the sprayer can be done for under $150. Dip Your Car has a Youtube channel and there are a ton of videos out there. If interested look at the videos by "The Puzzleman". He will spell it out on how to get it done that cheaply. There are basically two products out there. Sprayable and non thinned. The non thinned with the thinner Naptha will double your volume as it is mixed 1:1. The sprayable is already thinned. That is how they make their money. That is how it stays so cheap. About $57 for the paint and $12 for the thinner/gal. The small cans of the stuff are 14.5 oz and there is a combination that Puzzelman spells out in one of his videos of how to get the right amount without spending a bunch. I am guessing it will take about 3 gallons to do a 40. You need about 5 coats to do it right. That makes sure it is peelable #1 and looks right #2. Flat black is their basic color. They have lots of colors to choose from. + you can mix them and come up with your own special color. They have a make your own color kit that lets you experiment with colors(pigments). Check it out. I put it on my door tops and central spyder. Here is the post about it.
http://www.gt40s.com/forum/gt40-tech-exterior-interior-ac-trim/38802-experiment.html#post391067

Bill
 
Last edited:
Guys, thanks for the info on the plasti dip,..... I had my heart set on the gulf livery, now I'm not so sure.

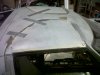
Spent the part of the weekend getting the body to fit, last week I had located the rear legs of the roof spider in the correct position, as it had been wrong when I got the car, consequently the rear clip and the doors had been in the wrong position too. First got the rear corrected, only to find it now fouled on the coolant header tank and the top fuel filter,..... sigh. Anyway the rear clam now fits and locates into the roof with a glorious 1/4" gap.

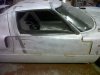
The Nearside door simply need moved forward slightly, the profile was/is correct. Not so the offside door, it was simply too big and the wrong shape, I took the old approach and hand sanded the edges of the door, it only took an hour or two, what the hell, this was important and I knew if I used a sander, I'd go too far.

Found some old carpet offcuts that are 1/4" thick, so thanks to them I now have the rear, the doors, the windscreen all 1/4" from each other, there are a few non critical places where the gaps need adjusted, either by sanding of building up the GRP.

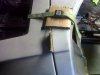
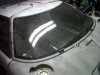
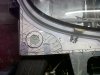
I can now fit the apron on the front of the windscreen to the scuttle plate/dash frame, the front clip is about right. The holes through the apron for the fuel are in the wrong position, so I'm thinking of removing that portion (hatched in the last pic), and attaching the fuel caps to the panel below, still mulling this over, what do you think?

The alternative is to remove the rectangular front of the apron and trim it back so its profile matches the bottom of the windscreen, perhaps extending out by about 2", however that means another panel is needed to support it in the middle portion of the dash. Anyway, I hope that is clear if you have any tips, let me know.
 

Attachments

  • IMG01453-20140125-1353.jpg
    IMG01453-20140125-1353.jpg
    178.8 KB · Views: 356
  • IMG01456-20140126-1739.jpg
    IMG01456-20140126-1739.jpg
    161.2 KB · Views: 367
  • IMG01455-20140126-1738.jpg
    IMG01455-20140126-1738.jpg
    151 KB · Views: 347
  • IMG01458-20140126-1742.jpg
    IMG01458-20140126-1742.jpg
    144.3 KB · Views: 349
  • IMG01460-20140126-1752.jpg
    IMG01460-20140126-1752.jpg
    185.6 KB · Views: 352
Doors and Fuel Caps

Got the nearside (passenger) door hung last night, user 3mm ally plate to lift the bottom hinge bracket off the chassis and allow the top of the fibreglass sill to slip in under the bracket, so it does not have to have a cut-out around the bracket, as had been done previously.

While I was in that neck of the woods, I plan to cut away the GRP /fibreglass where the filler caps sit, hatched in the first pic, I also plan to panel this area to give me something to fix the fuel filler caps to. When I got he car, is also got the items in the other pix, as well as the 'standard' GT40 hinged caps, not shown.

I plan to mount the small internal (silver) cap in the ally panel, the large GT40 hinged cap will sit over this, I will therefore not use the large black part shown. The only issue I see is that I need to put a breather connection on the top of the pipe from the cap to the tank. Can I ask,.... what are Tornado (poss others) are doing re. this, as I believe for IVA the cap needs to lock, and the bit I am proposing to bin has no means of locking, it is also angled which makes sourcing a locking cap a pain?
 

Attachments

  • fuel-1.jpg
    fuel-1.jpg
    185.6 KB · Views: 316
  • Fuel-bits-2.jpg
    Fuel-bits-2.jpg
    168.8 KB · Views: 343
  • Fuel-bits-1.jpg
    Fuel-bits-1.jpg
    188.2 KB · Views: 288
I intend to vent from the tank itself but quite a few caps both lock and have a vent (most motorcycle ones do, although they're not suitable for cars as they're designed to sit inside a special recess).

I was looking to get something like a pair of these Fuel Filler Cap but I don't know if they vent or not.
 
Reading the IVA docs again, during coffee break, the cap has to either be tethered to the car or be lockable. My caps don't have a (key) lock, so I may tether them with some stainless 'guys', there's plenty of room inside the main GT40 cap.

My tanks have a fill connection and a breather (~10mm), I was planning to weld another 10mm connection to the top of the main fill pipe, which would then sit just below the inner cap?
 
Keith,
To your points

1/ They still have to be tethered if you can remove the key. CBS used to have some advice on how to do this in their earlier catalogues has been removed, but it was to use a small piece of brass picture wire.

2/ Let me take a photo of what I have done on my car for you tonight. I originally asked Mick to do it when the car was at SGT and I believe he now does it on his fuel filler necks now

Brett
 
I shall measure for you tonight :)

BTW I like these as they fit perfectly so you don't have to try and make sure any gaps are there from an aethetics POV
 
Cheers guys. My version of the IVA doc is May 2009, " 16. The fuel filler cap must either be tethered to the vehicle or be of a lockable type where the key can only be removed when the cap is locked....." Has this changed in Jun 2013 version?

Just to be clear, I plan to tether only with no locks,.... if IVA allow.
 
Back
Top