Build Progress Week Ending 07/26/2013:
Once again lost some build time due to doctors appointments and parts snafus. So I decided to to do some designing and layout.
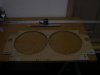
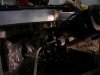
Radiator Shroud:
After over three hours of careful and exact “rechecking it four times measuring”, all I have to show for my efforts is cardboard template! (pic #001) Confident that my template was accurate, I took my template to a local metal shop, I had a very good one hour meeting with the owner.. I guess that I must still be living in the stone age. Silly me, I thought that they would simply lay my template on top of a hunk of 1/8” aluminum, trace it out and cut it. Bryan explained that is old school; today everything is done by computer and that is the reason he took his time, making sure that he understood each cut and its dimensions.
Once the dimensions are entered into the computer, a laser guide water jet will cut design. I'll have to sign off on a finished drawing and shroud should be complete in about two weeks.
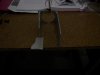
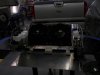
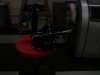
Pedal Assembly: (pic #003)
After several hours of dry fitting and repositioning the pedals, I just was not happy. I know that several builders position the plunger nob of the adjustable pedal slide in the front for ease of accessibility. The problem for me was that when I would transition my foot from the go pedal to the stop pedal, my foot would hit the nob.
I moved the nob to the rear and that solved that problem but now I discovered another problem. When I would transition my foot from the accelerator to the brake pedal, my size 9.5's would hit the bottom of the steering wheel “tilt” drive motor. Same problem with the clutch would hit the bottom of the steering wheel “telescopic” motor.
I removed the Tilton pedal assembly from the adjustable slide and adapter plate; this gave me an extra 13/16”. That helped a little but my foot still hit the bottom of the motors and I just was not comfortable with that!
I now made a couple of executive decisions! The first one was to scrap the idea of using the adjustable slide bracket; once again, if anyone is wanting one these...”such a deal I have for you”! The second decision was to put the installation of the pedal assembly on hold until I researched the steering column issue.
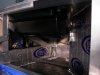
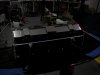
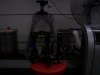
Steering Column Destruction: (pic #007)
I have to take this opportunity to say the I have read the build manual and each SL-C builders site several times and managed to pick up little tips from each. I don't know that I would be able to do this without all of the free flow-willing to help information on the SL-C Clubhouse Forum. But I have to give special acknowledgment and kudos to Zoe's blog! It seems like every problem that I encountered, Zoe has had and already successfully resolved! I'm trying to train myself to check on Zoe's blog before going onto the next project. The best advise I could offer an SL-C builder just getting started is.... read Zoe's blog!
The problem is: the steering wheel tilt motor (right side of column) and the telescopic motor (left side of column) are mounted vertically to a useless rectangular housing that surrounds the Cadillac steering column. We cut the housing off just forward of the two actual mounting points that hold the steering column to the ceiling of the drivers foot well of the chassis. I have to honestly confess, that had I not seen that Zoe had successfully performed this surgery, I don't think that I would have had enough nerve to butcher my brand new steering column!
Amputating the housing allowed us to fabricate and install a 3/16” aluminum plate to the to of the steering wheel mounting point and and mount the two motors horizontally.(pic 5 & 6) This afforded me another 4” inches of clearance between the bottom of each motor and my size 9.5's.
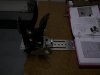
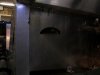
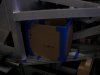
Installing Vintage Air Unit in Passenger Foot Well: (pic #004)
This was like the old saying of trying squeeze 100lbs. of (lets call it) “stuff” into a 1lbs. Bag! Once again Zoey to the rescue! There is absolutely no clearance between the right side of the V.A unit and and the 45* angle curb side of the passenger side foot well with the fittings installed and it is impossible to tighten the fittings after the unit is install. Solution...bend the right side copper tubing inward. This is another one of those things that I would be hesitant in doing if I had not seen that someone else had successfully accomplished the task without damaging the Vintage Air unit.
Now for a couple of tips of my own; there is 1/4-20 mounting bolt on the left front side of the the unit. It is impossible and unnecessary to use this mounting point, so remove the bolt. The 1/8” you gain by removing the bolt is the difference of getting the unit in or not! There is also a temp. nob and bracket on the right front; remove it and find a new place to mount it because it can't fit between the V.A and the center upright supports. I fabricated a “L” shaped mounting bracket for the right side front out of 1-1/4” perforated banding; securing one side to mounting point on the unit and the other to the ceiling of the passenger side foot well via a drilled & tapped 5/16” hole.
The two top rear mounting brackets have approx. an 2” slot so that they can be adjusted. I found it too difficult to feed a bolt down and try to tighten a nut blindly and to feed up through the bracket and the chassis ceiling without the bolt falling out was equally difficult. Solution: I fed a 5/16”X1” bolt up through the bracket, carefully measured the distance for my the center of my ceiling hole and the curb side wall of the chassis. I placed a 5/16” shoulder serrated lock nut on the up-ward bolt, turning into a fixed position stud and pushed through the ceiling of the chassis, affixing another shoulder serrated luck nut. Access can be had through the top inspection port hole.
This whole process only took almost an entire day and I'll have remove the unit to install my hoses but at least now I now know that you CAN put 100lbs of s_ _ _ into a 1lbs bag :thumbsup:
Jim